holiday

Citrusy New York Cheesecake

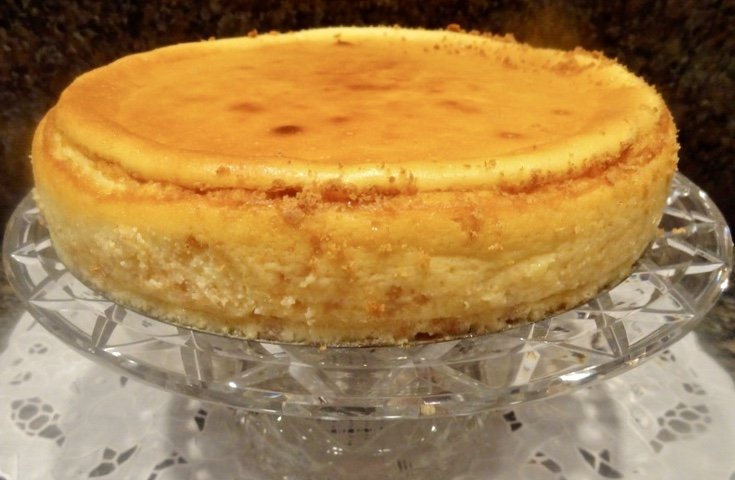
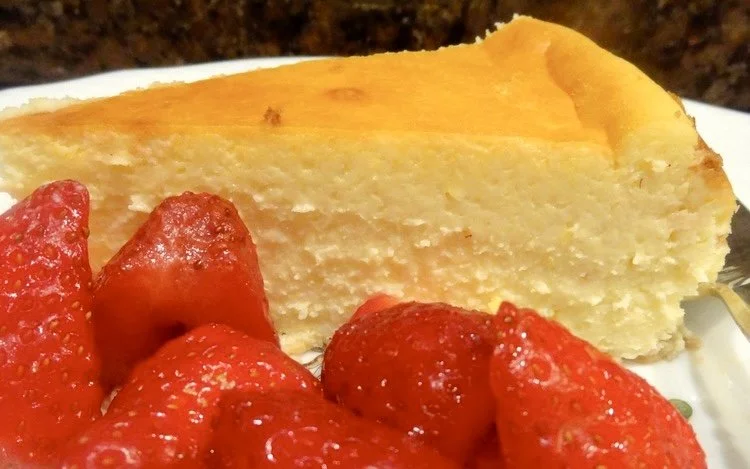
I’m one of those people who loves dairy foods so for me, Shavuot, which is in two days (June 11th at sundown), is the most delicious holiday because it’s the “dairy” holiday and even more specifically, it’s the cheesecake holiday. Who doesn’t like cheesecake!? I make all kinds but I really do love the plain, New York style cheesecake the best. Ok, maybe with some strawberries on the side. But that’s it!

NEW YORK CHEESECAKE


1-1/2 teaspoons butter or margarine
1/3 cup graham cracker crumbs (approximately)
1-1/2 pounds cream cheese (3-8 ounce packages)
freshly grated zest of one small orange
2 tablespoons freshly grated lemon zest
1 teaspoon vanilla extract
1/2 cup whipping cream
1 cup sugar
4 large eggs
1/3 cup dairy sour cream or unflavored yogurt


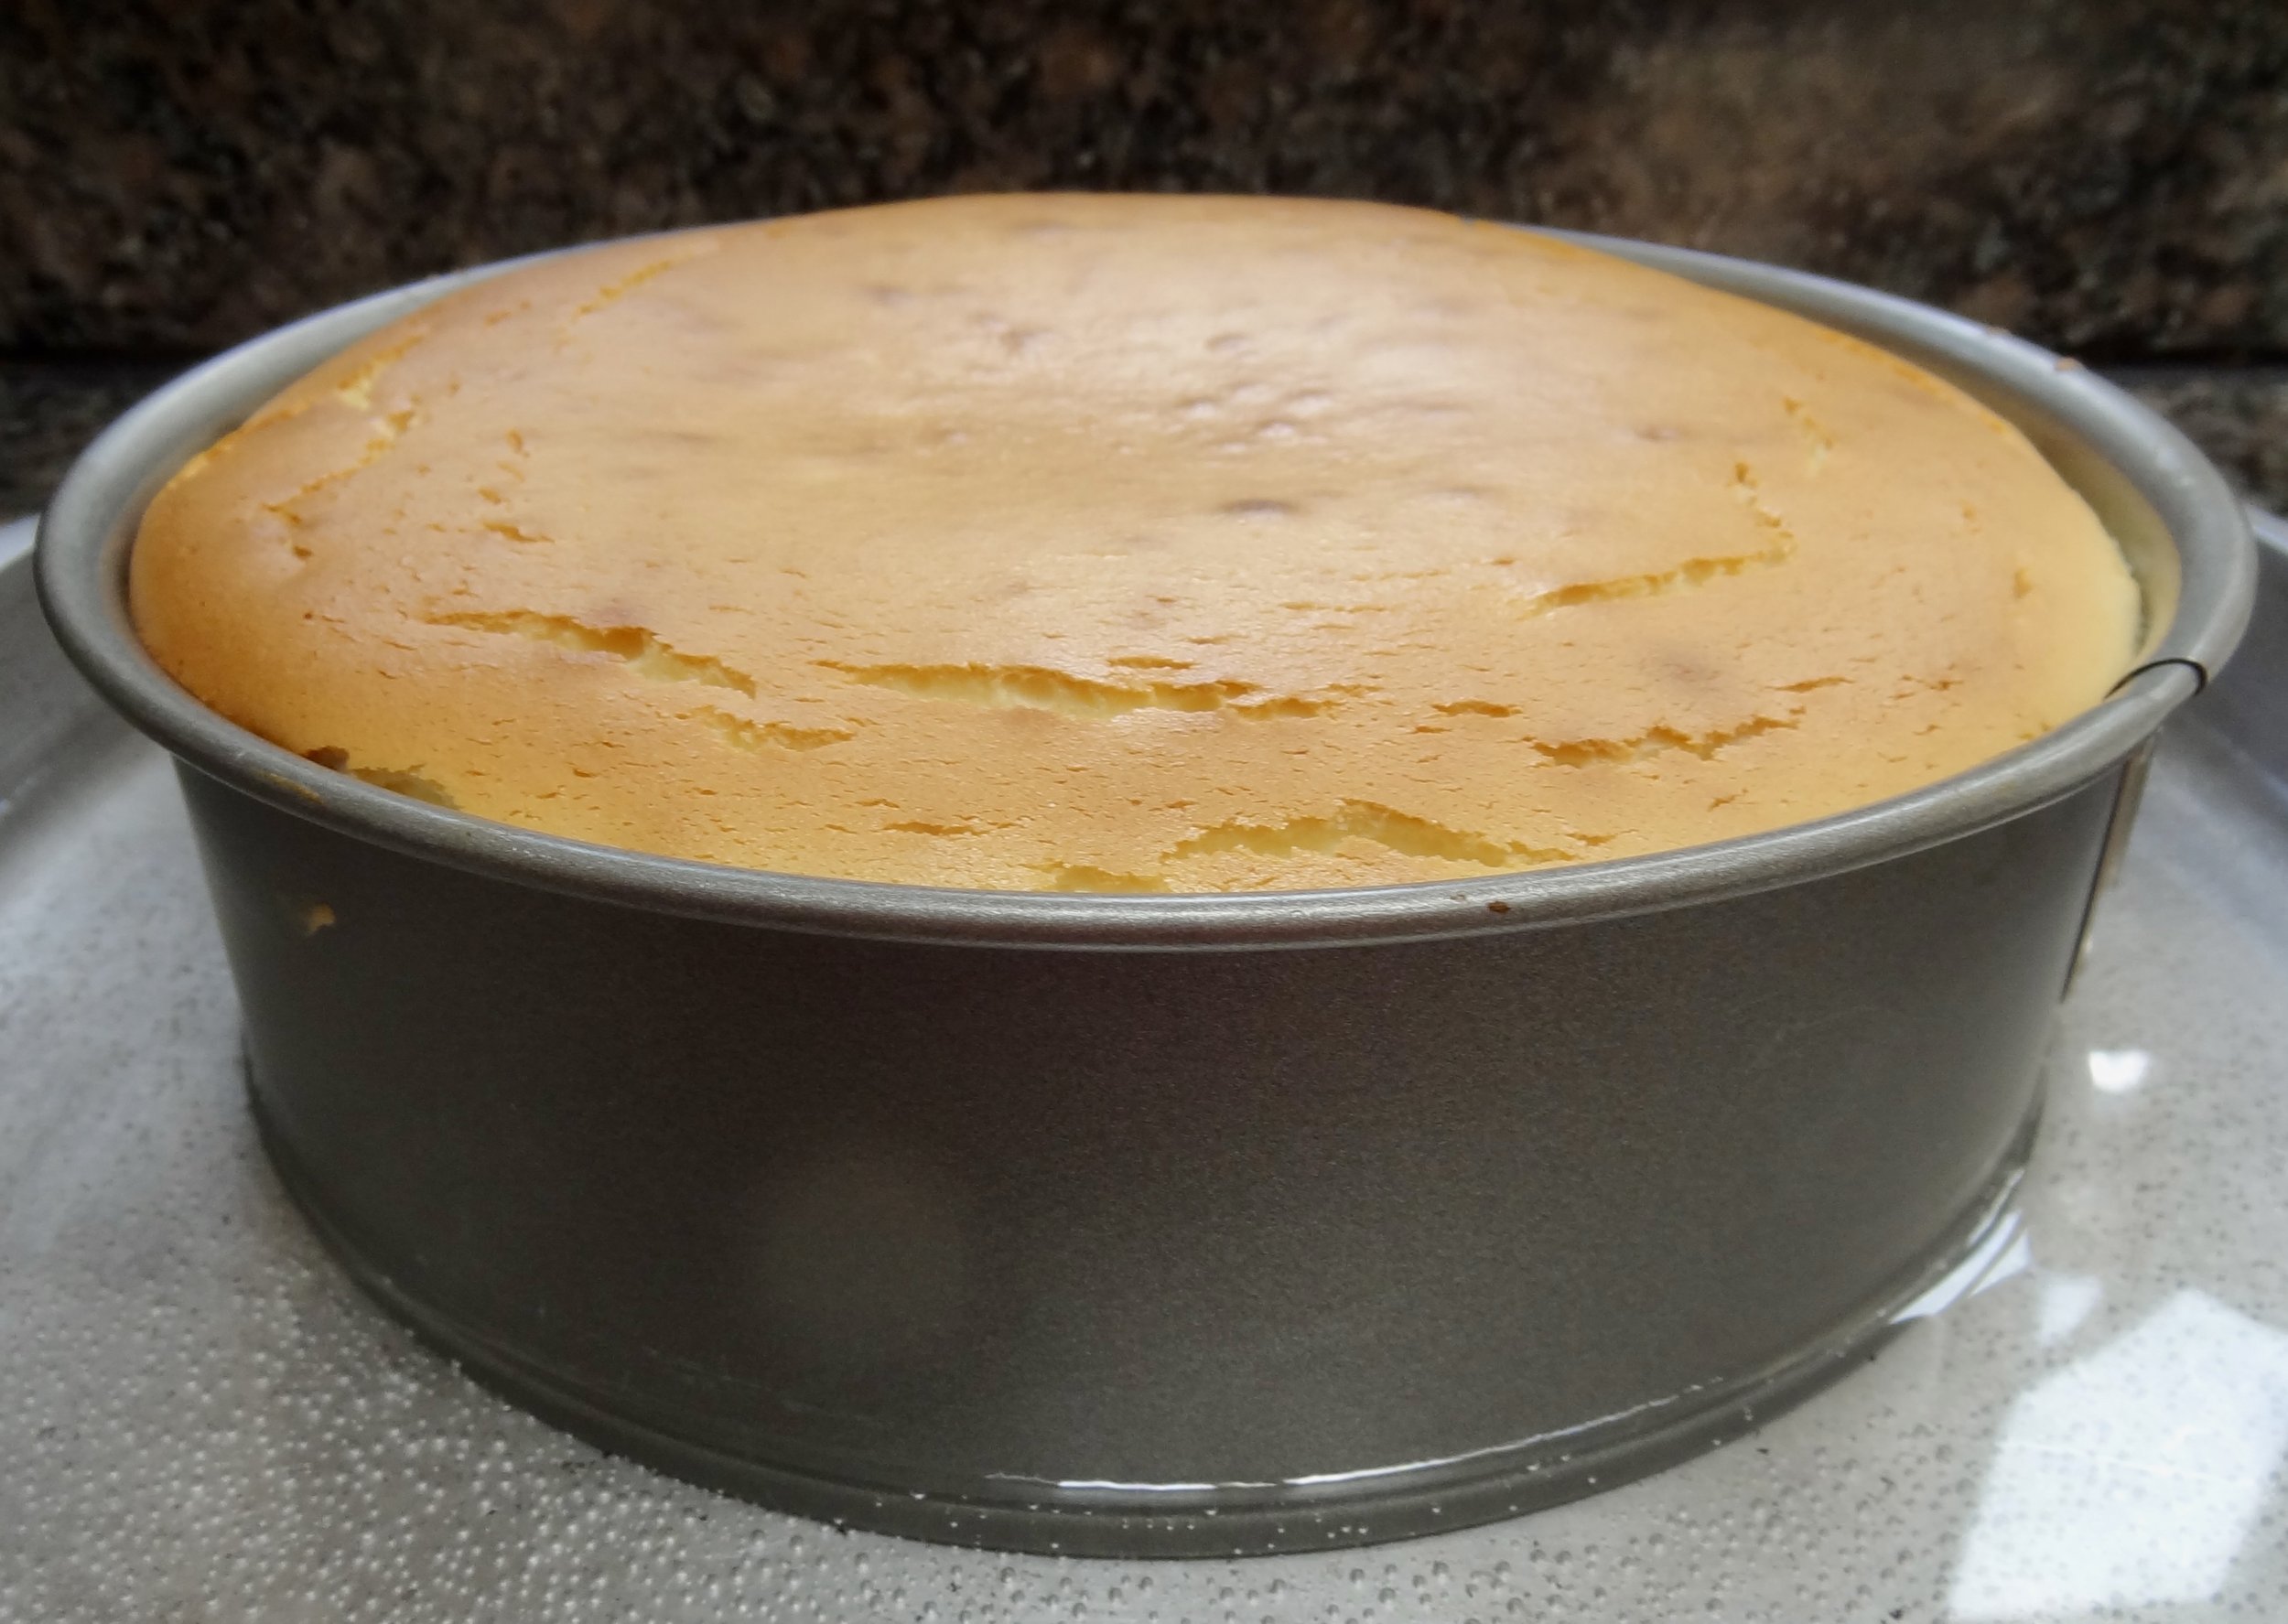
Preheat the oven to 350 degrees. Spread the butter on the bottom and sides of a 9” springform pan. Sprinkle the inside of the pan with the graham cracker crumbs. Shake the pan to coat the bottom and sides of the pan completely. Beat the cream cheese, orange zest and lemon zest together in the bowl of an electric mixer set at medium speed for 1-2 minutes or until the cheese has softened and is smooth. Gradually add the vanilla, cream and sugar and beat for 2-3 minutes or until the mixture is smooth, scraping down the sides of the bowl occasionally with a rubber spatula. Add the eggs one at a time, beating them in after each addition. Stir in the sour cream. Pour the batter into the prepared pan. Prepare a bain-marie, that is, place the springform pan inside a larger pan. Fill the larger pan with enough hot water to come at least 1-inch up the sides of the baking dish. Bake for 70-75 minutes or until the top of the cake is lightly browned. Remove the springform pan from the larger pan and let the cake cool in the springform pan. When the cake has reached room temperature, refrigerate it for at least 4 hours or until it is thoroughly chilled. Remove the sides of the pan to serve the cake. Slices best using a knife that has been inserted into very hot water. Makes one #cheesecake #cheesecakelover #cheesecakes #shavuot #shavuot2024 #shavuos #shavuos2024 #dairy #dairydessert

Matzo Balls for Passover

The torch has been passed.

For the first time, after decades, I am not hosting Passover. One of my daughters is taking over (next year it will be my other daughter).

It feels weird, sad and thrilling all at the same time. Who knew that last year would be my last?

Everyone says “it’s good!” “it’s time!” And yet …. are we ever really quite ready? Those of us who never minded the preparation, the cooking, the utter exhaustion that leads to our remarkable celebration of Passover?

But I am not giving up completely! I am bringing food.

Of course.

My grandchildren, as grandchildren will do, have told their mother that only my matzo balls will do. And my stuffed cabbage and charoset. And that even when she uses my recipes, it is “not like grandma’s.”

Grand children are the absolute best. And I am so lucky to have my five.

Chag Pesach Sameach everyone. Shalom.

Here is the matzo ball recipe I use. The photo below shows the matzo balls I made yesterday.

MATZO BALLS

  • 1 cup matzo meal

  • 1 teaspoon salt

  • freshly ground black or white pepper to taste

  • 1 tablespoon finely chopped fresh parsley or dill, or both, optional

  • 4 whole large eggs, slightly beaten

  • 1/4 cup melted goose fat, chicken fat, margarine or vegetable oil

  • 1/4 cup chicken soup, water or seltzer

In a bowl. combine the matzo meal, salt, pepper and parsley or dill (or both). In another bowl, beat the eggs, melted fat and soup together. Add the egg mixture to the matzo mixture and blend thoroughly. Stir in the liquid. Cover the ingredients and refrigerate for about 30 minutes. Bring a large pot of lightly salted water to a boil. With wet cold hands shape the matzo mixture into 1-inch balls (you may have to re-wet hands occasionally). Add the matzo balls one by one to the boiling water. Lower the heat so that the water is at a simmer. Cover the pan and cook for at least 50 minutes (do not lift the cover) or until they are tender. Remove the matzo balls from the water. Place into the soup to soak up more flavor.

Makes 14-16

Stuffed Peppers

Stuffed Peppers

Historians tell us that Queen Esther, hero of Purim, was a vegetarian. Rice-and-veggie stuffed peppers is a delicious way to honor that remarkable woman, who was successful in preventing the annihilation of the Jews in ancient Persia.

My grandmother made a similar dish. I don’t have her recipe but have been experimenting with the ingredients for years and this is the closest I’ve come to the dish I remember her serving when I was a child.

Stuffed Peppers

  • 8 bell peppers

  • 1 cup rice

  • 2 tablespoons currants or raisins

  • 5 tablespoons olive oil

  • 2 medium onions, chopped

  • 2 tablespoons pine nuts, optional

  • salt and freshly ground black pepper to taste

  • 1 large tomato, chopped

  • 2 teaspoons sugar

  • 1 teaspoon ground allspice

  • 1-3/4 cups vegetable stock

  • 2 tablespoons chopped fresh parsley

  • 2 tablespoons chopped fresh dill

  • 1 tablespoon chopped fresh mint

  • 2 tablespoons lemon juice


Place the peppers in a deep bowl and pour boiling water over them. Weight them down to keep them under the water. Let rest for 5 minutes. Drain and repeat the process with cold water. Cut a lid from the top of the peppers, but reserve the lids. Scoop out and discard the seeds and membranes. Set the peppers aside. Place the rice and currants in a bowl and pour boiling water over them. Let rest for 30 minutes. Drain. Heat the olive oil in a sauté pan over medium heat. Add the onions and pine nuts, if used, and cook, stirring occasionally, for 4-5 minutes or until the onion has softened and is slightly golden. Add the rice and currants and some salt and pepper to taste. Cook for another 1-2 minutes, stirring occasionally. Add the tomato, sugar and allspice and cook for another minute, stirring occasionally. Add the stock, bring to a boil, cover the pan and lower the heat. Cook for 18-20 minutes or until the rice is soft and all the liquid has been absorbed. Remove the pan from the heat. Stir in the parsley, dill, mint and lemon juice. Let cool. Use to fill the peppers. Place lids on top. (You may prepare to this point and cook later). Preheat the oven to 350 degrees. Place the peppers in a baking dish. Add 2 cups of water to the dish. Bake the peppers for 40 minutes. Let cool slightly before serving (warm or at room temperature).

Makes 8 servings

Chocolate Yogurt Bread

A few days ago @DanaLShrager (@JewishCooking Facebook group) asked for ideas — other than hamantashen — about what might make good mishloach manot for Purim. My suggestions included muffins, quickbreads and other homemade food goodies.

Like this chocolate bread. It’s rich and tender because it’s made with yogurt. It’s also easy to prepare and can be wrapped nicely to give away as a gift. You can add raisins or chopped nuts, or even leave out the chips. For sure, it’s a winner for Purim or any time.

Chocolate Yogurt Bread

  • 2 ounces unsweetened chocolate

  • 1-3/4 cups all-purpose flour

  • 1-1/2 teaspoons baking soda

  • 1 teaspoon salt

  • 1-1/4 cups sugar

  • 1/3 cup vegetable shortening

  • 2 large eggs

  • 2 teaspoons vanilla extract

  • 1-1/2 cups plain yogurt

  • 1/2 cup chocolate chips, optional

Preheat the oven to 350 degrees. Grease a 9”x5” loaf pan. Melt the chocolate and set it aside to cool. Mix the flour, baking soda and salt together and set it aside. In the bowl of an electric mixer set at medium, cream the sugar and shortening together. Add the eggs and vanilla extract and beat the mixture until it is smooth and creamy. Add the flour mixture, alternating with the yogurt. Stir in the chocolate and mix until ingredients are well blended. Stir in the chips, if used. Pour the batter into the loaf pan. Bake for 50-55 minutes or until a cake tester inserted into the center comes out clean. Cool in the pan for about 10 minutes, then invert onto a rack to cool completely. Makes one bread

How to Cook Hard Cooked Eggs

Hard cooked eggs

Do all your hard cooked eggs peel perfectly so they all look glorious at your Seder? I’ve made thousands of hard cooked eggs over a lifetime and although I’ve followed the “foolproof” advice of experts in the media (including making a hole at one end of the egg; cooking the eggs starting with cold water instead of immersing them into boiling water; steaming them, etc.) sometimes the shell is difficult to peel and the eggs look battered.

So here is my “expert advice,” the method that for me, has yielded the highest percentage of Seder-worthy eggs:

1. If possible, use eggs that are at least two weeks before you need to cook them. With time, the shell begins to separate from the insides, making the eggs easier to peel

2. Remove the eggs from the fridge at least an hour before cooking

3. Bring the water to a boil before adding the eggs, then gently spoon the eggs into the water, wait for a second boil, lower the heat and simmer (NOT boil) for 10 minutes. This is for size large eggs; extra-large and jumbo need slightly more time

4. After 10 minutes, immediately drain the water and add ice cubes and cold water to the pot

5. Crack the eggs in several places. One part of the shell may be easier as a starting point, usually the larger rounded bottom

6. Always make more eggs than you need because while this method is the best of more than a dozen other methods that I’ve tried, it seems that no matter how much of an expert you are and no matter how much advice you follow, the shells might not always peel off so well. Nobody really cares, of course. The Seder is not about the eggs

Want to add: don't rush! Sometimes you have to take off tiny pieces!

Chag Pesach Sameach

Spinach Pie

Every Hanukkah in our family, we retell the story of Judith, who played a major role in the Maccabees’ victory some 2000 years ago. According to the story, Judith visited Holofernes, a general in the enemy camp; he fell in love with her and asked her to dine with him.

During the meal Judith gave him great quantities of cheese, which made him very thirsty! To quench his thirst he drank so much wine that he fell asleep and Judith cut off his head with his own sword.

Thus was she able to get word to the Maccabees about the best time to strike.

Note: there are dozens of artworks depicting the event, including this well-known painting which hangs in the Uffizi gallery.

Since that fateful victory we have been making merry every year with an 8 day Hanukkah celebration.

Our celebrations are known to include latkes!

But did you know that the first “traditional” Hanukkah ingredient was cheese!

And that’s because of Judith.

Long ago it was Cheese Latkes that Jewish cooks prepared for Hanukkah.

But so many people couldn’t afford cheese so they substituted potato. Not bad, that.

Still. I always serve something made with cheese, every Hanukkah.

This year, how about this Cheese-loaded Spinach Pie to to remember the brave, intrepid Judith?

Cheese Loaded Spinach PIE

  •  1 tablespoon butter

  • 1/4 cup chopped red onion

  • 6 ounces fresh spinach

  • 1 partially baked 9-inch pie crust

  • 3-4 ounces grated Swiss cheese

  • 4 large eggs

  • 2 cups half and half cream

  • salt and pepper to taste

Preheat the oven to 375 degrees. Heat the butter in a sauté pan over medium heat. When the butter has melted and looks foamy, add the red onion and cook for 1-2 minutes to soften it slightly. Add the spinach and cook for another 2-3 minutes or until the spinach is completely wilted. If there is liquid in the pan, continue to cook until the spinach is dry (alternatively, place in a strainer and press out the excess liquid). Place the spinach inside the partially baked pie crust. Sprinkle the cheese on top. Beat the eggs and cream together with salt and pepper to taste. Pour over the ingredients in the pie crust. Bake for 40-45 minutes or until golden brown and set.

Makes 6-8 servings

Zucchini Latkes with Cheese

Anyone who knows me knows that the humble potato is my favorite food, so of course I am going to make potato latkes for Hanukkah!

But, ya know …. it’s a long, delicious holiday, so there’s time for zucchini latkes too. The recipe here includes cheese, because on Hanukkah I like to prepare food with cheese in honor of Judith, heroine of Hanukkah! You can read about it here.

Of course you can make these latkes without the cheese. They’re delicious either way.

Zucchini Latkes with Cheese

  • 2 medium zucchini (10-12 ounces each)

  • 1/2 teaspoon salt

  • 1/2 cup chopped red onion

  • 1/2 cup crumbled feta cheese

  • 2 large eggs

  • 1/2 cup plain bread crumbs, approximately (Matzo meal also fine)

  • vegetable oil for frying

Shred the zucchini in a food processor (or grate by hand). Place the shreds in a bowl, sprinkle with salt, toss the shreds and let rest for 10-12 minutes. Squeeze the shreds to extract as much liquid as possible. Return the shreds to the bowl. Add the onion, cheese and eggs and mix the ingredients. Add the bread crumbs and mix thoroughly. If the mixture seems too loose or soft, add another tablespoon or two (different bread crumbs absorb liquid/moisture differently). Heat about 1/8-inch vegetable oil in a large sauté pan over medium-high heat. Spoon portions of the mixture into the pan to make latkes about 2-inches in diameter. Leave some space between each one. Cook for 2-3 minutes per side or until crispy and golden brown. Remove to paper towels to drain. Repeat with the remaining zucchini mixture. Serve with dairy sour cream or plain yogurt or mashed avocado.

Makes about 12

Vegetarian Stuffed Red Pepper Halves

Sukkot, which begins at sunset September 29th, is a harvest holiday, which means that in addition to all the ritual and religions traditions, there’s lots of food, especially stuffed foods which are proof of the harvest bounty of fruits and vegetables.

Like stuffed peppers.

I have made stuffed peppers many times for Sukkot, but in recent years have found it easier to cut them into halves. The halves are still filled, but easier to cook and to eat. They are also easier to tote to a Sukkah.

This is one of the versions that my family has loved. I’ve made it with both Israeli and Moroccan couscous and also with rice and barley. The point is to include a starchy pasta or whole grain.

Btw, I cut the peppers in the middle, into top and bottom halves but obviously you can cut them from the stem down and have two top-and-bottom halves.

Vegetarian Stuffed Red Pepper Halves

  • 4 red bell peppers

  • 1/2 cup couscous (or use rice, barley, etc.)

  • 2 tablespoons olive oil

  • 1 medium onion, chopped

  • 2 cups halved cherry or grape tomatoes

  • 1 cup thawed frozen peas

  • 2 beaten eggs

  • 1 cup shredded mozzarella cheese

  • 3 tablespoons grated Parmesan cheese

Preheat the oven broiler. Cut the peppers in half. Discard the stems and seeds. Place the pepper halves, skin side up, on a parchment paper lined baking sheet. Broil the pepper halves for 4-5 minutes or until the skin darkens and blisters. Remove the peppers, wrap them in foil or place them in a bag and let them cool. When cool, remove the skin and place the pepper halves, hollow side up, on a parchment paper lined baking sheet. Set aside. Turn the oven to 425F.

Cook the couscous. Place the cooked couscous in a bowl and set aside. Heat the olive oil in a saute pan over medium heat. Add the onion and cook 2-3 minutes. Add the cherry tomatoes and peas and cook 1-2 minutes. Remove from the heat and add to the cooked couscous. Pour the eggs into the pan and cook, stirring, until the eggs are set. Place them on a cutting bord and chop them into small pieces. Add them to the couscous. Spoon equal amounts of the couscous mixture inside the pepper halves. Sprinkle with equal amounts of mozzarella cheese, then sprinkle with Parmesan cheese. Bake for 12-13 minutes or until the cheese has melted and begins to turn golden brown.

Makes 4-8 servings


Honey-Balsamic Glazed Carrots

Need a last minute side dish for Rosh Hashanah? Carrots are traditional for the holiday and few recipes are as easy as this one.

Bonus: set them up ahead and cook just before you need them.

Best of all: they are exceedingly delicious!

Honey-Balsamic Glazed Carrots

  • 2 tablespoons olive oil

  • 2 tablespoons honey

  • 2 tablespoons Balsamic vinegar

  • 1 pound carrots, peeled and cut into 1/2-inch slices

  • 1 large clove garlic, finely chopped

  • salt and freshly ground black pepper to taste

  • 2 tablespoons chopped fresh chives (or use the green part of scallion)

Preheat the oven to 400 degrees F. Line a baking sheet with parchment paper. Place the olive oil, honey and Balsamic vinegar in a small saucepan and bring to a boil over high heat. Cook briefly, just long enough for the honey to soften and become easy to pour. Set aside. Pace the carrots and garlic on the parchment lined cookie sheet. Pour the honey mixture on top and toss the carrots to coat all the pieces. Sprinkle with salt and pepper to taste. Roast for about 30 minutes, tossing the ingredients 2-3 times during that time, or until the carrots are lightly browned and tender. Spoon the carrots onto a serving dish and sprinkle with chives.

Makes 4 servings

Israeli Couscous with Seven Vegetables

It isn’t my Ashkenazi family tradition, but among North African Jews, and particularly Moroccan Jews, there’s a fabulous dish served on Rosh Hashanah: Couscous with Seven Vegetables.

I’ve cooked versions of this dish several times mostly because it sounded so delicious and also because I am always on the lookout for a good, festive and filling vegetarian entree.

This one satisfies in every way possible.

This is the recipe we like best: I used Israeli couscous rather than the traditional tiny grains of Moroccan couscous because my family likes it better. Also, I used Harissa paste (because I always have some) but you can substitute red pepper flakes or a pinch or two of cayenne pepper (or leave it out if you don’t want any pepper). My husband said he would like more raisins. Up to you…..

Israeli Couscous with Seven Vegetables 

  • 2 tablespoons olive oil

  • 1 large onion (preferably a sweet variety such as Vidalia), sliced

  • 1 teaspoon finely chopped fresh ginger

  • 1 clove garlic, finely chopped

  • 4 carrots, peeled and cut into 1/2-inch slices

  • 2 medium tomatoes, cut into chunks

  • 1 parsnip, peeled and cut in 1/2-inch slices

  • 1 cup cut up bite sized butternut squash

  • 1/2 teaspoon harissa paste

  • 1/2 teaspoon ground turmeric

  • 1/2 teaspoon ground cinnamon

  • 2-1/2 cups vegetable stock

  • 1/2 large red bell pepper, cut into bite sized chunks

  • 1 small zucchini, cut into bite sized chunks

  • 1 cup raisins

  • 1 cup canned chickpeas, rinsed and drained

  • Salt to taste

  • 1-1/2 cups Israeli couscous

Heat the olive oil in saucepan over medium heat. Add the onion and cook, stirring often, for about 5-6 minutes or until softened and beginning to brown. Add the ginger and garlic and cook for 1-2 minutes. Add the carrots, tomatoes, parsnip and squash and stir the ingredients. Stir in the harissa, turmeric and cinnamon. Add the stock, bring to a boil, reduce the heat to medium low and cook for about 15 minutes. Add the bell pepper, zucchini, raisins and chickpeas. Cook for about 10 minutes more, or until vegetables are tender. Add salt to taste. Cook the couscous according to the manufacturer’s directions. Spoon the couscous on large serving platter. Spoon the vegetables and pan fluids over the couscous.

Makes 4 dinner servings, 8 side dish ervings