dessert

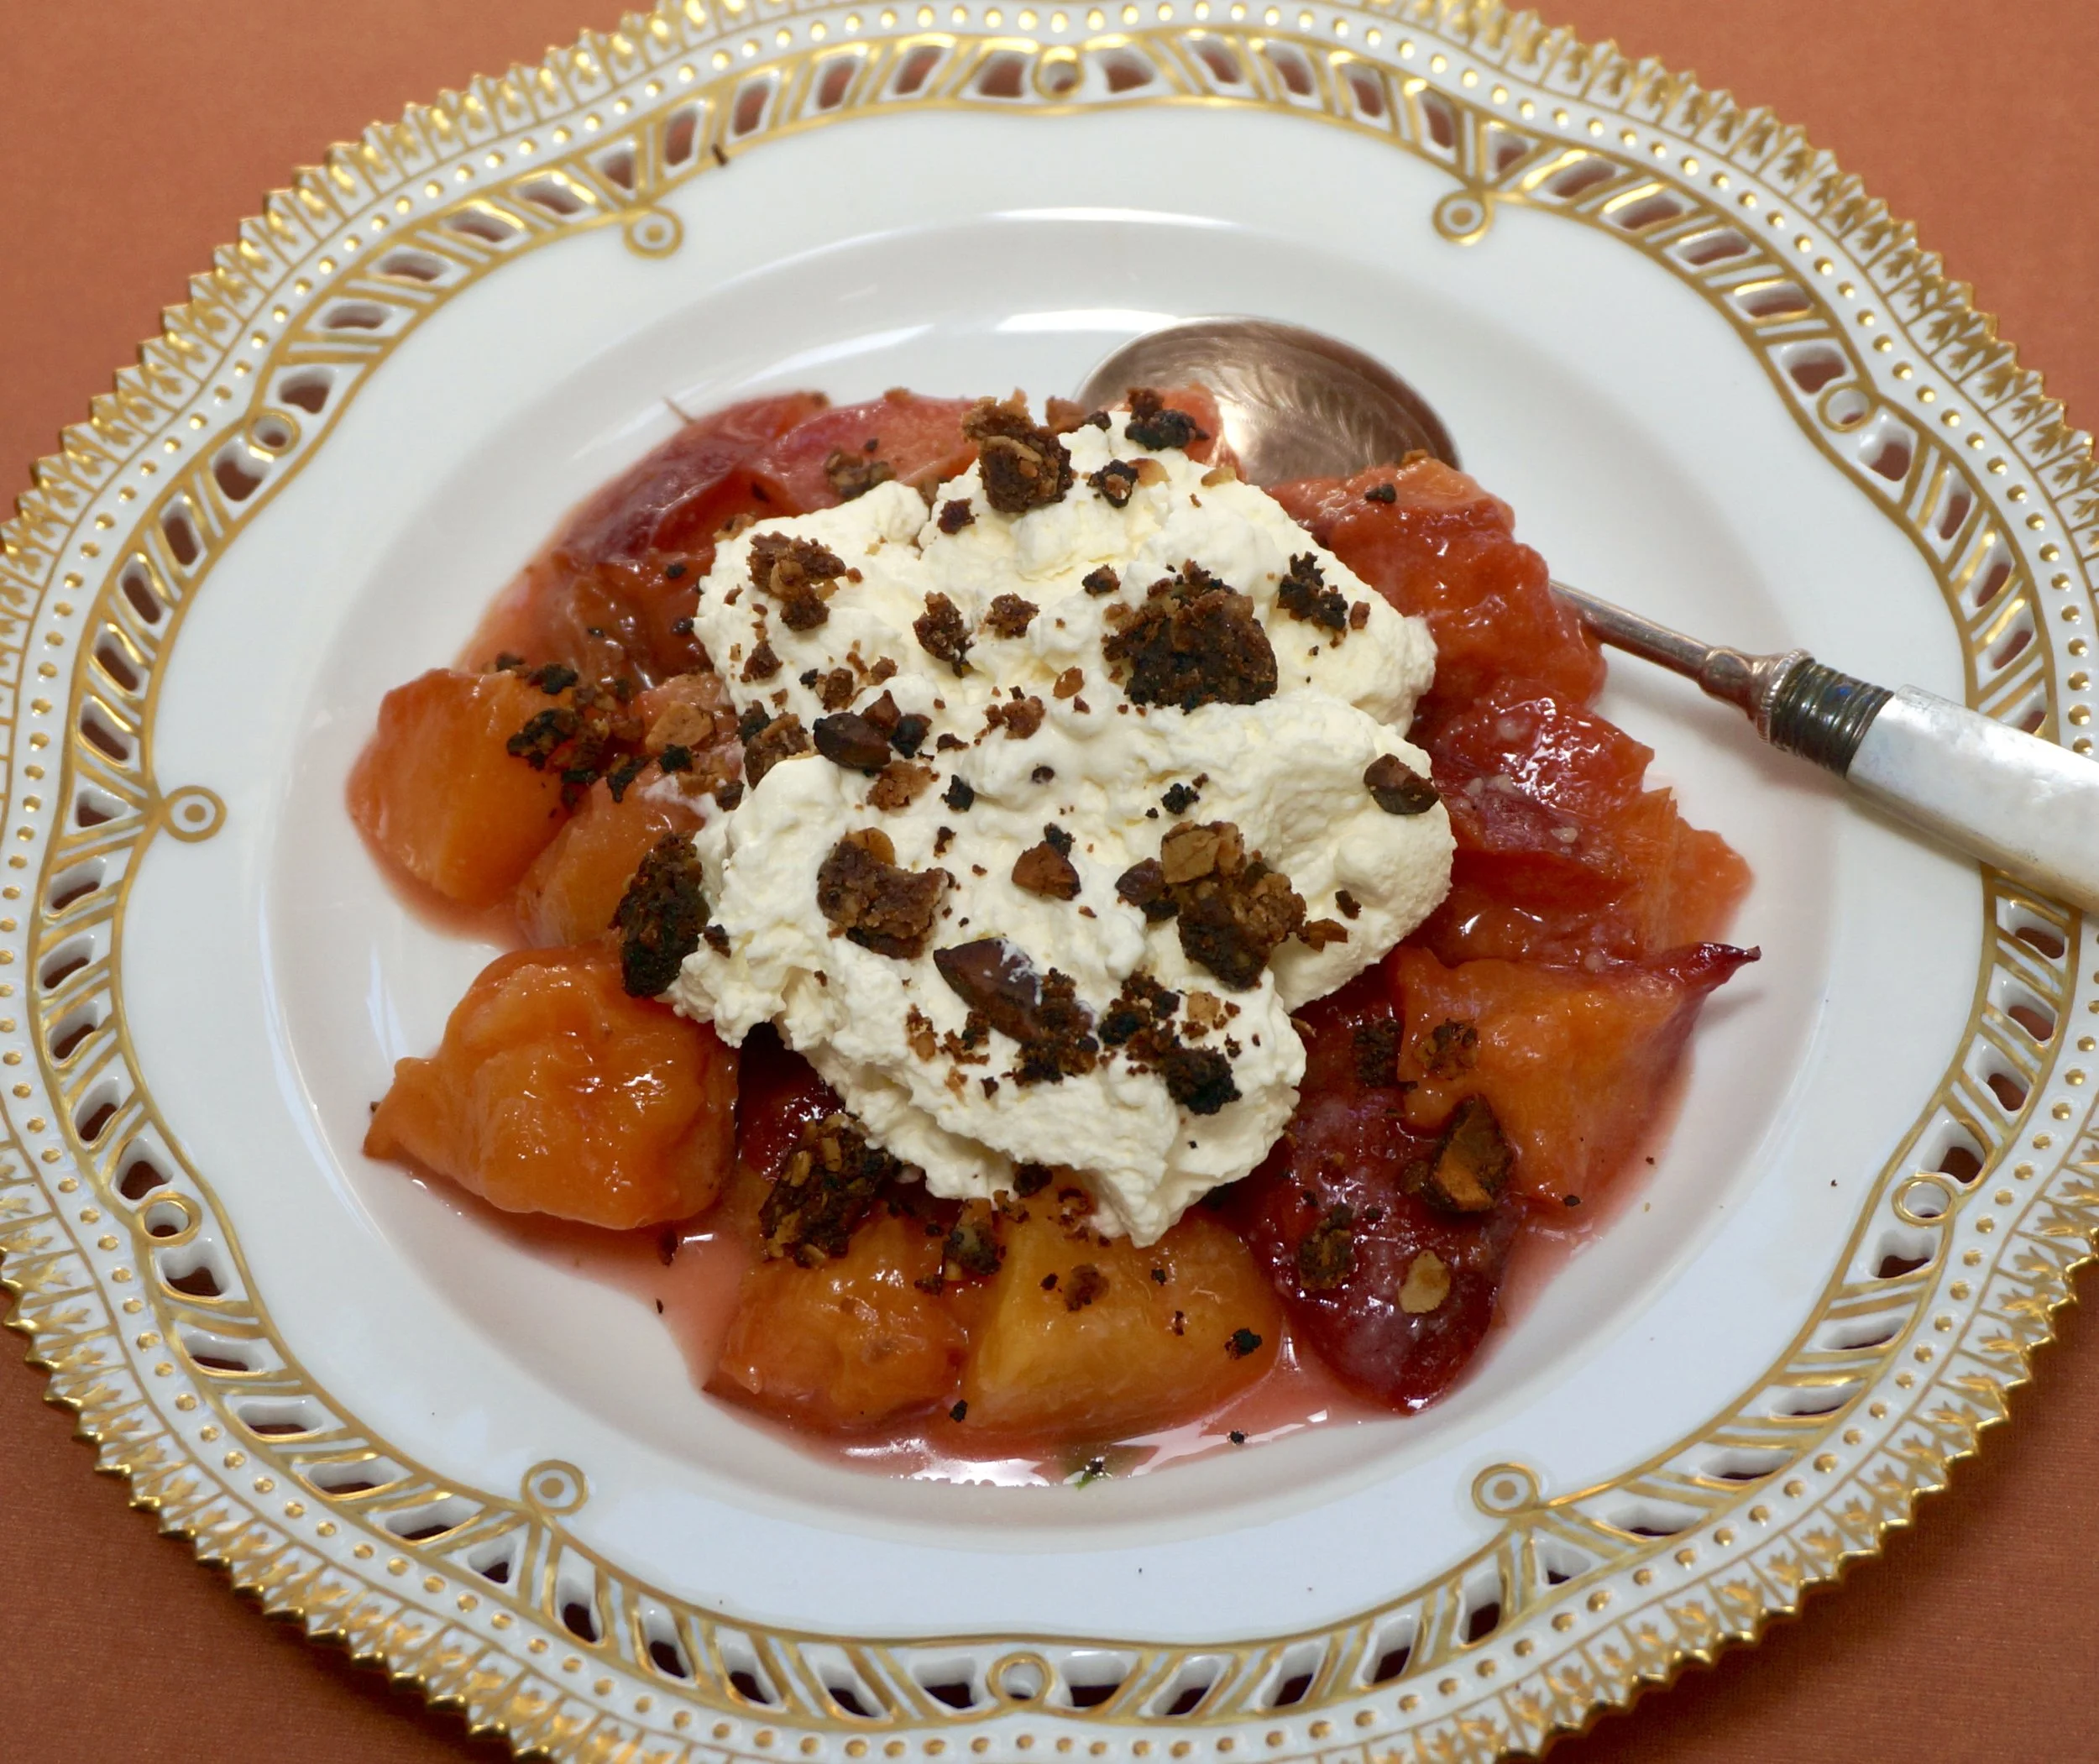
Roasted Nectarines or Peaches with Oat-Almond Crumbles

fullsizeoutput_84fe.jpeg

Mistakes happen. Sometimes it works out well.

Take this dessert, for example. I wanted to grill peach halves and serve them with whipped cream and some sort of crunchy topping. But I couldn't find good peaches, so I bought nectarines. But they weren't freestone, and when I tried to cut the fruit in half the flesh clung to the pit.

No halves.

I had to cut the nectarines into pieces.

That meant no grilling. So I roasted the pieces instead.

All I can say is I wish I had more of this dessert. It was so good that a recipe that is supposed enough servings to feed 8 people only served 4.

But maybe you will all be more abstemious.


Roasted Nectarines with Oat-Almond Crumbles

Oat-Almond Crumbles:

  • 3/4 cup all-purpose flour
  • 1/2 cup chopped toasted almonds
  • 1/2 cup quick oats
  • 1/3 cup brown sugar
  • 1/4 teaspoon salt
  • 1/2 cup melted butter

Preheat the oven to 350 degrees. In a bowl, mix the flour, almonds, oats, brown sugar, salt and melted butter. Spoon the mixture onto a rimmed cookie sheet and bake for 12-15 minutes, stirring halfway through, or until golden brown. Set aside to cool.

Roasted Nectarines and Cream:

  • 8 firm, but ripe nectarines or peaches
  • 2 tablespoons melted butter
  • 1-1/2 tablespoons sugar
  • 1 cup whipping cream
  • 1 teaspoon vanilla extract

Preheat the oven to 400 degrees. Cut the nectarines into chunks and discard the pits. Place the chunks in a bowl. Add the melted butter and all but one teaspoon of the sugar. Place the fruit on a rimmed cookie sheet and bake for about 10 minutes to caramelize the fruit. Place equal quantities of the baked fruit on serving dishes. Whip the cream with the remaining teaspoon sugar and the vanilla extract until it is thick. Top the fruit with equal amounts of whipped cream. Scatter the crumbles equally on top.

Makes 8 servings (unless you can't control yourself, in which case, maybe 4-6)

Blueberry Yogurt Pie

DSC06063.jpg

When life gives you blueberries you make pie. Also crisp, cake, muffins, jam, soup, tea bread.

The possibilities are awesome.

So recently, when I had lots of extra blueberries hanging around I decided to make cream pie. Sort of. There's no cream in it. This dessert actually began with an old recipe of my Mom's. Her version was made with dairy sour cream. I used plain (non-fat) yogurt. Hers had raspberries, mine was to be blueberries, which are sweeter than raspberries so I cut down on the sugar.

It is still mighty sweet! Enough to satisfy anyone with a sweet tooth. But also cool, creamy and refreshing and nice for anytime you want a rich dairy dessert.

Blueberry Yogurt Pie

Crust:

  • 1-1/4 cups flour
  • 1/2 teaspoon salt
  • 5 tablespoons butter
  • 2 tablespoons chilled shortening
  • milk (about 3 tablespoons) orange juice, or water

Mix the flour and salt in a mixing bowl. Work the butter and shortening into the flour mixture until the ingredients resemble crumbs (use your hands, a pastry blender or the pulse feature of a food processor). Add the liquid and gather the pastry into a soft ball of dough. Wrap the dough in plastic wrap and let it stand at least 30 minutes. Roll the dough on a floured pastry board and fit into a 9-inch pie pan. 

Filling:

  • 6 tablespoons butter
  • 4 large eggs
  • 1-1/2 cups sugar
  • 1 cup plain yogurt
  • 2 tablespoons all-purpose flour
  • 2 teaspoons grated orange peel
  • 1 teaspoon vanilla extract
  • 1 cup blueberries

Preheat the oven to 350 degrees. Melt the butter and set it aside to cool. Beat the eggs and sugar in a mixer set at medium speed for 3-4 minutes or until thick, well blended and pale yellow. Add the cooled melted butter and yogurt and mix briefly to blend them into the batter. Add the flour, orange peel and vanilla extract and mix thoroughly. Place the blueberries inside the unbaked pie crust. Pour the batter over the berries. Bake for about 45-50 minutes or until the surface is golden brown and the filling set.

 Makes 8 servings


My Bat Mitzvah Chocolate Cake

fullsizeoutput_8490.jpeg

Today is the anniversary of my Bat Mitzvah. It took place a LONG time ago! In the 1950s to tell you the truth.

Back in the day Bat Mitzvahs were not such a thing. In fact, I was the first girl from our newly established synagogue to reach this momentous occasion.

I have to confess, our rabbi mentioned the notion when we first joined the synagogue and I told my parents I wanted to learn some Hebrew and prayers and do whatever I had to, not so much because I had any particular religious feelings, nor was it because I wanted a big party -- the big themed events we see today didn't exist back then -- but because my two older brothers had Bar Mitzvahs and I couldn't understand why a girl wouldn't be treated equally.

My mother always said that when I was born I came out a feminist.

Still am. (So was she.)

Girls are equal to boys, women to men. Let's not even contest that one.

Still, my brothers did have a Saturday Shabbat service Bar Mitzvah and I was only allowed to have one on Friday night. I was content with that, it was a start.

We had a small party at home. I was allowed to invite one friend, and of course my family was there -- aunts, uncles, cousins, including my cousin Leslie, who, to this day, is like a sister.

I remember my dress: white with red and black lines. 

I don't remember what my Mother made for food.

But I do remember dessert. Because I made it: a dark chocolate cake with fudge frosting.

I didn't keep the recipe. I don't actually know whose recipe I used. I just remember what it looked like and that it tasted fabulous and that I made the cake for my own Bat Mitzvah.

So today I celebrate with Chocolate Cake. This one is a riff on the famous Hershey Black Cake with a few changes to make it dairy-free, less sweet and more to my tastes (you can change the frosting to dairy using 12 tablespoons of butter in place of the coconut milk and coconut oil). 

This is a good cake for a festive occasion, even one's own Bat Mitzvah.

Black Chocolate Cake

  • 1 tablespoon lemon juice
  • water
  • 1-1/2 cups all-purpose flour
  • 1 cup unsweetened cocoa
  • 1-1/2 cups sugar
  • 2 teaspoons baking soda
  • 1 teaspoon baking powder
  • 1 teaspoon salt
  • 2 large eggs
  • 1 cup strong, cooled coffee
  • 1/2 cup vegetable oil
  • 2 teaspoons vanilla extract
  • frosting

Preheat the oven to 350 degrees. Lightly grease 3 9-inch cake pans. Pour the lemon juice into a liquid (pitcher) measuring cup and add enough water to measure one cup. Set aside. Place the flour, cocoa, sugar, baking soda, baking powder and salt in the bowl of an electric mixer and mix at low speed to combine the ingredients. Add the eggs, the lemon-water, coffee, vegetable oil and vanilla extract and beat the ingredients at medium speed for 2-3 minutes, scraping down the sides of the bowl occasionally, or until well combined and smooth. Pour equal amounts of the batter into the prepared pans. Bake for 22-25 minutes or until a cake tester inserted into the center comes out clean. Let cool for 10 minutes. Invert the layers onto a cake rack to cool completely. Frost and serve.

Makes 8-10 servings

Frosting

  • 1-1/2 cups dairy-free semisweet chocolate chips
  • 6 tablespoons coconut milk
  • 6 tablespoons coconut oil
  • 1-1/2 teaspoons vanilla extract
  • 1/4 cup confectioners’ sugar
  • pinch of salt

Place the chocolate chips, coconut milk and coconut oil in a saucepan and place over medium heat. Cook, stirring, for 2-3 minutes or until the chips have melted and the mixture is smooth and uniform. Remove the pan from the heat and whisk in the vanilla extract, confectioners’ sugar and salt. Let cool, whisking the ingredients occasionally. Refrigerate until firm enough to be spreadable.


Banana Cupcakes with Brown Sugar Frosting

I am allergic to bananas, so I never eat them or any food that contains banana.

BUT, I buy bananas all the time. Ed eats some and the grandkids eat some. But mostly I buy them because I love the fragrance of a peeled banana and love cooking with bananas just so that I can have a whiff or two.

Over the years I've developed quite a number of banana bread and banana cake recipes, including some dairy-free, some with chocolate chips, some with dried fruit, some with chocolate flavored batter, some with coconut, some with mango, some with streusel. You get the point. I enjoy these goodies vicariously as I watch other people eating them. 

A few days ago, as usual, I had a few unused bananas. I am also trying to use up all the flour in my cabinet before Passover. So there was a double purpose to creating some new banana concoction and the result was cupcakes. My tasters have told me that the cake part is delicious. I tasted the thick and creamy frosting and give it two thumbs up.


Banana Cupcakes with Brown Sugar Frosting(P)

  • 2 cups all-purpose flour
  • 1 teaspoon baking soda
  • 1/2 teaspoon baking powder
  • 1/2 teaspoon salt
  • 1 teaspoon grated fresh orange peel
  • 1 cup sugar
  • 1/2 cup vegetable oil
  • 2 large eggs
  • 3 medium very ripe bananas
  • 1/4 cup orange juice
  • 3/4 teaspoon vanilla extract
  • Brown Sugar Frosting

Preheat the oven to 350 degrees. Lightly grease 12-15 muffin tins (or line them with cupcake papers). Combine the flour, baking soda, baking powder, salt and orange peel in a bowl and set it aside. Beat the sugar and vegetable oil with a handheld or electric mixer set at medium speed for 2-3 minutes or until the mixture is light and fluffy. Add the eggs one at a time, beating after each addition. Mash the bananas and add them to the sugar mixture. Beat thoroughly until the ingredients are well blended. Add the flour mixture, stirring only enough to moisten the dry ingredients and blend them in. Stir in the orange juice and vanilla extract. Pour the batter into the prepared tins. Bake for 20-25 minutes or until a cake tester inserted into the centers comes out clean. Let cool for about 10 minutes. Then remove the cupcakes from the pan and cool on a cake rack. Frost with Brown Sugar Frosting.

Makes 12 large or 15 medium cupcakes

Brown Sugar Frosting (P)

  • 1/4 cup Earth Balance Buttery Spread or pareve margarine
  • 1/4 cup coconut oil
  • 6 tablespoons brown sugar
  • 1-1/3 cups confectioner’s sugar
  • 1/2 teaspoon vanilla extract
  • orange juice (1-2 tablespoons)

In a large bowl or an electric mixer, beat the buttery spread, coconut oil, brown sugar, confectioner’s sugar and vanilla extract together at medium speed for 3-4 minutes or until smooth and thoroughly blended. Gradually add orange juice, using enough to make the mixture spreading consistency.

Mom's Date-Nut Bread

Tu B'Shevat is one of the lesser known Jewish holidays, but also one of the more delicious ones. From my childhood I remember it as a time when my mom would buy dried figs that came in a wreath of sorts, the figs tied together with string.

I ate dozens of them.

It was also when she made her fabulous Date-Nut Bread. She served the slices like a sandwich, with cream cheese slathered between the layers. 

I ate dozens of those too.

My cousin reminded me that her mother and mine baked Date-Nut bread in a coffee can. Yes, of course! Because our mothers were married young women during WWII, when metal -- and therefore loaf pans and other assorted baking equipment -- was in short supply. So they kept the cans from ground coffee and other foods such as fruit cocktail and used those instead.

I recently made a batch of date-nut bread using my mom's recipe. I used a loaf pan and was a little disappointed. Not in the pan. In the bread. It seemed dry. Maybe I over baked it. Not sure, but I always loved this recipe, so I tried again but made a few changes.

I used less flour.

I also thought it might be a good idea to include some figs (or, frankly, any other dried fruit) with the dates and I also thought the flavor would perk up a bit with a small amount of fresh orange peel. 

My mother added Madeira or sherry, but because I had a lovely sample of Cherry Heering that I got at Kosherfest, I used that instead. She also mixed in walnuts but because of allergies, I replaced them with toasted almonds.

Of course, the bread was completely different with all these changes.

I loved it.

Especially when sliced and slathered with cream cheese.


Mom’s Date-Nut Bread New Version

  • 1-3/4 cups all-purpose flour
  • 1 cup sugar
  • 2 teaspoons baking soda
  • 1 teaspoon salt
  • 1 cup chopped dates
  • 1 cup chopped dried figs, apricots, cranberries, cherries, prunes or raisins
  • 1 cup chopped toasted almonds
  • 2 teaspoons grated fresh orange peel
  • 2 tablespoons vegetable oil
  • 2 tablespoons Orange brandy, cherry Heering, Madeira, Port or Sherry wine
  • 1 large egg
  • 1 cup boiling water
  • cream cheese, optional

Preheat the oven to 350 degrees. Grease a 8”x4-1/2”x3” loaf pan (or a one-pound coffee can). Mix the flour, sugar, baking soda and salt into a bowl. Add the fruits and nuts and toss the ingredients to coat the fruit with the flour mixture. In another bowl, combine the vegetable oil, wine and egg. Pour the boiling water into the fruit-flour mixture and mix thoroughly. Add the egg mixture and blend it in thoroughly. Spoon the batter into the prepared loaf pan. Bake for about 50 minutes or until a cake tester inserted into the center comes out clean. Let the bread cool in the pan for 10 minutes. Invert onto a cake rack to cool completely. Slice and serve plain or with cream cheese.


Makes one loaf


Cream Puff Swans on the Lake

_DSC1118.jpg
IMG_4392.jpg

I love that my grandchildren love to cook and absolutely love that they like a challenge. My eldest makes perfectly shaped butter cookies; the next eldest recently cooked a vegetarian rice and beans dinner for her siblings. One of them once helped me bake a flourless chocolate roll for Passover.

Recently, my 9-year old grand daughter said she was bored and wanted to cook something really delicious, very pretty and also "hard." 

Be still my heart!

What better choice than cream puffs made into the shape of swans?!

I have taught baking classes on this particular recipe and have seen fully committed grown ups nervous about getting it right.

But off we went into the kitchen.

There are two really difficult challenges to making swan shape cream puffs. The first thing is mixing the eggs into the butter-flour dough, which is very stiff and therefore not easy to incorporate the liquidy eggs. Fortunately, this kid is athletic, with the kind of strong arms that come with spending hours doing chin-ups and stuff at the playground.

No problem! Stiff dough/eggs, perfectly mixed and blended. Check!

The second hard part is piping out small slivers of dough for the necks. There were lots of not-so-good ones (we just ate these as snacks after they were baked) but she did manage to create enough for us to use in the final product.

After that it was easy: we made some vanilla pudding but I told her that some other time you could also fill the swan bodies with whipped cream, sorbet or ice cream.

She said it would be really nice for the swans to have something to swim on.

Remember that old piano piece, Swans on the Lake? The music that so many of us learned as children taking our first year or so of piano lessons?

Well of course, there had to be a lake. We melted some chocolate. So easy. So lovely to look at when we put the swans down on each serving plate.

Wouldn't this be a beautiful finale to a lovely dinner for New Year's or someone's birthday or other special occasion?


SWAN PUFFS

  • 1 cup all purpose flour
  • 3/4 teaspoon salt
  • 3/4 teaspoon sugar
  • 1 cup water
  • 1/4 pound unsalted butter, cut into chunks
  • 4 large eggs
  • whipped cream, ice cream, sorbet or vanilla pudding
  • melted chocolate or chocolate sauce


Preheat the oven to 425 degrees. Cover two baking sheets with parchment paper. Whisk the flour, salt and sugar together in a bowl and set aside. Heat the water and butter in a medium size saucepan. Bring the mixture to a boil over medium heat. When the water comes to a boil, raise the heat and add the flour mixture, all at once. Stir vigorously with a wooden spoon until the mixture is blended and begins to come away from the sides of the pan. Remove the pan from the heat and let it cool for 2-3 minutes. Add the eggs, one at a time, blending well after each addition. Spoon 12-18 mounds of the dough onto one of the baking sheets, shaping them into ovals with your fingers, and leaving some space between each oval for the dough to spread. Place the sheet in the oven and bake for 18-20 minutes. Reduce the heat to 375 degrees and bake for another 12-18 minutes or until puffed and golden. Remove from the oven and let cool. 

To make the necks, preheat the oven to 400 degrees. Spoon some of the dough into a pastry bag fitted with a narrow-holed tip. Pipe the dough into "S" shapes about 2-inches long onto the second baking sheet. Bake the necks for about 15 minutes or until golden brown. 

To assemble: Split the swan puffs in half lengthwise using a serrated knife. Cut the top portion in half lengthwise to use as wings. Spoon some whipped cream, ice cream, sorbet or pudding into the swan bottoms. Arrange the split top wings on top of the filling. Spoon some melted chocolate or chocolate sauce onto dessert plates. Place the filled swan bottoms on top of the chocolate. Insert the necks into the front. If desired, use a toothpick to dip into some meted chocolate and make a dot as an eye on the top of the neck.

Makes 12-18


Election. Cake.

In the old days -- and I do mean old, as in right after the American Revolution -- most people (read men) had to travel far to vote, so they started out after church on Sunday and rode by horse and buggy to their nearest polling place. Which could take a day or so to get to. In fact, it might take until the next Tuesday, which is why our elections are held on a Tuesday. 

There was usually a cake waiting for them. Usually commissioned by the local politicians. It was a way to celebrate the right to vote and to pay tribute to the folks (read men) who actually did the traveling to exercise that right.

The cakes were huge (a typical recipe could call for dozens of quarts of flour and pounds of butter and so on). They were fragrant with warm spices and were typically created from sourdough starter.

Too many of us (read men and women) these days don't celebrate the right to vote.

But I do. I have never missed an election.

And I like the idea of cake to celebrate my right to do so.

But I don't have time or the inclination to do a sour dough starter, so I invented my own version of New England Election Cake based on my old recipe for baba au rum, to which I added the typical election cake spices and dried fruit.

Also, this cake is the usual size: it will serve 10-12 people.

It's a lovely looking, celebratory dessert. I'm serving it to my election night crowd.

Be sure to vote.


Election Cake

The Cake:

  • 10 tablespoons butter
  • 3/4 cup milk
  • 1 package active dry yeast
  • 1/2 cup sugar
  • 1/4 cup warm water
  • 4 large eggs
  • 3/4 teaspoon salt
  • 1 teaspoon grated fresh lemon peel
  • 3/4 teaspoon grated nutmeg
  • 1/2 teaspoon ground cinnamon
  • 1/4 teaspoon ground cloves
  • 2-1/4 cups all-purpose flour
  • 1 cup chopped dried fruit (raisins, candied cherries, dried cranberries, etc.)

Syrup:

  • 3/4 cup sugar
  • 1 cup water
  • 7 tablespoons bourbon
  • 1/2 cup apricot preserves

Melt the butter and set it aside to cool. Scald the milk in a small saucepan (bubbles form around the edges of the pan); remove from the heat. In a small bowl, whisk together the yeast, 1/2 teaspoon of the sugar and warm water; set aside for about 5 minutes or until bubbly. In the bowl of an electric mixer set at medium, beat the eggs with the remaining sugar and salt for 3-4 minutes or until thoroughly blended. Add the melted, cooled butter, lemon peel, nutmeg, cinnamon, cloves, warm milk and the yeast mixture. Blend ingredients thoroughly. (The dough will be soft and almost like batter.) Add the flour and blend it in. Add the dried fruit and mix it in. Cover the bowl and set it aside in a warm, draft-free place for about 1-1/2 hours or until well-risen, about doubled in bulk.

While the dough is rising, butter an 8-10 cup bundt pan and place it in the refrigerator. Spoon the risen dough into the mold. Let the dough rise again in the mold for 30 minutes. Preheat the oven to 450 degrees. Bake the cake for 5 minutes. Reduce the heat to 350 degrees and continue to bake the cake for another 20 minutes or until it is browned and a cake tester inserted into the center comes out clean. While the cake is baking, prepare the syrup.

To make the syrup, combine the 3/4 cup sugar and water in a small saucepan and bring to a simmer over medium-high heat. Simmer for 10 minutes or until slightly thickened. Remove the pan from the heat. Stir in 5 tablespoons of the bourbon and set aside.

Place a cake rack over a jelly-roll type baking sheet. When the cake is ready, remove it from the oven and place it on the cake rack. Immediately pour the syrup over it (while the cake is still in the pan). Let the cake cool in the pan for 10 minutes. Invert the cake onto a cake rack to cool completely. (If any liquid trickles down, it will fall into the jelly-roll pan; pour it over the cake.)

To serve: melt the preserves with the remaining 2 tablespoons bourbon. Strain the mixture and brush it over the outside of the cake.

Makes 10-12 servings


Chocolate Challah Bread Pudding

I usually don't have leftover challah, even when I make my giant size recipe

But for Yom Kippur I make TWO giant size challahs, one for the pre-fast dinner and one for break-the-fast.

So, for the kids, there's usually a hunk or two left for French toast.

But this year I had bits and pieces left over: crusts from the pieces that went into the French toast (for the kids who don't like crust). And a few pieces of "insides" left from the grownups who picked off some of the crust.

I hate throwing food away, especially something as delicious as challah.

Waste not, want not.

I put all the leftover pieces into a bowl and made it into chocolate bread pudding.

You can't go wrong mixing challah, milk, sugar and chocolate.


Chocolate Challah Pudding

  • 6 ounces semisweet chocolate
  • 12 ounces leftover challah,including crusts, (about 7-8 loosely packed
  •                                                                         cups of small pieces)
  • 3 cups whole or 2% milk
  • 3 large eggs
  • 1-1/4 cups sugar
  • 1-1/2 teaspoons pure vanilla extract

Butter a large, deep baking dish or (8-cup) souffle dish. Preheat the oven to 350 degrees. Melt the chocolate and set it aside to cool. Break the bread into pieces into a bowl. Pour the milk over the bread and let it soak for 6-8 minutes, stirring occasionally so all pieces of bread absorb some milk. In the bowl of an electric mixer set on medium speed, beat the eggs with the sugar for 4-5 minutes or until the mixture is thick and pale. Stir in the vanilla extract. Stir in the melted chocolate. Mix in the bread-milk mixture. Pour the bread mixture into the prepared baking dish. Place the dish inside a larger pan. Add enough water to the outer pan to come up one-inch of the sides of the baking dish. Bake for 50-55 minutes. Remove from the oven and let cool slightly.

Makes 8 servings


How Sweet It Is!

Apple Chai Cake.jpg

After Labor Day the entire social structure of my life changes along with everyone else's. All of a sudden we switch gears from grilling and walks on the beach to back-to-school stuff and fall fashions.

And the High Holidays.

Everywhere I look now there's a Rosh Hashanah reminder. Even though it's late this year (Jewish holidays are always early or late, never on time). The first night is October 2nd. Not so far away!

And so, to paraphrase the poet Shelley, I ask you: when Rosh Hashanah comes can Apple Cake be far behind?

No way! Because Apple Cake is one of the culinary icons of the holidays, a rite of passage for all would-be Jewish bakers. It wouldn't be a proper holiday without this dessert.

But not every apple cake is quite like Amy Kritzer's! This delectable new version, fragrant with chai-inspired spices (cardamom, cinnamon, ginger and cloves) and cloaked with a soft, maple-infused cream cheese frosting is a standout for its creative take on an old-fashioned classic. It's a beauty as well, with its creamy drizzle and, if you wish, chopped walnuts for garnish.

The recipe is from Amy's new book, Sweet Noshings, which is loaded with magnificent recipes that feature modern updates to and new ways with traditional Jewish baked goods. Everything from Mandel Bread (Amy's includes espresso powder and dried cherries), to Chocolate-Lime Sufganiyot (perfect for Hanukkah) to Flourless Chocolate-Orange Cupcakes with Beet (!) Frosting (I can't wait to try that one!).

There's even a riff on the classic egg cream (it includes strawberries and almond milk).

Anyone who is familiar with Amy's popular blog, WhatJewWannaEat, knows that her recipes always surprise, always inspire. The cookbook does too. Satisfying those of us who like to go beyond ordinary when we cook.

And it certainly satisfies a sweet tooth.

Apple Chai Cake with Maple­ Cream Cheese Drizzle

Prep time: 30 minutes  • Cook time: 1 hour 15 minutes  • Makes: 12 servings

 For cake

  • Butter, oil, or cooking spray for greasing pan
  • 3 cups (426 g) all-purpose flour, 
  • plus more for flouring the pan
  • 1 tablespoon baking powder
  • 1 teaspoon kosher salt
  • 1 cup (235 ml) neutral-flavored oil (such
  • as canola, vegetable, or grape seed)
  • 4 eggs, at room temperature
  • ¼ cup (60 ml) orange juice
  • 1 tablespoon vanilla extract
  • 2 cups (400 g) sugar, plus extra 5 tablespoons for apples
  • 4–5 Granny Smith apples, (3½ cups/440 g), sliced
  • 1 tablespoon ground cardamom
  • 1 teaspoon ground cinnamon
  • 1 teaspoon ground ginger
  • 1 teaspoon ground cloves

 For drizzle

  • 4 ounces (113 g) cream cheese, softened
  • 2 tablespoons unsalted butter, softened
  • 1 cup (113 g) powdered sugar
  • 3 tablespoons maple syrup
  • Pinch kosher salt
  • 1 tablespoon (plus 1–2 teaspoons, if needed) milk (or water or almond milk if keeping parve), at room temperature

1. Preheat oven to 350ºF/ 180ºC. Grease a 12-cup (2.8 L) Bundt pan with butter and a dusting of flour (or use nonstick spray) and set aside.

2. In a large bowl, whisk together flour, baking powder, and salt. Set aside.

3. In a separate large bowl of a stand mixer with a whisk attachment, or in a large bowl with a hand mixer or spoon, mix together oil, eggs, orange juice, and vanilla. Then mix in 2 cups of the sugar until combined. Add dry ingredients to wet ingredients, switching to the beater attachment (or continue to mix by hand). Mix until combined, being careful not to over mix. Batter should be thick but pourable. 

4. Peel and core apples and cut into thin, 1/8-inch (3 mm) wedges.

5. Combine apples in a large bowl with remaining 5 tablespoons sugar, cardamom, cinnamon, ginger, and cloves.

6. Spoon a third of the batter in pan. Add half of the apple mixture in an even layer, add another third of the batter. Follow with other half apple mixture and last of the batter.

7. Bake for 1 hour 10 minutes or until toothpick comes out clean. Let cool in the pan for 15 minutes, then remove and finish cooling on a cooling rack. 

8. To make drizzle, beat cream cheese and butter with a hand mixer until light and fluffy. Then beat in powdered sugar, butter, maple syrup, salt, and enough milk to get a thick but runny glaze. Keep beating until smooth. Drizzle all over your cooled cake. 
 

Blueberry Streusel Pie

Recently I bought a load of blueberries because they were on sale (Fairway: $1.00 per pint carton!) and I couldn't resist.

So then of course I had to use them.

Pie came to mind first. It's always pie first for me.

My mother, who was a master pie baker, never baked blueberry pie because she said the insides were either too thick and gloppy or too runny. I experimented with the fruit, sweetener and thickening agent a few times before the filling consistency was right.

Here it is: 

Blueberry Crumb Pie

Crumb crust:

  • 3/4 cup flour
  • 1/3 cup sugar
  • 1/4 teaspoon salt
  • 6 tablespoons butter, margarine, shortening, coconut oil or a mixture

Combine the flour, sugar and salt. Add the butter in chunks and work it into the dry ingredients with fingertips or a pastry blender until the mixture looks like coarse meal. If you use a food processor, add the ingredients to the work bowl and mix using 18-24 quick, short pulses (enough for the mixture to resemble coarse meal). Set aside.

 Filling:

  •  6 cups blueberries
  • 1/2 cup sugar
  • 5 tablespoons all-purpose flour
  • 3/4 teaspoon ground cinnamon
  • 1/4 teaspoon salt
  • 2 tablespoons lemon juice
  • 1 unbaked pie crust bottom

Preheat the oven to 375 degrees. Mix the blueberries, sugar, flour, cinnamon, salt and lemon juice in a large bowl. Pour the filling into the pie crust. Cover the top with the crumbs. Bake for 50-60 minutes or until  golden brown.

Note: you can use almost 3 “1-pint” boxes of blueberries. Although a liquid pint equals 2 cups, a dry pint of blueberries from most markets is about 2-1/2 cups.

Makes 8 servings