side dish

The Kugel to End all Kugels

This is the kugel to end all kugels.I mean it. I am a kugel-eating expert, if only because when I grew up my grandmother and mom made salty kugel stuffed with mushrooms and onions and it was only when I was grown, married and with kids that I had my…

This is the kugel to end all kugels.

I mean it. I am a kugel-eating expert, if only because when I grew up my grandmother and mom made salty kugel stuffed with mushrooms and onions and it was only when I was grown, married and with kids that I had my first taste of this. That taste was a transforming moment.

My friend Susan brought this dish to my annual Break-the-fast (she got the recipe from her friend Linda and I don’t know where Linda got it).

For years after that I have tasted more kugels than you could possibly imagine (including those hard, dried up things they sell in some supermarkets) always trying to surpass that moment of culinary discovery. 

I was even a judge once in a kugel contest.

I have made some wonderful kugels since then. But this is still my favorite. I always ask Susan to make an extra one so there will be leftovers. I pack pieces of it in my freezer so I can have a little treat whenever.

Don’t even think about the calories. Just enjoy.


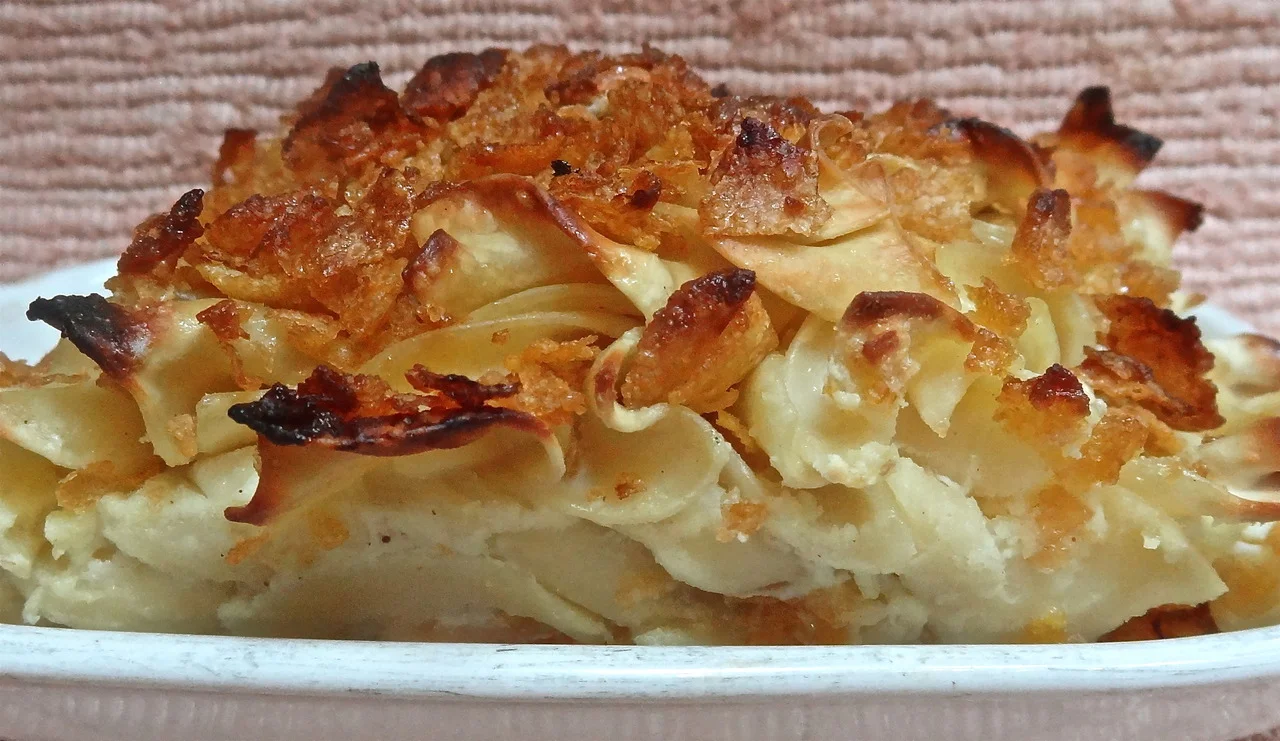
Susan/Linda’s Sweet Noodle Kugel

      1 12-ounce package egg noodles

      1 8-ounce package cream cheese at room temperature

      1/4 pound unsalted butter at room temperature

      1 cup sugar

      2 cups dairy sour cream

      6 large eggs

      1 teaspoon cinnamon

      1 cup raisins, optional

      2 cups crushed frosted flakes or corn flakes

      4 tablespoons melted butter

Preheat the oven to 350 degrees. Cook the noodles in slightly salted water until al dente (not soft). Drain and set aside. In an electric mixer, beat the cream cheese and butter until thoroughly blended and softened. Beat in the sugar until well blended. Add the sour cream and blend thoroughly. Add the eggs one at a time, beating after each addition. Stir in the cinnamon and raisins, if used. Pour the mixture into the noodles and toss to coat them completely. Place in a baking dish. Combine the frosted flakes and melted butter and sprinkle on top of the noodles. Bake for about 40 minutes or until the top is crispy. 

Makes 8 servings  

Corn fritters

Do you ever daydream about foods you haven’t had in a long time?Like the fried chicken you used to eat but you don’t now because it’s too fattening, too fatty and too messy to make?Or Mac n’ Cheese the way your Grandma made it, but it doesn’t taste …

Do you ever daydream about foods you haven’t had in a long time?

Like the fried chicken you used to eat but you don’t now because it’s too fattening, too fatty and too messy to make?

Or Mac n’ Cheese the way your Grandma made it, but it doesn’t taste the same since she’s gone?

Or the original Bonomo’s Turkish Taffy that doesn’t taste anything like it used to so you don’t bother?

One of the foods I think about more than occasionally is my Mom’s Corn Fritters. Crispy outside, soft and puffy within, and loaded with corn. Great for breakfast, lunch or dinner. With a little real maple syrup.

It’s an indulgence, to be sure, so I don’t make them too often. But I just had to have some yesterday. I had been thinking about them, mostly because I had some corn left over from a few extra cobs I cooked over the weekend.

So I made some. I changed one important ingredient though. I switched from dairy milk to coconut milk. UNSWEETENED refrigerator case coconut milk (not canned).

The fritters were vaguely sweeter, but every bit as wonderful, delicate, crispy-edged and perfect. I think Mom would approve.


CORN FRITTERS


2 tablespoons margarine or butter

1 large egg

1 cup coconut milk (or use regular, whole milk)

2 cups cooked corn kernels (about 4 ears of corn)

1-1/4 cups all-purpose flour

1 tablespoon baking powder

1 teaspoon sugar

1-1/4 teaspoons salt (or to taste)

margarine/butter/vegetable oil for frying

maple syrup, optional

Melt the butter and set it aside to cool. In a bowl, beat the egg and coconut milk together. Stir in the cooled melted butter and the corn kernels. In a second bowl, mix the flour, baking powder, sugar and salt; add this to the corn mixture and stir ingredients gently to blend them together. Heat enough margarine, butter and/or vegetable oil in a saute pan over medium heat. When the fat has melted and looks foamy (or the vegetable oil is hot), drop the corn batter by the 1/4-cupful. Cook for about 2 minutes or until the bottom has browned. Flip the pancakes and cook for another 2 minutes or until the second side is brown. Serve with maple syrup if desired.

Makes 6-8 servings

Farro Salad with Carrots, Peas, Tomatoes and Dill

Farro is becoming trendy. So says this article, which I read recently.Actually, farro has been pretty popular in my house for the last several years. It’s one of those whole grains, you know, the stuff everyone says is so healthy, full of fiber…

Farro is becoming trendy. So says this article, which I read recently.

Actually, farro has been pretty popular in my house for the last several years. It’s one of those whole grains, you know, the stuff everyone says is so healthy, full of fiber and nutrients and so on.

It’s popular with me because it tastes so good and because there are so many things you can do with it.

I first cooked farro because I was getting bored with white rice, brown rice, black rice, red rice and every other kind of rice. And with pasta, potatoes and egg noodles. And there’s been an overload of quinoa recently too.

But I wanted something filling and “starchy” as a side dish with dinner. 

There was this little bag of farro in the store. It looked intriguing. I decided to give it a try.

SUCCESS! Farro is sumptuous and tastes sort of nutty and toasty.

I’ve made it dozens of ways, treating it just like rice: steamed, poached, sauteed, in pilaf. Plain. With vegetables. As a salad, drizzled with vinaigrette.

Every recipe is terrific.

Some say farro is the same as spelt, but it is actually a different, if similar grain. It is also a lot like wheatberries and oat groats (so you can substitute those in recipes). Farro is sometimes called emmer wheat. 

Do try it. You can use it all summer in a salad and all through the year in other ways.

Here’s one recipe we love at our house. 

Farro Salad with Carrots, Peas, Tomatoes and Dill


1 cup farro

1-3/4 cup water or vegetable stock

2 carrots, chopped

1 cup thawed frozen green peas

1 cup halved grape tomatoes

3 tablespoons olive oil

2 tablespoons lemon juice

1-1/2 tablespoons chopped fresh dill

1 teaspoon grated fresh lemon peel

salt and freshly ground black pepper to taste


Place the farro and water in a saucepan and bring the liquid to a boil over high heat. Lower the heat, cover the pan and simmer for about 30 minutes or until the farro is tender, but still chewy. Set the farro aside to cool slightly. Cook the carrots in boiling water for 3-4 minutes or until tender. Drain and add to the farro. Add the peas and tomatoes and toss the ingredients to distribute them evenly. In a separate bowl or a jar, combine the olive oil, lemon juice, dill and lemon peel. Whisk the ingredients until well combine (or shake in a covered jar). Pour into the farro mixture and toss the ingredients. Season to taste with salt and pepper.


Makes 4-6 servings 


Imam Bayildi

Need a good side dish? Imam Bayildi is one of my favorite go-to recipes whenever I am at a loss. It’s a good family dish and also works for company. 

I learned to make Imam Bayildi years ago when I was working on an article for eggplant. I found a recipe and the name of the dish, translated, was so intriguing — “the Imam fainted” — I had to try it. If only because, as the story goes, the Imam (an Islamic clergyman or spiritual leader) who first ate this dish was so delighted that he passed out from joy.

Well, whether the tale is apocryphal or not, this dish is very very good. And what’s more, you can serve it hot, warm or at room temp, so you can either get it together in advance and cook it for dinner, or make the whole thing in advance and serve it for dinner.

It’s also a good item for a vegetarian meal (I like it accompanied by scrambled eggs or mushroom ragout).

This year during Passover I made this dish for dinner and used leeks instead of the usual onions. My family liked it even better this way, so here’s the recipe.

Btw, a tumblr reader once told me she added olives to the dish when she made it. I’ve tried that and it is delicious! So, add some olives if you like — black, pitted olives make the dish even more colorful.

Imam Bayildi

  • 1 medium eggplant

  • salt

  • 1/2 cup olive oil

  • 3 medium leeks, cleaned and sliced

  • 2 large cloves garlic, chopped

  • 3 large tomatoes, deseeded and chopped

  • 3 tablespoons chopped fresh parsley

  • 1 teaspoon sugar

  • 1 teaspoon salt or to taste

  • 3 tablespoons fresh lemon juice

  • 1/3 cup water

Cut the eggplant into slices about 3/8-inch thick. Sprinkle with salt and let rest for 30 minutes. Wipe the eggplant slices dry with paper towels. Preheat the oven to 350 degrees. Heat one tablespoon olive oil in a saute pan over medium heat. Cook the eggplant slices a few at a time for 2-3 minutes per side or until slightly wilted. Add more olive oil to the pan as needed to prevent scorching (use 4-5 tablespoons more if needed). Place the cooked eggplant into a baking dish (cut it into smaller pieces if you wish). Add 2 tablespoons olive oil to the pan. Add the leeks and cook for 2-3 minutes. Add the garlic and cook for another minute. Add the tomatoes, parsley, sugar, salt and lemon juice. Cook for one minute, stirring frequently. Spoon the vegetables on top of the eggplant. Drizzle with any remaining olive oil and the water. Cover the pan and bake for 45 minutes. Serve hot, warm or at room temperature.

Makes 6-8 servings

Chremslach

Passover wouldn’t be right without Chremslich. My grandma’s soft, honey-drenched matzo fritters.
I can’t remember ever having a Seder without these. 
Some people eat chremslich for dessert but grandma always served them with the tu…

Chremslach

Passover wouldn’t be right without Chremslich. My grandma’s soft, honey-drenched matzo fritters.

I can’t remember ever having a Seder without these. 

Some people eat chremslich for dessert but grandma always served them with the turkey, right alongside whatever vegetables there were. Like the cranberry sauce at Thanksgiving.

There are hundreds of recipes for chremslich and I’ve tried many. But none measure up to the ones I’ve known since before I can even remember.

Except that my grandmother added broken walnuts to hers and my daughter Gillian is allergic to walnuts so I make mine with pignolis, to which my brother Jeff always says “it’s better with walnuts,” but it actually isn’t.

I have also included raisins, on occasion, just to see what it’s like. And once in a while, grated fresh orange peel. Although methinks that the orange peel, though delicious, might be a bit too nouvelle for some people.

Maybe.

Anyway, here’s grandma’s recipe. I hope this is one of those recipes that my kids make in years to come. I can’t imagine Passover without these.

Btw, you can make these days in advance and keep them in the honey — and add more honey because by then the fritters are soaked through. And they are just as good. Some would say even better.

Or you can keep the fritters and honey separate and cook them together just before you serve them.

Chremslach

  • 3 large eggs

  • pinch of salt

  • 1 tablespoon vegetable oil

  • 1 teaspoon grated fresh lemon or orange peel, OPTIONAL

  • 1/4 cup sugar

  • 3/4 cup matzo meal

  • vegetable oil for frying

  • 1 pound honey, approximately

  • 1/2 cup raisins, OPTIONAL

  • 1/3 cup pignoli nuts (or use 1/2 cup chopped walnuts)

Separate the eggs. In a bowl, beat the egg yolks, salt and one tablespoon vegetable oil together until well blended. Stir in the citrus peel, if used, and set aside. In a separate bowl, beat the egg whites until foamy. Gradually add the 1/4 cup sugar and continue to beat until the whites stand up in peaks. Fold the beaten whites into the egg yolk mixture. Fold in the matzo meal. Let the mixture rest for about 30 minutes (I refrigerate). With cool, wet hands, shape portions of the mixture into disks about 1-1/2-inches in diameter and 1/2-inch thick (sometimes I drop the batter by the tablespoonful into the pan). Heat about 1/4-inch vegetable oil in a saute pan over medium heat. Fry the disks for 1-2 minutes per side or until golden brown on both sides (you may have to flatten them slightly with a rigid spatula). Drain on paper towels and place the fried disks in a large saucepan. Pour the honey over the disks. Add the raisins, if used, and the nuts. Cook over low-medium heat for 5-6 minutes or until heated through and all the disks are coated with honey. Serve immediately or make ahead and reheat. Add more honey as tastes dictate.

Makes 10-12 servings

Buttermilk Herb Slaw

I am constantly amazed at how creative people can be with food.

Take cole slaw. As a kid I remember cole slaw as that deli stuff with shredded cabbage and carrots in a thin white liquid that you bought when you were going to eat hot dogs or hamburgers or some sort of deli sandwich, like corned beef on rye.

My grandmother made her own cole slaw, which she referred to as “cull sloy.”

But now, in specialized food stores, supermarkets and bodegas everywhere, you can find a variety of “slaws,” which after all, just means “salad.” My local store offers “Asian Slaw” and “Health Slaw” in addition to plain old Cole Slaw.

But I like to make my own because that way I can get creative too. Like with this recipe — I like the tangy taste of buttermilk and it lets you cut down on the fatty mayonnaise of a standard recipe. The shredded snow peas add a rich, green color and a crispiness. Adding lots of fresh herbs gives it the refreshing taste of summer.

Btw, if you think it’s silly to buy buttermilk because you’re never going to use it for anything else, read this.

Buttermilk Herb Slaw

  • 6 cups shredded cabbage
  • 1 cup shredded snow peas
  • 1-1/3 cups buttermilk
  • 1/4 cup mayonnaise
  • 2 tablespoons cider vinegar
  • 2 tablespoons sugar
  • 1/4 cup chopped chives or scallion
  • 1/4 cup chopped fresh parsley
  • 2 tablespoons chopped fresh dill (or use a mixture of herbs)
  • 1 teaspoon salt or to taste
  • pinch or two of cayenne pepper

Place the cabbage and snow peas in a large bowl an toss to distribute them evenly. In another bowl, combine the buttermilk, mayonnaise, vinegar, sugar, chives, parsley and herb, whisk the ingredients and pour over the vegetables. Toss the ingredients and let rest for at least 15 minutes. Before serving, taste for seasoning and add salt and cayenne pepper to taste.

Makes 8 servings

Imam Bayildi with Onions

Passover will feel a little strange for me this year. I’m used to having lots of grownups and a bunch of kid cousins, a crowded dining room with tables that spill into the entryway, a ton of food, crayon-friendly placemats for the little ones, plus puppets and other props we use to keep the children occupied and interested during the Haggadah reading.

But families get bigger as the years go by and people move and somehow — it seems this happens to so many people — the time comes when families separate and have their own Seders. That’s what’s happening to me this year.

It’s been my gig for more than 25 years. In the early days when my generation were the young ones with children, there were a couple of times when my sister-in-law Barbara had a Seder. And two or three times we went to my brother Jeff’s house for Passover. And once we even had a Seder at a restaurant with extended family. I hated that.

My Mom had the Seders before I took over. Now I understand how she felt when my aunt Min called one year before Passover and told her that their family had become so big (4 children had married and had kids) they couldn’t burden my Mom anymore and would have their own.

But we’ll still celebrate. Still read the Haggadah. Still have the Seder plate and sing the songs and hide the afikomen and pour the cup of wine for Elijah. Passover is a joyous holiday. A time to be happy that so many of us are still together, celebrating together, appreciating our lives and being grateful for what we have. Isn’t that what the Haggadah really tells us? To read about the journey to freedom and be thankful for it?

A Thanksgiving of sorts. 

In fact, when my son-in-law Jesse asks what I’m serving and I tell him “turkey” he answers, “oh, Thanksgiving.”

Sort of. My Passover menu always centers around turkey. My mother made turkey. My grandmother made turkey. There’s also cranberry sauce. But that’s where the Thanksgiving comparison ends. Obviously there won’t be pie or bread stuffing!

Of course there will still be a ton of other food. Like most families, we will repeat our favorite menu, although I can’t help but add a few things here and there and experiment with a few dishes so we always wind up with days worth of leftovers.

One of the constant dishes in my menu is Imam Bayildi, which is braised eggplant with tomatoes. It’s a good side dish and you can make it a day or so ahead. Also, it’s the kind of dish you can eat hot, warm or at room temperature. If there’s a vegetarian in your life, this dish is also a winner.

So, smaller Seder or whatever, we are going to celebrate and wish everyone a Happy Passover.

Here’s the recipe:

Imam Bayildi

  • 1 medium eggplant
  • salt
  • 1/2 cup olive oil
  • 2 medium onions, chopped
  • 2 large cloves garlic, chopped
  • 3 large tomatoes, deseeded and chopped
  • 3 tablespoons chopped fresh parsley
  • 1 teaspoon sugar
  • 1 teaspoon salt or to taste
  • 3 tablespoons fresh lemon juice
  • 1/3 cup water

Cut the eggplant into slices about 3/8-inch thick. Sprinkle with salt and let rest for 30 minutes. Wipe the eggplant slices dry with paper towels. Preheat the oven to 350 degrees. Heat one tablespoon olive oil in a saute pan over medium heat. Cook the eggplant slices a few at a time for 2-3 minutes per side or until slightly wilted. Add more olive oil to the pan as needed to prevent scorching (use 4-5 tablespoons more if needed). Place the cooked eggplant into a baking dish (cut it into smaller pieces if you wish). Add 2 tablespoons olive oil to the pan. Add the onions and cook for 3 minutes. Add the garlic and cook for another minute. Add the tomatoes, parsley, sugar, salt and lemon juice. Cook for one minute, stirring frequently. Spoon the vegetables on top of the eggplant. Drizzle with any remaining olive oil and the water. Cover the pan and bake for 45 minutes. Serve hot, warm or at room temperature.

Makes 6-8 servings

Carrot and Parsnip Fries

fullsizeoutput_867f.jpeg

Man and woman does not live by french fries alone, although sometimes that’s all I think I want for dinner.

But french fries aren’t the healthiest thing and besides they can be messy to make if you cook them from scratch.

Long ago I tried to find an alternative because I realized I would never be able to eat as many french fries as I’d like to. Nothing really comes close. I’ve tried the baked fries, but really, they’re awful unless you put a whole lot of olive oil on them and then, what’s the point?

On the other hand, if you don’t use potatoes your expectations aren’t the same. When you make carrot “fries” or green bean “fries” you don’t expect them to taste like regular french fries so you don’t make the comparison in the first place. You can even bake them rather than fry them and it’s okay because your mind is not thinking the usual.

I make carrot and parsnip fries at least once a week. They’re roasted. It’s one of the vegetables that I DOUBLE at dinner because everyone, I mean, everyone who eats dinner at my house, loves these things.

They’re not french fries. But they’re really really good.

Try some. This is from my book, Hip Kosher.

Carrot and Parsnip Fries

  • 1 pound carrots
  • 1 pound parsnips
  • 3 tablespoons extra virgin olive oil
  • salt to taste
  • 3 tablespoons chopped mixed fresh herbs, optional

Preheat the oven to 450 degrees. Peel the carrots and parsnips and cut them into strips about 4-inches long, 1/2-inch wide and place them on a baking sheet. Pour the olive oil over the vegetables and toss them to coat each piece. Sprinkle with salt and the optional herbs. Roast for about 20 minutes, turning them once or twice, or until the vegetables are tender and lightly crispy.

Makes 4 servings