gluten free

Saigon Chicken Pho

Last March Ed and I travelled to Vietnam and Cambodia. We had wanted to go to both countries for years, Angkor Wat (in Cambodia), the big draw of course. But when we were young adults it wasn't possible because of the Vietnam War, which, btw, the Vietnamese call The American War.

And then way led upon way, we took other roads more or less travelled until finally this trip got on our radar and we grabbed the opportunity.

It was a revelation in many ways. Because of the politics. Because these days Vietnam is a friend and trading partner. Because Vietnam is thriving, entrepreneurial and modern whereas the only photos I had in my head were horrific ones from the 1960s (and if you have any desire to see those they are on full display in Saigon's War Remnants Museum). 

I also didn't realize how totally different Vietnam and Cambodia are. In every way: culture, ethnicity, religion, language, food, the look of the people.

I vowed to try cooking some of the food we sampled in both countries. 

So far, so good. Especially the pho, one of Vietnam's iconic dishes.

Chicken Pho -- basically chicken noodle soup -- is what your bubbe would make if she were Vietnamese. It's nourishing, flavorful, rib-sticking, comforting, warmth-giving. Perfect now that the cold weather is upon us, at least here in Connecticut. 

Really. Try this pho. I can't stop wanting some.

Fyi, the second photo is a scene from the breathtakingly beautiful Ha Long Bay in what used to be called North Vietnam. The third photo is the scene in Saigon (Ho Chi Min City) where the helicopters took off on that fateful day in 1975 when the Americans left.


SAIGON CHICKEN PHO

  • 3-1/2 to 4 pound chicken

  • 2 whole star anise

  • 6 cloves

  • 1 tablespoon coriander seeds

  • One 2 1/2-inch cinnamon stick

  • 1 teaspoon black peppercorns

  • 1 medium onion, quartered

  • 3 1-inch thick slices fresh ginger

  • 1 tablespoon dark brown sugar

  • 8 ounces dried rice noodles

  • 3-4 chopped scallions

  • 1/4 cup chopped cilantro

  • garnish to taste with thinly sliced jalapeno peppers, bean sprouts, basil leaves, mint leaves, lime wedges. Sriracha (in the United States)


Preheat the oven to 400 degrees. Place the chicken in a soup pot and cover with water. Bring the liquid to a boil over high heat. Turn the heat to low and simmer for 4-5 minutes, removing the debris that rises to the top. While the chicken in cooking, place the star anise, cloves, coriander seeds, cinnamon stick and peppercorns in a single layer in a small dish. Roast the spices for 3-4 minutes, or until fragrant. Add the roasted spices to the soup pot. Add the onion, ginger and brown sugar. Simmer the soup for about 2 hours, until the chicken is very soft. Strain the soup. Remove the chicken to a carving board and, when cool enough to handle, remove and discard the skin and bones. Cut the breast and thigh meat into julienne shreds. (Use the rest of the chicken for other purposes or add more to the soup.)

Keep the soup stock hot over low heat. Cook the rice noodles according to package directions.

To serve, place some rice noodles in serving bowls. Pour the stock over the noodles. Scatter scallions and cilantro into each serving bowl. Garnish as desired with jalapeno pepper slices, bean sprouts, basil leaves, mint leaves and lime wedges.

Note: in restaurants in the United States it is customary to serve Pho with Sriracha sauce on the side, to splash into the soup. Not the case in Vietnam, where fresh chili peppers do the job of spicing the soup.

Makes 8 servings

Potato Salad with Lemon-Oregano Vinaigrette

_DSC6159 (1).jpg

Some people say potato salad comes from German cuisine. Others tell you it is French. Or from some other European country.

But I think potato salad is actually thoroughly American.

Potatoes are a "new world" plant. Back in the 16th century, before Europeans ever knew there was even another continent, Spanish explorers sailed to what would later become the "Americas." They were looking for gold and plenty in the mythical kingdom of El Dorado. 

Surprise!

What they found were plenty of potatoes, and that was their real treasure.

They brought potatoes back to Europe, where it met with mixed reviews, especially because so many people thought potatoes were poisonous. Others refused to eat potatoes because they weren't mentioned in the bible. 

Fortunately potatoes are nourishing and easy to grow, so in the poorer European communities the people were obliged to eat them or starve. 

And so by the time Europeans settled in what would become the United States, potatoes were a staple part of the diet.

With all this in mind, I say again: potato salad is an American food, because -- it all started with the potato. And so it's the perfect side dish for a 4th of July picnic, barbecue or any other sort of get-together.

For my money -- potato salad is best when served at room temperature. Not hot, not cold. There are a zillion versions. Here's one:

Potato Salad with Lemon-Oregano Vinaigrette

  • 2-1/2 pounds small red potatoes        
  • lightly salted water
  • 1/4 cup olive oil
  • 1/4 cup fresh lemon juice
  • 2 scallions, finely chopped        
  • 1 tablespoon minced parsley
  • 1-1/2 tablespoons chopped fresh oregano (1-1/2 teaspoons dried) 
  • 3/4 teaspoon salt, or salt to taste
  • freshly ground black pepper to taste

Place the potatoes in a saucepan, cover with lightly salted water and bring to a boil over high heat. Lower the heat and simmer for 15-20 minutes or until tender. Drain under cold water and peel, if desired. Cut the potatoes into bite-size pieces and place in a large bowl. Pour in the olive oil and lemon juice and toss ingredients gently. Add the scallions, parsley, oregano, salt, and pepper. Toss gently. Let rest at least 1 hour before serving.

Makes 4-6 servings


Passover Orange Almond Cake

A few weeks ago I was going through my Passover recipes file and came across a recipe for Italian Almond Cake with Poached Fruit from the Jerusalem Post. Unfortunately, it didn't say whose recipe it was. Also I didn't have the second page of instructions.

I made some changes and figured out how to proceed based on similar cakes I've baked.

 First, I converted all the metric measurements. 

I figured out how much, in cups, came from 3/4 cup whole almonds.

I didn't use blanched almonds, figuring that almonds with skin were just as good.

I switched to coconut oil because I don't like margarine. 

I deleted the liquor and used orange juice instead, and added some freshly grated orange peel. 

I separated the eggs and whipped the whites with sugar to provide a lighter texture than I thought the cake would have without fluffed whites.

I didn't serve it with poached fruit (I used fresh oranges and sorbet).

Some would say that with all these changes the recipe is now mine, and I understand that.

Still, the cake was delicious and I would have preferred to give credit!

Btw, it's gluten free!

Here's my version of Passover Orange-Almond Cake.

Passover Orange Almond Cake

  • 1/3 cup coconut oil
  • 1 cup ground almonds
  • 6 tablespoons plus 2 tablespoons sugar
  • 3 large eggs, separated
  • 2 tablespoons orange juice
  • 2 teaspoons finely grated fresh orange peel
  • 1/4 cup potato starch

Preheat the oven to 350 degrees. Using a small amount of the coconut oil, lightly grease an 8-inch round cake pan, line the bottom with parchment paper and lightly grease the paper. Set aside. Melt the remaining coconut oil and set aside to cool. Place the almonds and 6 tablespoons sugar in the bowl of an electric mixer and stir at low speed for a minute until the ingredients are well distributed. Add the egg yolks, orange juice and orange peel and beat them in at medium speed for about one minute. Stir in the potato starch. Stir in the cooled coconut oil. In a separate bowl, beat the egg whites for 1-2 minutes, going from low to high speed, or until the whites stand in soft peaks. Add the remaining sugar and beat until the mixture stands in stiff peaks. Fold them into the almond mixture. Pour the batter into the prepared pan. Bake for about 25 minutes or until golden brown and a cake tester inserted into the center comes out clean.

Makes 6-8 servings


Fried Rice is Always Welcome

Ed and I have eaten a lot of fried rice recently. In Hong Kong. In Vietnam. In Cambodia. In the Philippines.

You could say fried rice is a staple in our lives. Just this simple dish: hot rice, vaguely crispy from the fry, lightly salty (but never with added soy sauce) and with a bit of egg, onion (usually in the form of scallion) and cooked vegetables. And that's how we had it (with a change of seasonings, depending on where we were) throughout Southeast Asia.

And that's how we have it at home (only from now on I will add more of the flavorings we recently sampled -- like sliced chili pepper or fresh coriander or star anise).

Because no matter what else I make for dinner, Ed will always welcome fried rice as a side dish.

He will also welcome fried rice as the main dish.

That makes it very easy for me, especially on days when I don't feel like fussing over dinner.

It does take some thinking ahead, because it's best to make fried rice using cold, cooked rice.

After that it's simple. You stirfry the rice and add all sorts of other ingredients from cooked carrots or mushrooms or any other veggie, to frozen peas to canned water chestnuts to fresh scallions to leftover chicken or veal to scrambled eggs -- whatever you have! And season it the way you like.

Like the recipe below, which was a filling, satisfying, delicious one-pot dinner.

Another bonus -- I added some of the Carrington Sriracha flavored coconut oil that I mentioned when I posted about Sriracha-Parmesan Popcorn. I got the oil, among other things at Crafted Kosher, a new website that has an enormous assortment of interesting products. The coconut oil is coming in handy for many of my recipes (stay tuned). Just a small amount makes a huge flavor difference, as it did with this fried rice.

Fried Rice with Egg and Peas

  • 4 large eggs
  • 2 tablespoons vegetable oil
  • 1 tablespoon Sriracha flavored coconut oil
  • 4 scallions, chopped
  • 3 cups cooked cold rice
  • 3/4 cup thawed frozen peas
  • 1 cup diced leftover turkey, chicken or veal, optional
  • 1/2 teaspoon salt or to taste

Beat the eggs in a bowl and set aside. Heat 2 teaspoons of the vegetable oil in a wok or stirfry pan over medium-high heat. Add the eggs and cook, stirring once or twice until they are set on the bottom. Turn the eggs over and cook briefly until firm. Dish out the eggs onto a chopping board, chop them and set them aside. Heat the remaining vegetable oil and the coconut oil in the pan. Add the scallions and stirfry for about one minute. Add the rice, eggs, peas, optional meat and salt and stirfry for 2-3 minutes to distribute ingredients and heat the rice.

Makes 2-4 servings, depending on whether this is a one-dish meal or part of a meal


A Vegetarian, Gluten Free Side Dish

_DSC6681.JPG

My freezer broke last week.

Fortunately I still have my original, trusted, reliable old freezer from the stone age in my basement. I transferred the meat and soups, casseroles and other goodies that I had cooked. Anything that could be saved.

Unfortunately quite a lot wasn't worth saving, so I threw away lots of stuff. Half a cake that no one liked and made me wonder why I had saved it anyway. Breads with 2 slices left that were stuck together with ice crystals. A chicken leg, freezer burned because the plastic wrap had fallen off. Like that.

It felt so good to get that freezer empty and clean, ready for the repairman, that I started on the cabinets. I discarded anything out of the sell-by date; open boxes of cereal, crackers that I had placed in plastic bins who knows when, 2/3 eaten jars of peanut butter. Like that.

I also cooked some of the stuff that was still good.

The sorghum for example.

In case you haven't cooked with it or know what it is, sorghum is a cereal grain. Easy to use, tasty and gluten free. I had tried some at the Wondergrain booth at the Fancy Food Show last year and then used some for stuffing. I love the texture and the fact that it is so versatile I can use it for so many different kinds of dishes.

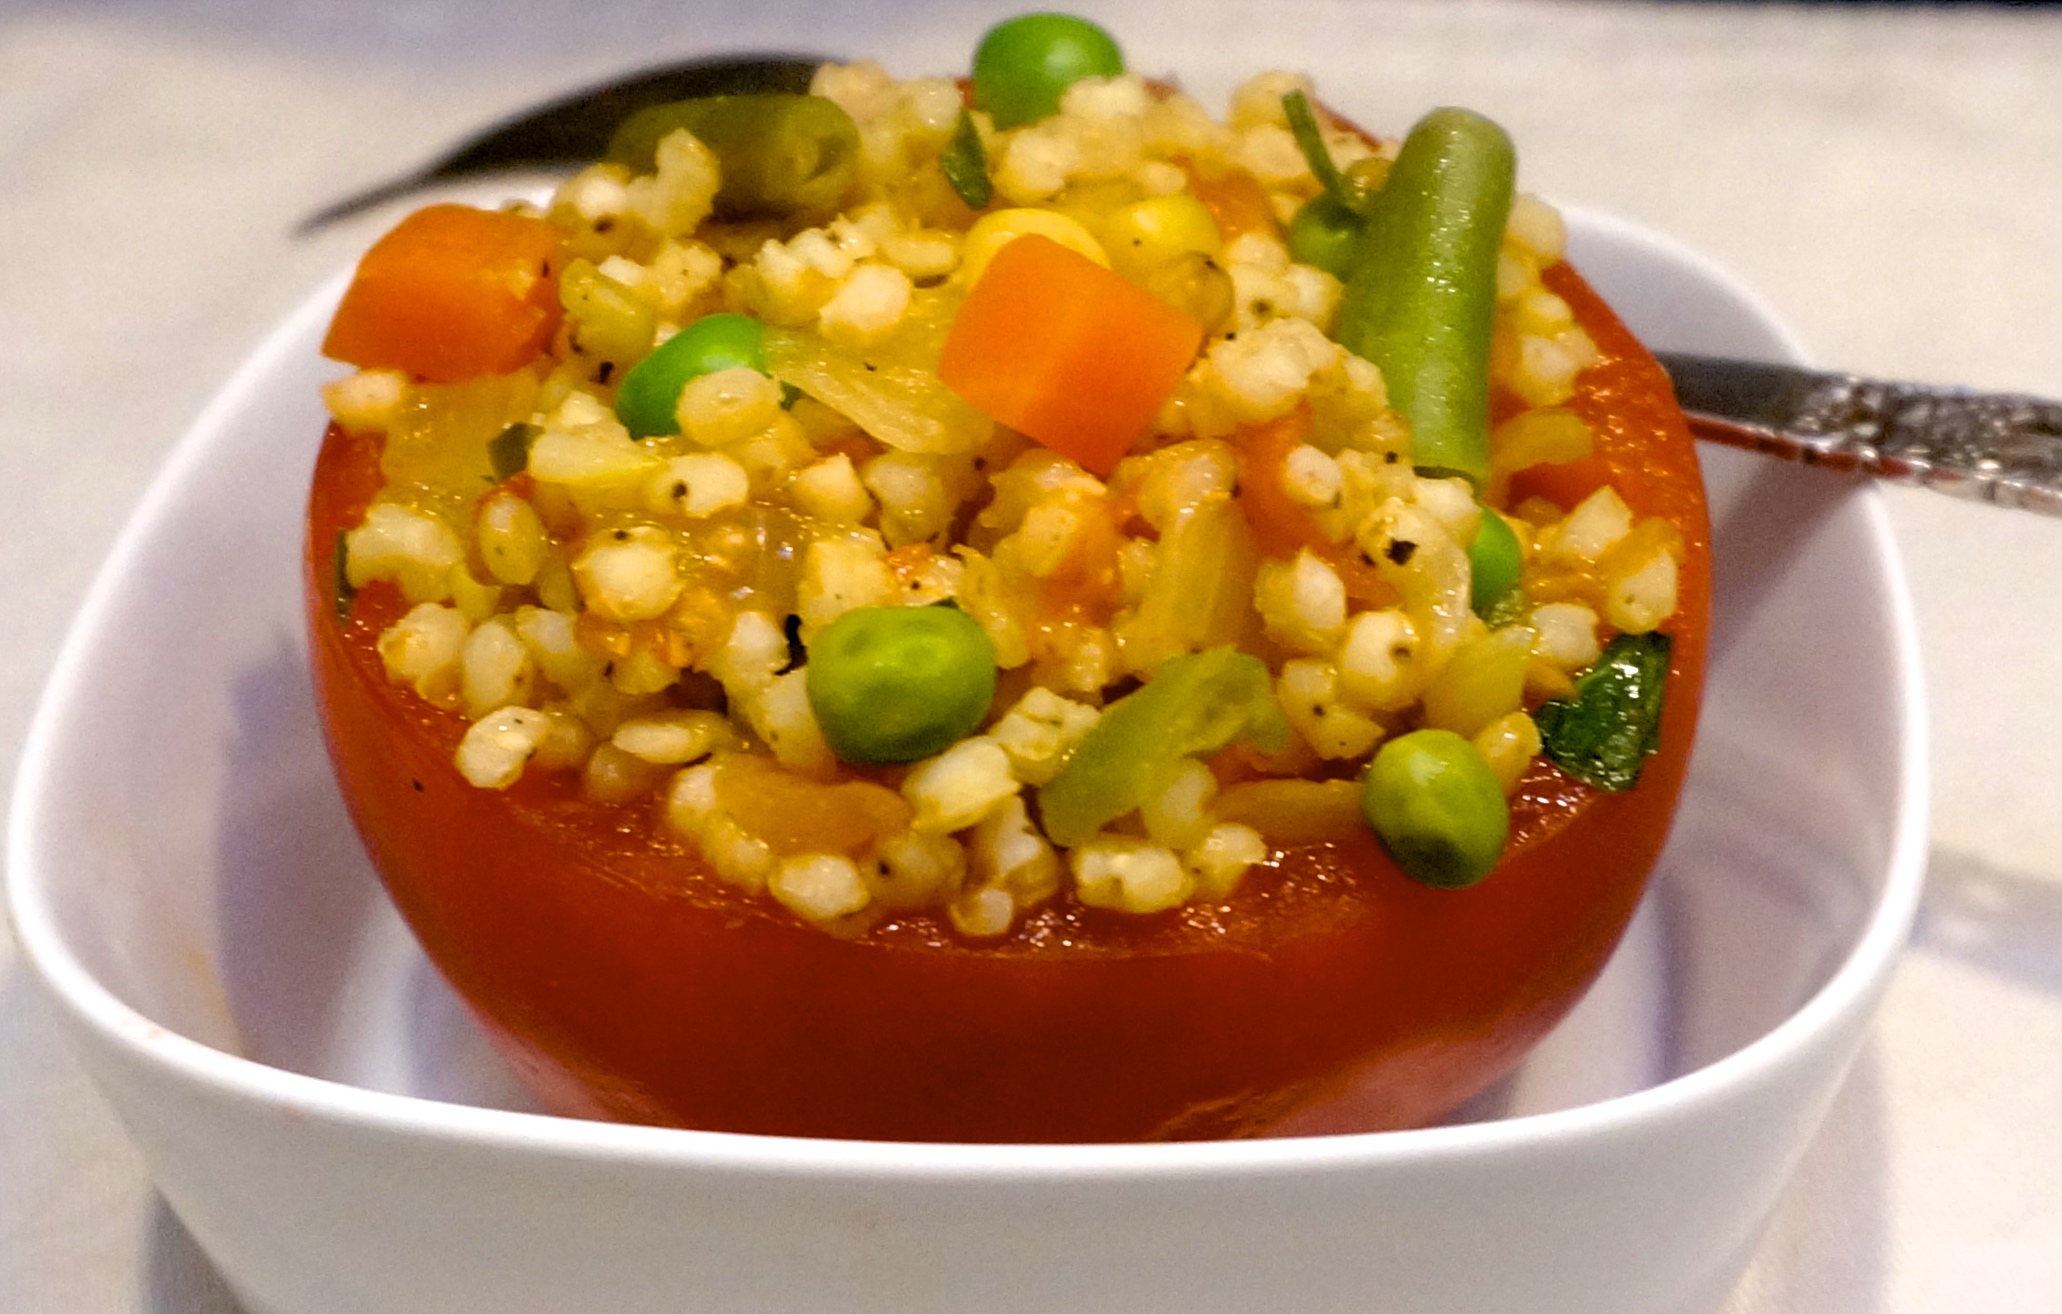
Last night I mixed it with vegetables to use as a side dish with dinner. Not only did it taste good, it was colorful and lovely to look at on the plate, which always makes dinner much nicer. Early in the day I stuffed the sorghum-veggie mix into hollowed out tomatoes and baked them several hours later, so this is a good make-ahead dish.

Sorghum Stuffed Tomatoes

  • 8 large tomatoes
  • 1 cup sorghum grain
  • 3 cups vegetable stock and/or water
  • 3 tablespoons vegetable oil
  • 2 medium onions, sliced
  • 1 small chili pepper, deseeded and chopped
  • 1 large clove garlic, chopped
  • 1 cup chopped cooked vegetables
  • 2 tablespoons chopped fresh parsley
  • salt and freshly ground black pepper to taste


Slice a cap off each tomato and scoop out the insides. Chop the insides and set aside. Place the hollowed out tomatoes upside down on paper towels to drain off excess liquid. Place the sorghum in a saucepan, pour in the stock and bring to a boil over high heat. Reduce the heat to low, cover the pan and cook for 35-40 minutes or until the sorghum is tender and the liquid has been absorbed. (If the liquid has not been absorbed and the grains are tender, strain off the liquid.) Set the cooked sorghum aside. Preheat the oven to 375 degrees. Heat the vegetable oil in a sauté pan over medium heat. Add the onions and cook, stirring occasionally, for 3-4 minutes or until slightly softened. Add the chili pepper, garlic and tomato insides and cook for 1-2 minutes. Add the cooked vegetables and stir them in. Spoon the vegetables and any cooking fluids into the pan with the sorghum. Stir to distribute the ingredients evenly. Stir in the parsley and salt and pepper. Place the tomatoes on a baking sheet. Spoon the ingredients into the hollowed out tomatoes. Bake for about 20 minutes or until hot.

Makes 8 servings


Zimtsterne Cookies

When you see the first twinkle of stars in the night sky, the Yom Kippur fast is over.You take your fist sips of that long awaited coffee, and with it …. Zimtsterne.German star cookies. To remind you that we celebrate a new year, new beginnings, bei…

When you see the first twinkle of stars in the night sky, the Yom Kippur fast is over.

You take your fist sips of that long awaited coffee, and with it …. Zimtsterne.

German star cookies. To remind you that we celebrate a new year, new beginnings, being with loved ones. Sweet. Lovely. Gluten-free too.

Zimtsterne

  • 3 large egg whites

  • 1-1/4 cups sugar

  • 1/2 teaspoon salt

  • one pound finely chopped almonds or hazelnuts, approximately

  • 2 teaspoons ground cinnamon

  • 2 teaspoons grated fresh lemon peel

  • confectioners sugar**

Line a cookie sheet with parchment paper. Preheat the oven to 275 degrees.

Beat the egg whites until they stand in soft peaks. Continue to beat the whites, gradually increasing the speed and gradually adding all the sugar and salt, for 6-8 minutes or until they whites stand in glossy, stiff peaks. Remove about 3/4 to one cup of this mixture to a small bowl and set it aside.**

In another bowl, combine the nuts, cinnamon and lemon peel. Fold the nut mixture into the egg white mixture in the bowl until it is uniform in color. Spoon the mixture onto parchment paper and flatten the “dough” sightly. Let stand for about 15 minutes. Place another piece of parchment paper on top. Roll the dough about 1/2-inch thick. Remove the top piece of parchment paper. One at a time, cut out star shapes from the dough (the dough is sticky and difficult to work with). Place each star on the parchment paper on the cookie sheet.

When all the stars are cut, use the reserved sugar mixture and spread on top of each star.  Let rest for 60 minutes.

Bake for about 25-30 minutes.

Makes about 42

**you can skip this meringue coat and bake the cookies uncoated (in this case, do not set aside the 3/4 cup meringue. You might need about 1/2 cup more ground nuts to make the dough less sticky). When they are baked and cooled, mix about 1/2 cup confectioners sugar with enough water to make a paste and use a small spoon to cover the cookies with the sugar paste. Let dry and serve.

Gluten-free Gingersnaps

A few weeks ago I wrote an article about sorghum syrup for The Jewish Week and mentioned that this sweetener (which was very popular before cheap, refined sugar came along) was gluten-free. 
But then I gave a recipe for sorghum-sweetened gingersnaps…

A few weeks ago I wrote an article about sorghum syrup for The Jewish Week and mentioned that this sweetener (which was very popular before cheap, refined sugar came along) was gluten-free. 

But then I gave a recipe for sorghum-sweetened gingersnaps and unfortunately the cookies were not gluten-free.

That was a mistake! 

So here it is, a completely gluten-free recipe for gingersnaps. I like these even better than the original recipe. They are somewhat softer that regular gingersnaps.

Gluten-free Gingersnaps


3/4 cup vegetable shortening

1/4 cup coconut oil

1 cup sugar

1 egg

1/4 cup sorghum syrup

1 teaspoon vanilla extract

1 cup Bob’s Red Mill gluten-free flour

3/4 cup coconut flour

1/4 cup quinoa flour

1 tablespoon baking soda

1/4 teaspoon salt

1 teaspoon ground cinnamon

3/4 teaspoon ground ginger

3/4 teaspoon ground cloves

1/8 teaspoon grated nutmeg

2 tablespoons sugar


Preheat the oven to 350 degrees. Lightly grease a cookie sheet. Combine the shortening, coconut oil and sugar in the bowl of an electric mixer and beat at medium speed until well combined. Add the egg, sorghum syrup and vanilla extract and beat until well blended. Add the gluten-free flour, coconut flour and quinoa flour, baking soda, salt, cinnamon, ginger, cloves and nutmeg and beat until the dough is well blended, smooth and uniform in color. Scoop mounded tablespoons of the dough and place them on the prepared cookie sheet, leaving an inch space between each piece (you will have to repeat or use several cookie sheets). Sprinkle the dough lightly with sugar. Bake the cookies for about 12 minutes or until the cookies have spread and are flat and crispy, with lines on the surface.

Makes about 60