dessert

Cream Cheese Cookies

While cleaning out/purging my files recently, I rediscovered this recipe for these Cream Cheese Cookies. It was on an old index card, in my mother's handwriting. I'd always wanted to try these, but never did because after the list of ingredients there was this instruction: "bake and freeze."

I don't remember watching my Mom bake these cookies and I had no clue what "bake and freeze" meant other than that I had to chill the dough before doing anything with it. She also never wrote down the oven temperature.

So I tried several versions. I rolled clumps of dough into 1-inch balls and baked them. I made some crescent shaped. The best ones were when I rolled the dough into two long logs, refrigerated them overnight and cut the logs into 1/4-inch slices, baked at 325 degrees.

My mother never said to dust the baked cookies with confectioners' sugar. I tried them with and without and think the cookies taste better and look nicer with that final garnish.

Glad I finally tried the recipe! The cookies are rich and tender, lightly sweet (only 2 tablespoons of sugar!), a perfect snack for a coffee or tea break.

Here's the recipe, with instructions.

MY MOTHER'S CREAM CHEESE COOKIES

  • 1/2 pound butter
  • 1/2 pound cream cheese
  • 2 large egg yolks
  • 2 tablespoons sugar
  • 1/2 teaspoon salt
  • 1 teaspoon vanilla extract
  • 1-3/4 cups all-purpose flour
  • confectioners' sugar

Beat the butter and cream cheese together in the bowl of an electric mixer set at medium (or use a hand mixer) for 2-3 minutes, until softened and completely blended. Add the egg yolks, sugar, salt and vanilla extract and beat them in thoroughly. Add the flour gradually, beating it in until a smooth, uniform dough has formed. Cut the dough in half and roll each half into a long log about 1-inch in diameter. Wrap in plastic wrap and chill for at least 4 hours, or until firm and cold. Preheat the oven to 325 degrees. Slice the logs into 1/4-inch slices and place the slices on cookie sheets. Bake for 23-25 minutes or until lightly browned. Remove from the oven and let cool. Dust with confectioners sugar (best if sifted over the cookies).

Makes about 60 cookies


Aunt Kate's Cheese Cake

My Mom always talked about what a good cook Aunt Kate was. She'd say "Kate could make franks and beans taste like a gourmet dinner."

Truth is, Aunt Kate (Kate Winter) was actually not my biological or married-in aunt; she was our neighbor when I was a little girl in Bridgeport, CT. In those days it was the custom to call your parents' good friends aunt/uncle, out of respect. My parents and the Winters remained close friends, even after my parents moved away.

Recently, while going through a purge of my recipe files, I came across Aunt Kate's recipe for cream cheese cake. It was on an index card, in her handwriting, complete with instructions, including the reminder to place the finished, cooled cake "in the ice box."

Naturally, I had to try it.

My Mom was right. This was one fabulous recipe. Creamy, rich cheesecake -- but lighter and fluffier than most. It doesn't need anything but itself, although Aunt Kate apparently garnished it with strawberry topping (frozen strawberries mixed with cornstarch and sugar). I preferred to use fresh berries so I changed that part.

Otherwise, in all its delicious glory, here is the recipe for Aunt Kate's wonderful cheese cake.

AUNT KATE'S CHEESE CAKE

  • 2 teaspoons butter or margarine

  • 1/3 cup graham cracker crumbs

  • 1 pound cream cheese

  • 1 pound cottage or farmer cheese

  • 1 cup sugar

  • 3 large eggs

  • 1 teaspoon vanilla extract

  • Topping

 TOPPING:

  • 2 cups dairy sour cream

  • 3 tablespoons sugar

  • 1 teaspoon vanilla extract

 GARNISH

  • 12-15 strawberries

  • 1/4 cup apricot or currant preserves


Preheat the oven to 375 degrees. Spread the butter on the bottom and sides of a 9-inch springform pan. Sprinkle the inside of the pan with the graham cracker crumbs. Shake the pan to coat the bottom and sides of the pan completely. Beat the cream cheese and cottage cheese in an electric mixer at medium speed for 1-2 minutes or until they are thoroughly blended. Add the sugar and blend it in. Add the eggs and vanilla extract and beat the ingredients for 2-3 minutes or until the mixture is smooth, scraping down the sides of the bowl occasionally with a rubber spatula. Pour the batter into the prepared pan. Bake for 20 minutes.

While the cake is baking, make the topping by mixing the sour cream, sugar and vanilla extract together until well blended. When the cake has baked for 20 minutes, remove it from the oven and carefully spoon the topping over the cake. Return the cake to the oven. Bake for 10 minutes. Turn the heat off but leave the cake in the oven until it has cooled to room temperature.

When the cake has reached room temperature, (“place it in the ice box”) refrigerate it at least 4 hours or until it is thoroughly chilled. Wash and trim the berries and cut the in half. Place the halves attractively on top of the cake. Heat the preserves in a small saucepan and brush the melted preserves over the berries. Remove the sides of the pan to serve the cake.

Makes one cake serving 12-16


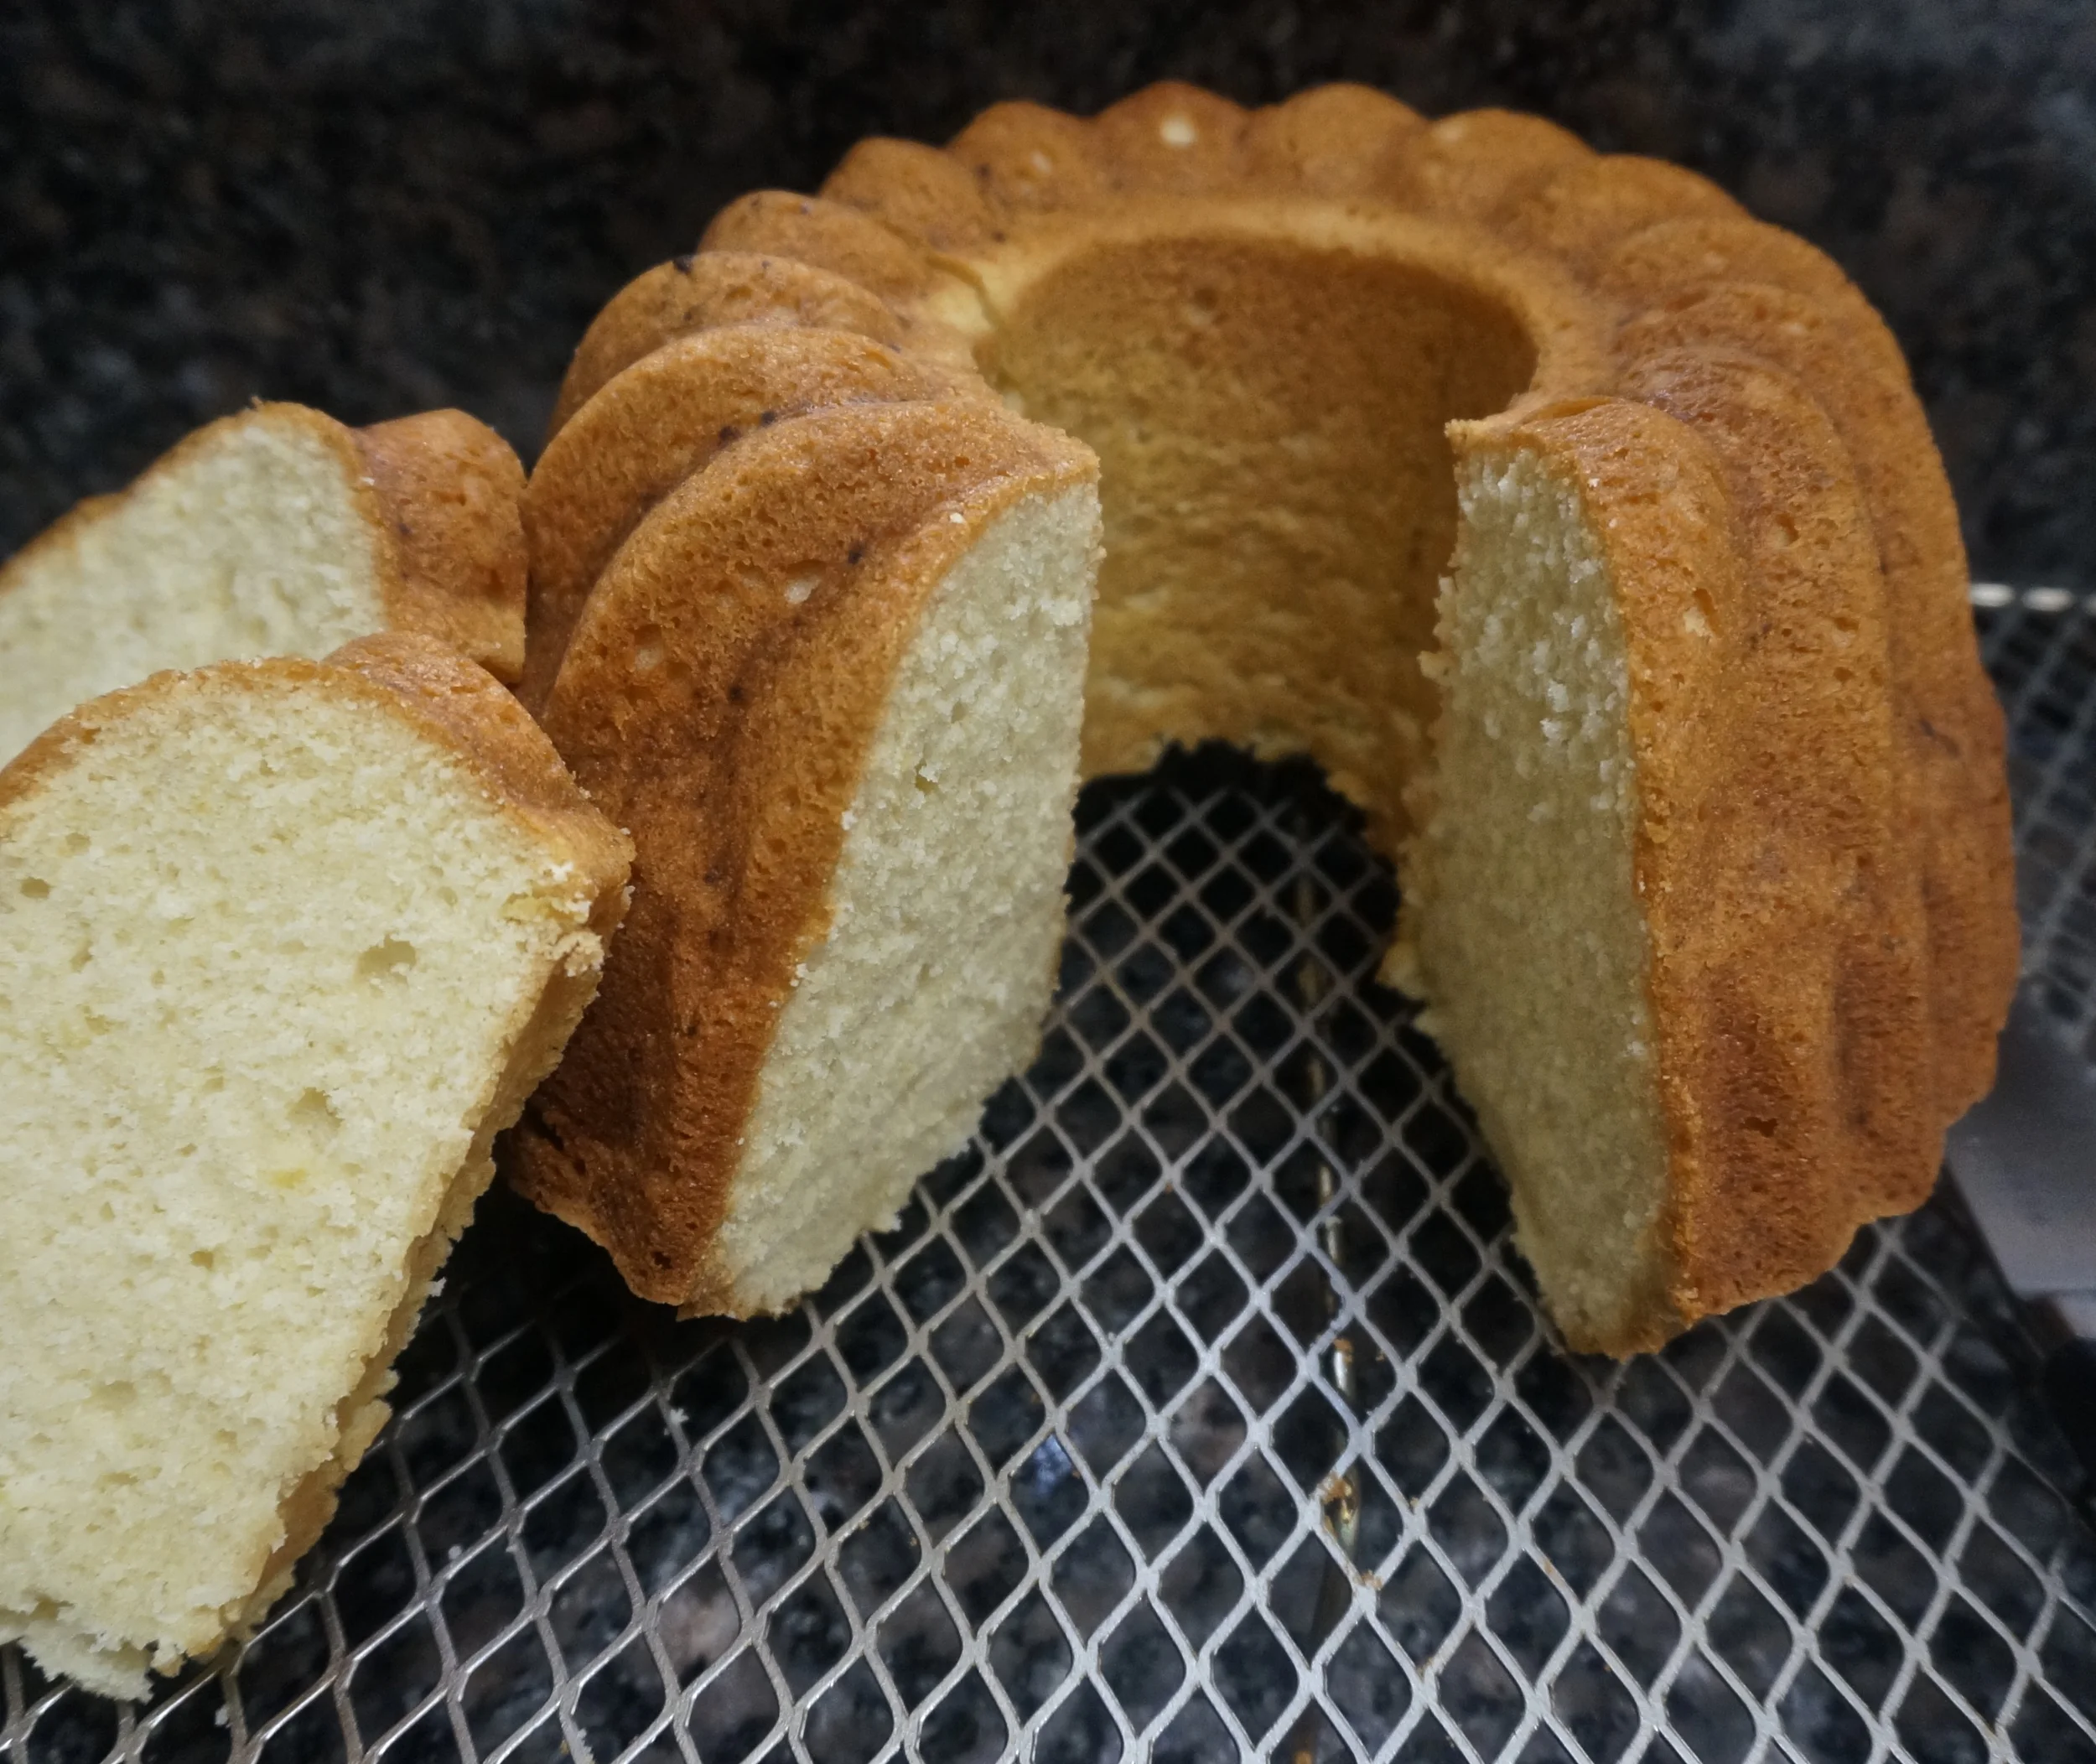
Rich, Dense, Cream Cheese Pound Cake

_DSC7518.JPG

I've been experimenting with cream cheese lately, mostly because I had some extra left over from creating and testing recipes for Philadelphia Cream Cheese at JoyOfKosher.com. (You can find the recipes here, where there are recipes also from Tamar Genger and Jamie Geller).

But also because the Jewish holiday of Shavuot is coming and this particular holiday usually involves a lot of cream cheese.

I've made several cheesecakes. You'll read about them here soon.

But I decided to make a pound cake too. With the addition of cream cheese, this plain old cake is outrageously dense, moist and rich.

You don't need to add frosting, powdered sugar, any sort of glaze, accompaniments of any kind like ice cream or fresh fruit. Although, of course, none of those would hurt.

But this one is good just the way it is.

Cream Cheese Pound Cake

  • 1-1/2 cups butter
  • 8 ounces cream cheese
  • 2-1/2 cups sugar
  • 6 large eggs
  • 2 teaspoons vanilla extract
  • 2 teaspoons grated lemon peel
  • 3 cups all-purpose flour
  • 1 teaspoon baking powder
  • 1/2 teaspoon salt

Preheat the oven to 300 degrees. Grease a 10-cup bundt pan. Beat the butter and cream cheese together in the bowl of an electric mixer set at medium for about 2 minutes, or until well blended. Add the sugar gradually and beat for about 2 minutes or until thoroughly incorporated. Add the eggs one at a time, beating after each addition. Scrape down the sides of the bowl occasionally to keep the batter smooth and uniform. Add the vanilla extract and lemon peel and stir them in. Add the flour, baking powder and salt and beat the ingredients for about 1-2 minutes or until smooth, uniform and well-blended. Spoon the batter into the prepared pan. Bake for 1-1/2 hours or until a cake tester inserted into the center comes out clean.

Makes one cake serving 16 people

Cheesecake Cookies

I usually bake the same cookie recipes over and over. Butter cookies. Grand Finale (chocolate chip) cookies. Peanut Butter cookies

But recently I decided to branch out with some Chinese cookies. And a few other recipes I'll post about here soon.

I got my inspiration straight from the "cookies" folder in my file cabinet on one of those days when I decided to do a purge of unnecessary stuff. This particular folder includes recipes clipped from magazines and newspapers. I should have known as I collected them that I would probably never actually make most of them.

But there were a few handwritten recipes that I just couldn't resist. A few from my Mom and my Aunt Beck. A few recipe cards that are sentimental for me because they are from friends and relatives that have passed away.

There was also this recipe for Cheesecake cookies from someone named Rose. I have no idea who she is, or was. My Mom had a friend Rose. Maybe it was hers. I don't recognize the handwriting on the index card. It isn't my Mom's handwriting. Or my Aunt's. 

Unlike most of the hand written recipes from women of my mother's generation, this one was complete with a list of ingredients (though not in the right order) and instructions on how to make the cookies. I've edited the recipe to conform to our more modern style of recipe writing. But below is the recipe for the most fabulous, tender, salty-and-sweet, tangy with cheese, creamy centered but crusty sandwiched cookies you can imagine.

Nice idea for Mother's Day.

Thanks Rose, whoever you are. These are great! 

Rose's Cheesecake Cookies

  • 1/3 cup butter
  • 1 cup all-purpose flour
  • 1/2 cup chopped nuts
  • 1/3 cup packed brown sugar
  • 8 ounces cream cheese
  • 1/4 cup sugar
  • 1 large egg
  • 1 tablespoon lemon juice
  • 2 tablespoons milk or cream
  • 1 teaspoon vanilla extract


Preheat the oven to 350 degrees. Melt the butter and set it aside. In a medium bowl, combine the flour, nuts and brown sugar and mix to distribute the ingredients evenly. Add the melted butter and mix until the mixture is crumbly. Remove one cup of this mixture and set it aside. Place the remaining mixture inside an 8-inch square baking pan. Press the crumbs down firmly to cover the bottom of the pan evenly. Bake for 12-15 minutes or until firm. Remove the pan from the oven and set it aside. Beat the cream cheese and sugar together in the bowl of an electric mixer set at medium speed for 1-2 minutes or until well blended. Add the egg, lemon juice, milk and vanilla and beat the ingredients for another minute or until thoroughly blended. Spoon the cheese mixture evenly over the baked crumbs. Top with the remaining, reserved unbaked crumbs. Bake for about 25 minutes or until golden brown. Remove from the oven and let cool. Cut into small squares (16 pieces).


Makes 16 cookies

Warning! These cookies are irresistible.

WARNING!

Do not make these if you are on a diet.

Even if you aren't, hide them from yourself. As for me, as soon as they're cool I store these in my basement freezer so that if I am tempted to get one I at least have to walk down and up a flight of stairs.

These ultra-buttery, pleasurably sweet, satisfyingly crispy cookies are monstrously difficult to resist. 

The inspiration for the recipe -- Dutch Butter cookies -- thanks to a friend, Ro Dekker, z"l, who passed away many years ago. She was a brave, smart, funny, good and righteous woman. She and her children escaped on the last boat out of Holland to America in World War II. (Her husband Mauritz, z"l, was already in the United States.) Everyone else in her family stayed behind and perished in the Holocaust.

I will always think of Ro when I eat these.


dutch butter cookies (Jan Hagels)

  • 3/4 cup plus 2 tablespoons unsalted butter

  • 1/2 cup brown sugar

  • 1 teaspoon grated lemon peel

  • 1 large egg, beaten

  • 2 1/3 cups all-purpose flour

  • 3/4 cup sliced almonds

  • 2 tablespoons sugar

  • 1 teaspoon cinnamon

Preheat the oven to 350 degrees. Line a 13”x9” cookie sheet with parchment paper and butter the parchment paper (or use spray). Beat the butter, brown sugar, lemon peel and 1 tablespoon of the egg in the bowl of an electric mixer. Mix at medium speed for about 2 minutes or until well blended. Add the flour and beat at medium speed for 2-3 minutes or until a uniform dough has formed. Place the dough on the parchment paper and press to completely cover the entire pan. Be sure to make the dough as even as possible. Use a small rolling pin or tumbler to make the dough even. Brush the entire surface of the dough with the remaining egg. Scatter the almonds evenly on top of the dough. Mix the sugar and cinnamon together in a small bowl. Sprinkle the cinnamon-sugar evenly over the almonds. Bake for 22 to 25 minutes, or until the surface is golden brown. While still warm, cut the cookies in 4 equal parts lengthwise and widthwise, to make 16 large cookies. (Or cut into smaller pieces.)


Note: pizza cutter works well for cutting


Makes 16 cookies


Chinese Cookies

Passover is sort of like the visit from the grandchildren.

Both are joyous, thrilling and celebratory.

You love every precious moment.

It's also so nice when it's over. 

This is not a complaint. Just a statement of reality.

When the kids and grandkids leave after a visit, the house looks like the recycle guy made a mistake and dropped his truck full of stuff in your living room. Ah, the mess (despite your children's tidying up). But it's worth it. You wouldn't have it any other way and anyone who is a grandparent will tell you the same thing.

Besides, after they leave it's suddenly very calm and quiet and you can relax and sip a glass of leftover Passover wine.

When Passover is over you think over the hard work needed to get through the holiday. Cleaning the cabinets, the fridge. Getting out the dishes, setting the table, arranging the bridge chairs, making tons of food.  All the cooking, the matzo balls and chremslich, haroset and flourless chocolate cake were worth it. You wouldn't have it any other way and endless numbers of people will tell you it's worth it.

Besides, after it's over you can relax and sip a glass of leftover Passover wine.

And also, after Passover is over and you clean up from the visit and put away the new groceries, you can start to cook and eat all the foods you missed during the holiday. 

For me, that means cookies. Cookies are always what I miss most during Passover.

Like these almond cookies. When I was a kid these were known as Chinese cookies because they were served for dessert at so many Chinese restaurants in the New York Metropolitan area. Chinese cookies are tender and crumbly, redolent of almond, with a clump of sweet chocolate in the middle and a half almond in the very center.

This rich cookie, giver of childhood memories, is a perfect way to end a Passover diet.

“Chinese” Cookies

  • 2/3 cup shortening
  • 1/3 cup coconut oil
  • 1 cup sugar
  • 1/4 cup ground almonds
  • 1 large egg
  • 2 teaspoons almond extract
  • 2-1/2 cups all-purpose flour
  • 1-1/2 teaspoons baking powder
  • 1/4 teaspoon salt
  • 3 ounces semisweet chocolate
  • sliced or halved almonds


Preheat the oven to 350 degrees. Beat the shortening, coconut oil and sugar together in the bowl of an electric mixer set at medium for 1-2 minutes or until smooth and well blended. Add the ground almonds, egg and almond extract and beat them in. Add the flour, baking powder and salt and mix for 1-2 minutes or until the dough is thoroughly blended and uniform. Roll the dough on a lightly floured surface to 1/2-inch thick. Cut out circles with a 2-1/2-inch cookie cutter. Place the circles on (ungreased) cookie sheets. Bake for about 18 minutes or until lightly browned. Remove the cookies from the oven and use a rigid spatula to place each on a rack to cool. Melt the chocolate. Spoon a small amount of melted chocolate into the center and swirl the melted chocolate to form a small circle in the center of each cookie. Place an almond half or slice in the middle of the chocolate. Let dry.


Makes about 24


Passover Rhubarb Crisp

We are big rhubarb fans in our family. And unlike many rhubarb lovers, we like the stuff on the sour side, without the sugar overload. It's the way we got used to it as kids, the way my Mom made it.

I suppose she cut down on sweetening food as part of the need during World War II to ration sugar, and then just never went back to the old ways. In any event, she used to cook rhubarb all the time and serve it like applesauce. It was always kind of tart and wonderfully refreshing as a side dish to roasted chicken or turkey. 

Rhubarb is a natural for Passover because that's when the first of the new crop appears. You can get fresh stalks everywhere. We always have so many side dishes at our Seder that I don't cook it up the way my Mom did, to serve with dinner. But it does make a good dessert. Like in this recipe for Rhubarb Crisp.

I usually add a little less sugar than the recipe calls for, just because that's the way we like it. You can cut the sugar to 1/2 cup OR, if you have a real sweet tooth, add a bit more.

You can make this dessert a day or so ahead. It's a nice choice after a typical meat Seder meal, because it's parve (unless you switch to butter), but is also a good choice throughout the holiday.


PASSOVER RHUBARB CRISP

  • 2 pounds rhubarb

  • 3/4 cup sugar

  • 2 tablespoons potato starch

  • 1 teaspoon grated lemon peel

  • 3/4 teaspoon cinnamon

  • 2 cups crumbled coconut macaroons

  • 1/2 cup chopped almonds

  • 1/3 cup matzo meal

  • 1/4 cup brown sugar

  • 1/4 coconut oil or butter

Preheat the oven to 375 degrees. Cut the rhubarb into 1/2-inch thick slices and place in a bowl. Add the sugar, potato starch, lemon peel and cinnamon and toss the ingredients to distribute them evenly. Spoon the mixture into a baking dish. In a bowl combine the coconut macaroons, almonds, matzo meal and brown sugar. Add the coconut oil and work it into the dry ingredients until the mixture is crumbly. Place on top of the fruit. Bake for 40 minutes or until the crust is golden brown.

Makes 8-10 servings

The Gift

One of the loveliest, most heartwarming traditions of Purim is mishloach manot, the act of giving gifts of edible food (and drink) to our friends, neighbors and those in need.

Every year I bake or cook something to give away. This year it was Banana Double Chocolate Swirl Cupcakes. But other times I've given Dried Apricot, Pear and Raisin Chutney, Banana Mango Bread with Chocolate Chunks, Candied Kumquats and lots more.

Yesterday, I got mishloach manot from an unexpected source: NoMoo Cookies!

There, on my front porch was this box of one dozen giant Choco-lift with Cherry Cookies! Just for me.

Now, you may have read my review of NoMoo cookies a while ago. If not, take a look. These are fabulous, dairy-free and kosher.

The Choco-lift with Cherry is a limited edition cookie. I have to say, the cherry part made me think of blooming spring cherry trees, which is quite a lovely image today as more snow is falling on the already 2 or 3 feet of it in my backyard. The chocolate part was rich and not too sweet (over-sweet is one of my pet peeves with most packaged cookies).

I've already finished one. My husband finished one. The rest went right into the freezer because even though these cookies are terrific, fresh from the package, we also like them hard and cold.

That's a good cookie.

Thank you NoMoo. Chag Purim Sameach.

Dried Fruit Pie with Port Wine

My daughter Gillian and son-in-law Jesse gave me this unusual Hanukkah gift: a rolling pin carved with the words “handmade by Ronnie Fein.” The words are mirror-image backwards, of course, so that when you roll the pastry it comes out right.

I couldn’t wait to use this thing so I decided to make a pie to freeze and then serve on New Year’s weekend. I rolled out the dough using this new device.

Problem. 

With pie dough, you have to keep rolling until you get the proper thickness. That meant I had to go over the words several times and so they got all jumbled and on top of each other.

Okay, so I used the mixed up piece of dough for the bottom crust and rolled the top crust using a regular rolling pin, then gave it a final flourish with the carved one, to get the words onto the pastry.

The result: really cute, but I have to say, this thing has limited value. In addition to its use for the final roll only, you really couldn’t see the words on the finished, baked pie.

Sorry kids. 

Maybe it will work better on sugar cookie dough. I’ll try that next.

Meantime, the pie itself is worth making. It’s a riff on old-fashioned Prune and Apricot Pie, but no prunes. I used dates and raisins instead, and since dried fruit goes so magnificently with port wine, I included some in the filling. It’s a rich, sumptuous pie, perfect a New Year celebration and throughout the cold days of winter. 

Dried Fruit Pie with Port Wine

Pie Dough:

  • 2-1/2 cups all-purpose flour
  • 1 teaspoon sugar
  • 3/4 teaspoon salt
  • 1/2 cup cold butter
  • 1/3 cup cold vegetable shortening
  • 4-6 tablespoons cold milk, juice, water or melted ice cream

To make the dough: Combine the flour, sugar and salt in a large bowl. Cut the butter and shortening into chunks and add the chunks to the flour mixture. Work the fat into the flour mixture until the ingredients resemble crumbs (use your hands, a pastry blender or the pulse feature of a food processor). Add the liquid, using only enough to gather pastry into a soft ball of dough (start with 4 tablespoons). Cut the dough in half and flatten each half to make a disk shape. Wrap the dough in plastic wrap and let it stand at least 30 minutes.

Filling:

  • 1 cup dried apricots (preferably California apricots)
  • 1 cup golden raisins
  • 1 cup pitted, halved dates
  • 1-1/2 cups water
  • 1 cup port wine
  • 1/2 cup sugar
  • 1 tablespoon cornstarch
  • 1/2 teaspoon ground ginger
  • 1/4 teaspoon ground cinnamon
  • 1/4 teaspoon grated nutmeg
  • 1/8 teaspoon salt
  • 1/4 cup lemon juice
  • 1 tablespoon butter

Preheat the oven to 400 degrees. Prepare the pie dough. Let the dough rest while you prepare the filling. Cut the dough in half and roll out one of the halves on a floured board. Fit the dough into a 9-inch pie pan. Spoon the filling into the dough-lined pan. Cut the butter into smaller pieces and place the pieces over the filling. Roll out the second piece of dough. Place it over the filling. Crimp the edges to seal the bottom and top pieces of dough. Bake for about 40 minutes or until the crust is golden brown. 

To make the filling: Place the apricots, dates and raisins in a saucepan. Pour in the water and port wine. Bring to a boil over high heat. Lower the heat to a simmer and cook, stirring occasionally, for about 10-12 minutes, or until the fruit is soft. Strain the fruit into a bowl, pressing down to extract as much liquid as possible. RESERVE the cooking liquid (about 1/2 cup). Place the sugar, cornstarch, ginger, cinnamon, nutmeg and salt in a small saucepan and whisk to combine ingredients completely. Add the reserved 1/2 cup liquid (add water if you don’t have enough but only add 1/2 cup if you have more). Cook over medium heat for 3-4 minutes or until the mixture has thickened. Spoon the liquid over the fruit and mix ingredients thoroughly. Stir in the lemon juice. 

Makes 8-10 servings 

Baked Pound Sweet Apples

I discovered a new apple. New for me anyway. It’s called Pound Sweet (a/k/a Pumpkin Sweet) and it’s actually a very old heritage apple first known in Connecticut in the early 1800s.I’d never heard of this one, but at Clarkdale Fruit Farm in Deerfiel…

I discovered a new apple. New for me anyway. It’s called Pound Sweet (a/k/a Pumpkin Sweet) and it’s actually a very old heritage apple first known in Connecticut in the early 1800s.

I’d never heard of this one, but at Clarkdale Fruit Farm in Deerfield, Massachusetts, where I drove recently to buy my yearly supply of Rhode Island Greening apples for pies (my Connecticut source didn’t have any this year) they pointed them out and so I bought a bagful.

Turns out (as they told me at the farm) that Pound Sweet are not the best eating-out-of-hand apple — they’re mild tasting and not especially tart/acidic — but they are terrific for baking.

So I baked some. They certainly hold their shape very well and don’t become as mushy as some apple varieties. I found that baking them also took slightly longer than the more usual Romes and Cortlands do.

But the result was really good. If you can find a bunch of Pound Sweets, wonderful, but of course this recipe will be fine when made with any baking apple (if you use other varieties, do not cover and bake for the 10 minutes suggested).

Baked Pound Sweet Apples


4 large Pound Sweet baking apples (or use any baking apple)

half a lemon

1/3 cup raisins

1/3 cup dried cranberries

3 tablespoons cinnamon sugar

2 teaspoons coconut oil

1 cup mango juice 

Preheat the oven to 375 degrees. Wash the apples and remove the core with an apple corer or small knife, leaving about 1/2” of the core on the bottom. Peel the apples halfway down from the top and rub the peeled surfaces with the cut side of the lemon. Put the apples in a baking dish.  Mix the raisins and cranberries and stuff them into the apple hollows. Sprinkle the apples with the cinnamon sugar. Place 1/2 teaspoon coconut oil on each apple top. Cover the pan with foil and bake for 10 minutes. Remove the cover and bake for another 15 minutes. Pour the juice over the apples. Bake for another 40-45 minutes, basting occasionally with the pan juices, or until the apples are tender. Serve warm or at room temperature.


Makes 4 servings