cake

Angel Food Cake

My mother used to say that eating Angel Food Cake was like eating a sponge. A dry sponge at that.

She had this way of sneering by raising her upper lip up almost into her nose that, to this day, years since she passed away, when I think of it and picture her, still makes me howl with laughter.

Anyway, she made that face when she mentioned Angel Food Cake. Which she refused to eat. My mother was a baker and insisted there were better baked goodies to feast upon.

At some point I was asked to write about Angel Food Cake for a newspaper column. This was a dilemma, because I had never tasted it homemade, so I didn’t actually know what the goal was. I had tasted Angel Food Cake in my college dorm cafeteria and had to agree with my mother on this one. It was like a sponge.

The packaged Angel Food Cakes at the supermarket didn’t look any better, so I never bought one. And I didn’t want to spend any money on an expensive bakery version because what if it was as awful as I expected? 

So, I tested several recipes and experimented.

I was pleasantly surprised by the result. Very pleasantly surprised. 

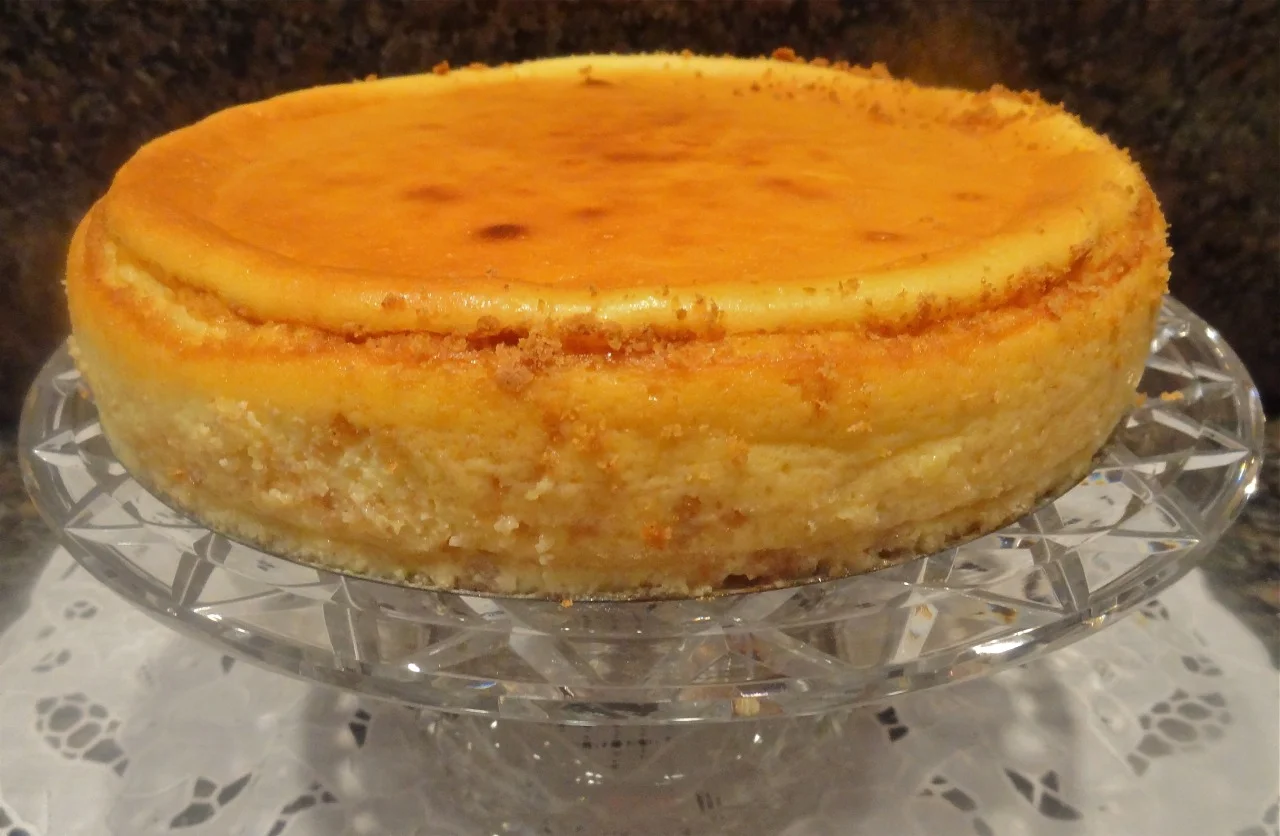
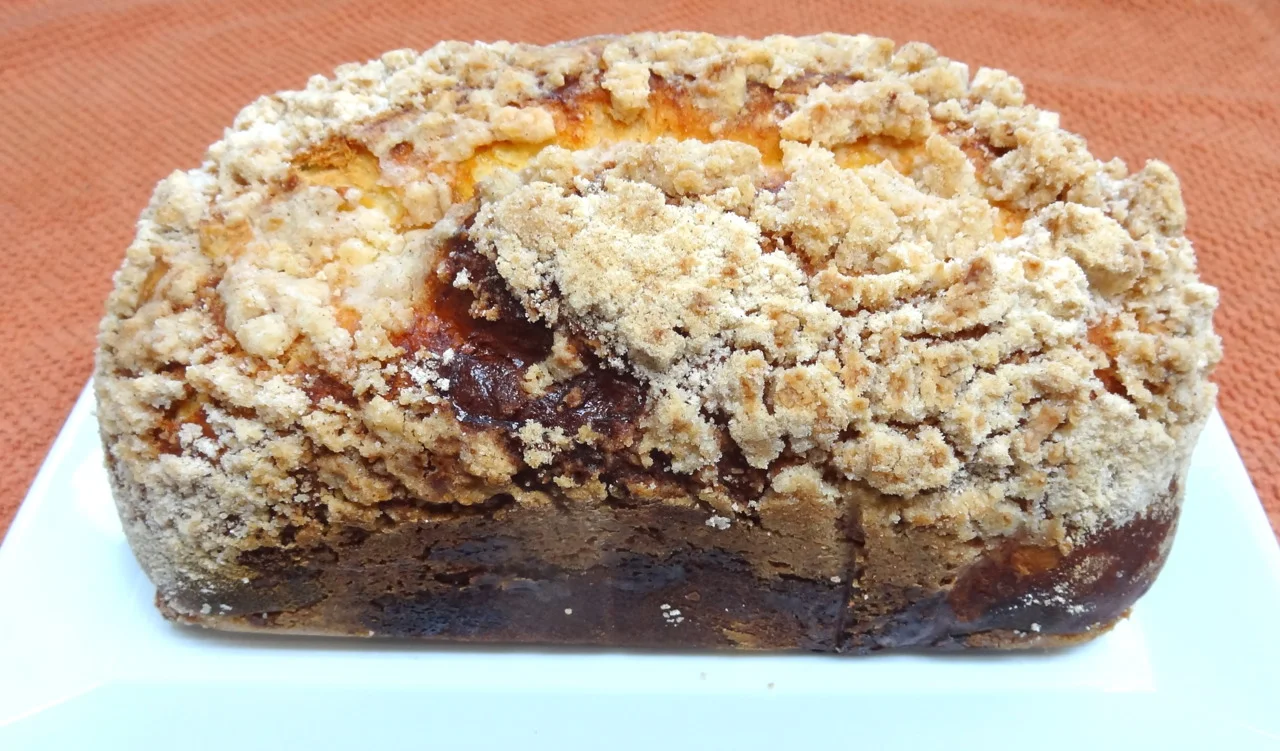
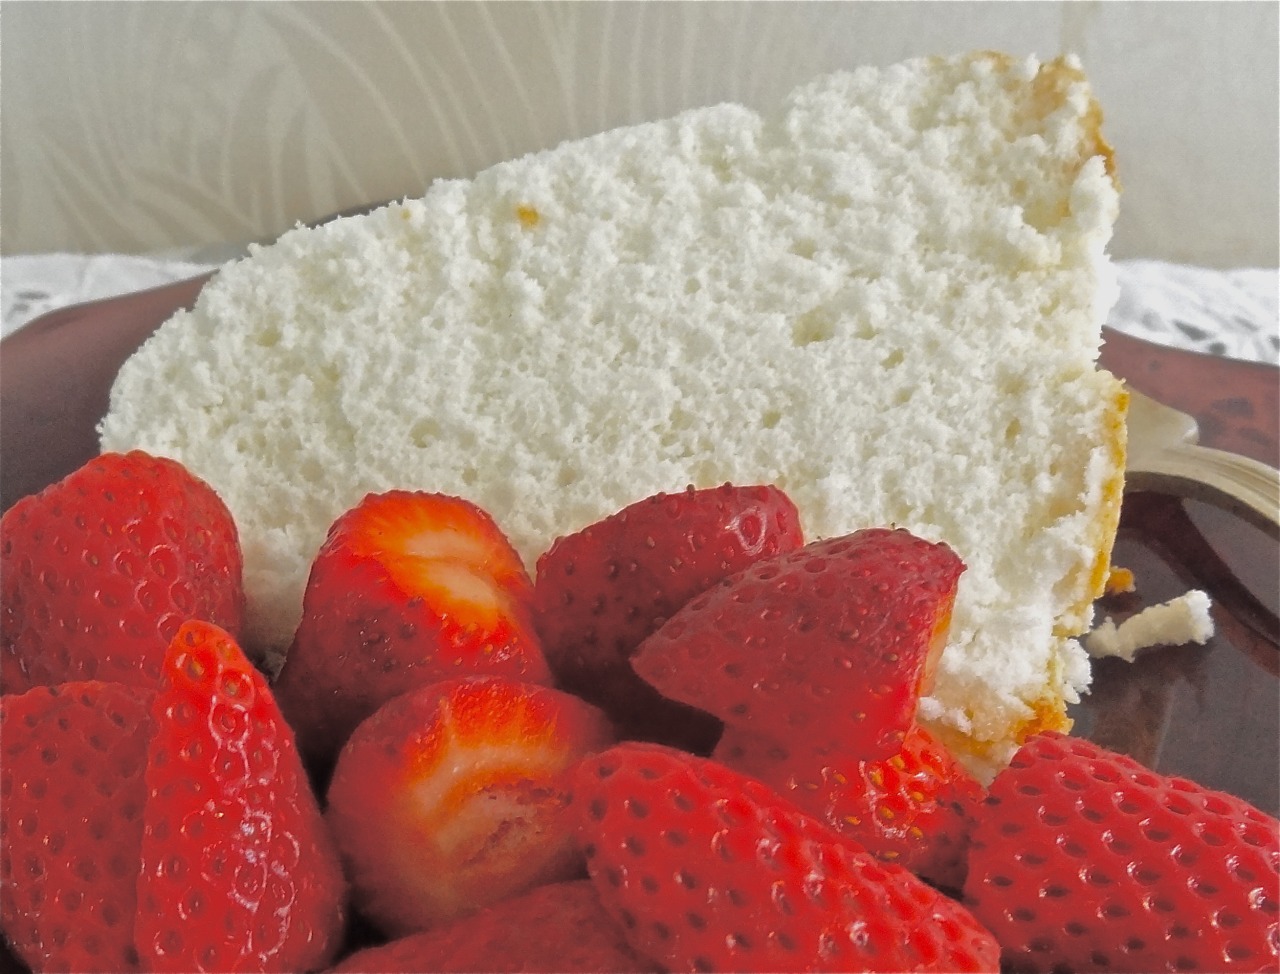
Angel Food Cake is not rich or dense like, say, a chocolate cake or a marshmallow-frosted coconut cake. 

Nope. It is the opposite. It is light, soft, ethereal. The kind of confection that’s perfect on a summer day or after a big meal when you want a bit of sweet but not something that will make you weighed down like you swallowed a boulder.

And this is the bonus: Angel Food Cake is dairy free and fat free. No butter, margarine, oil, egg yolks, milk, cream, yogurt or sour cream in this cake. 

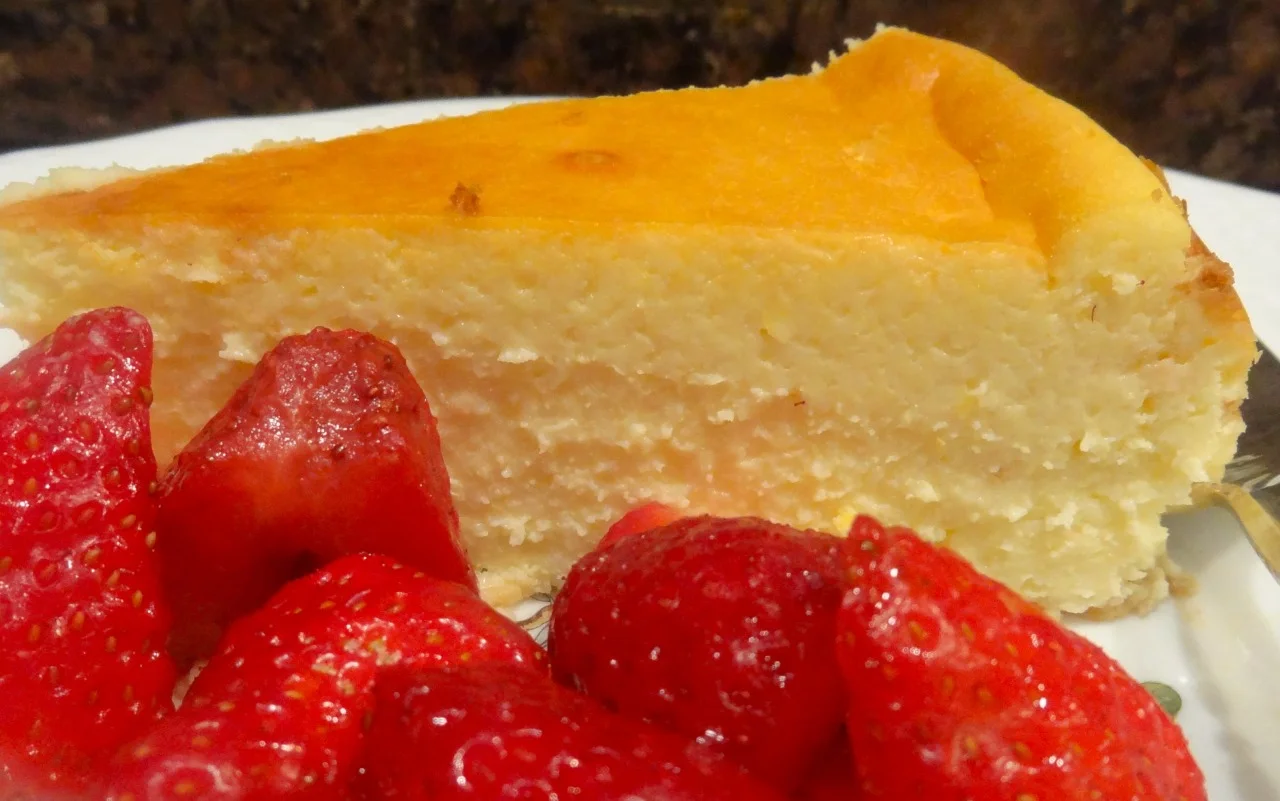
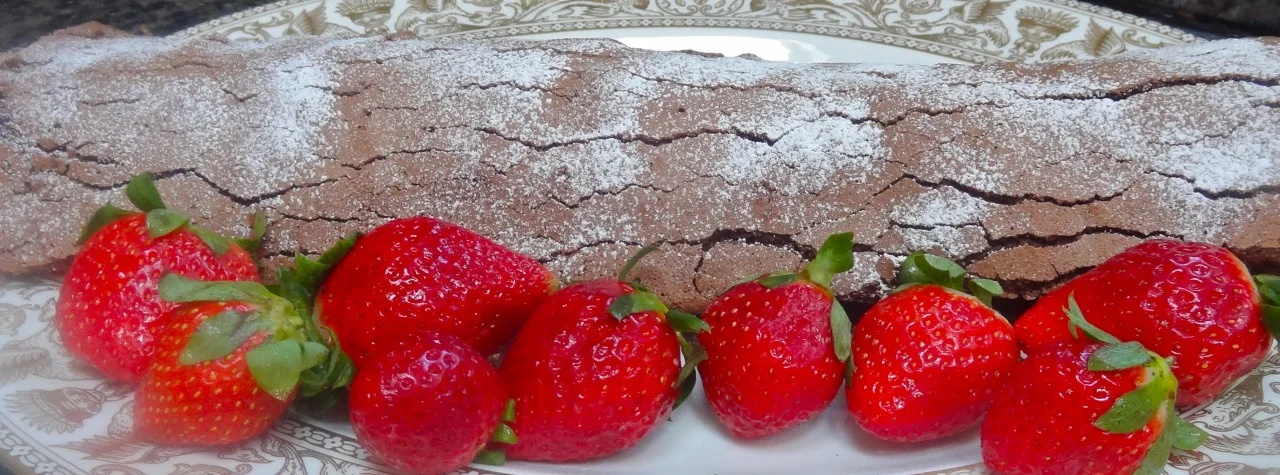
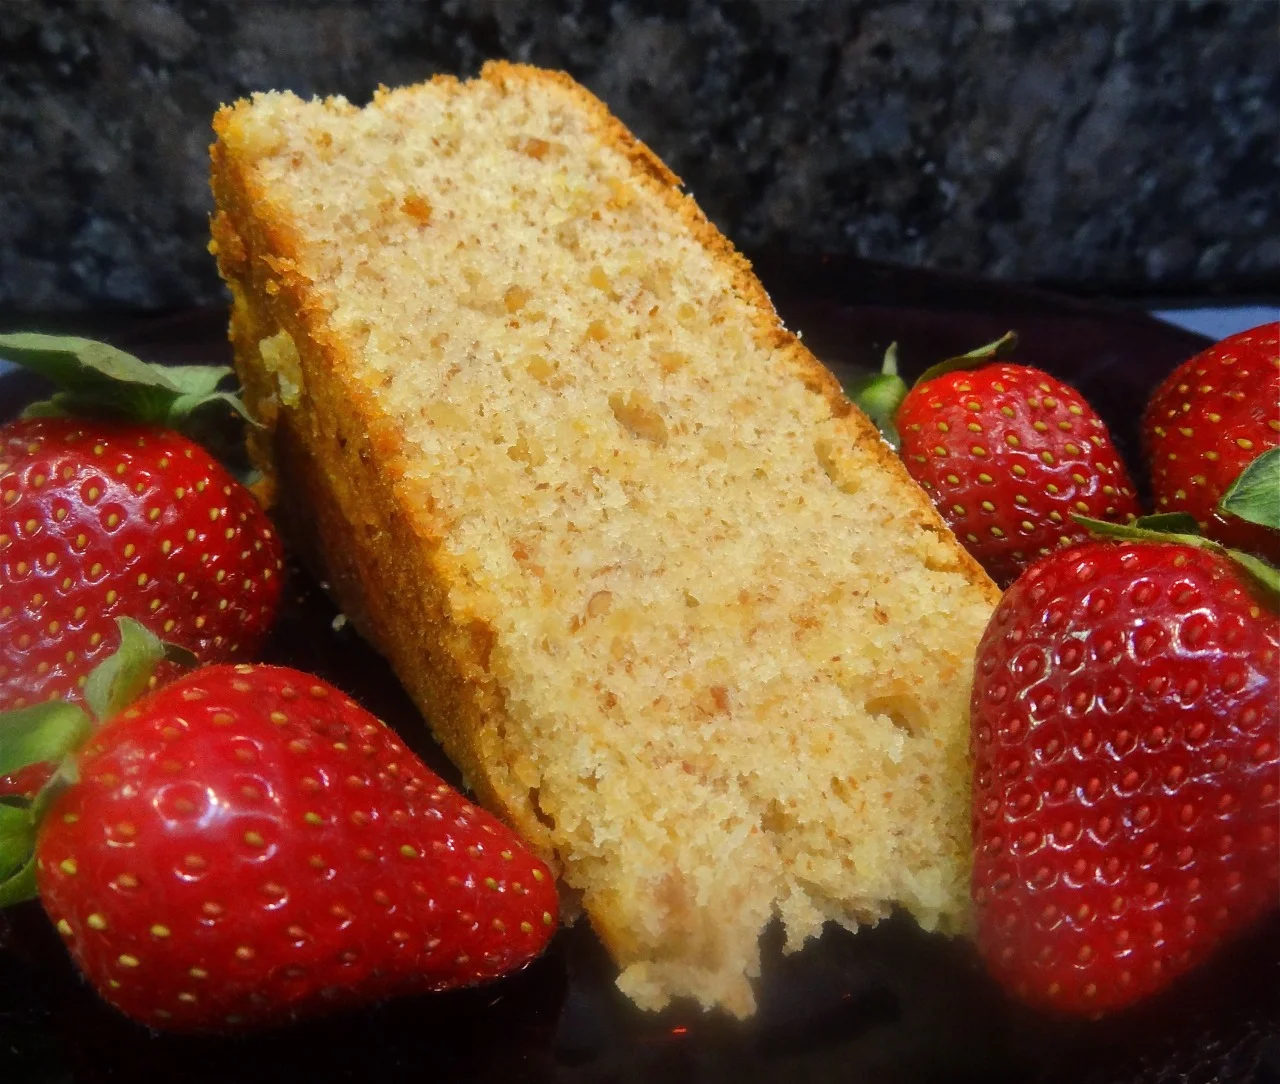
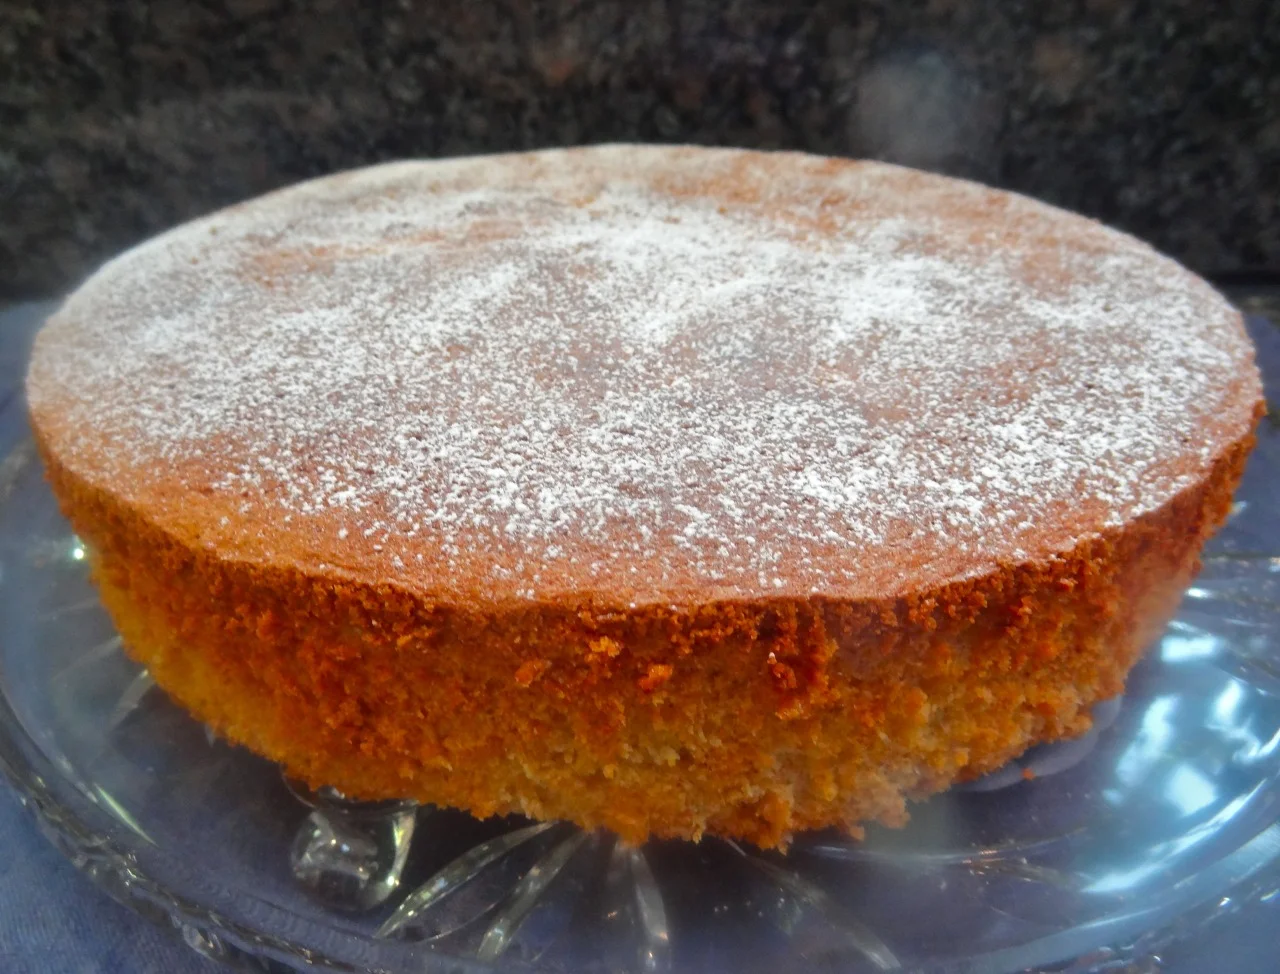
Best of all, it tastes good. I make it with vanilla and almond extracts and sometimes with orange extract and freshly grated orange peel. I’ve made it chocolate flavored too. 

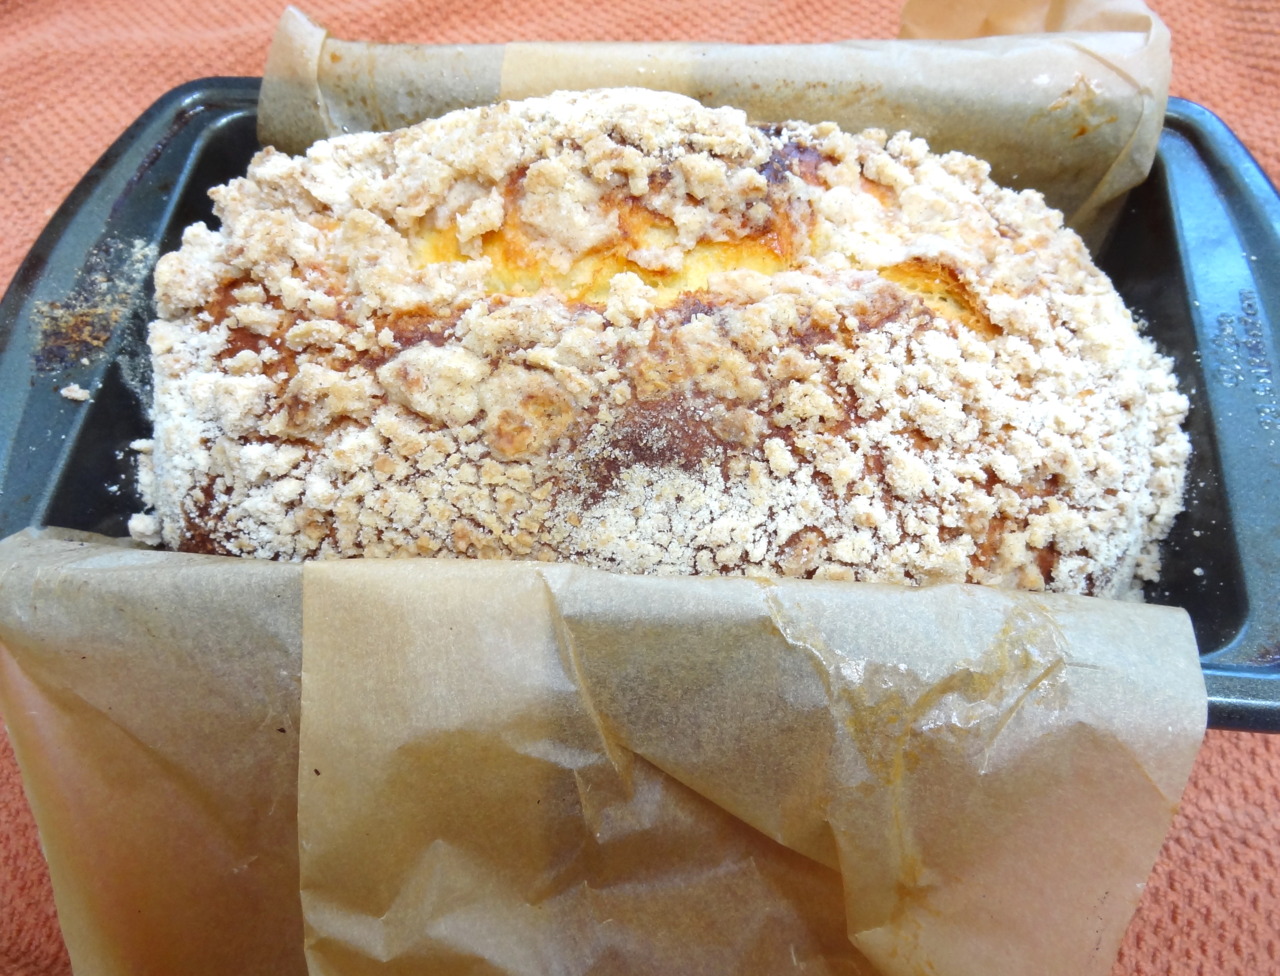
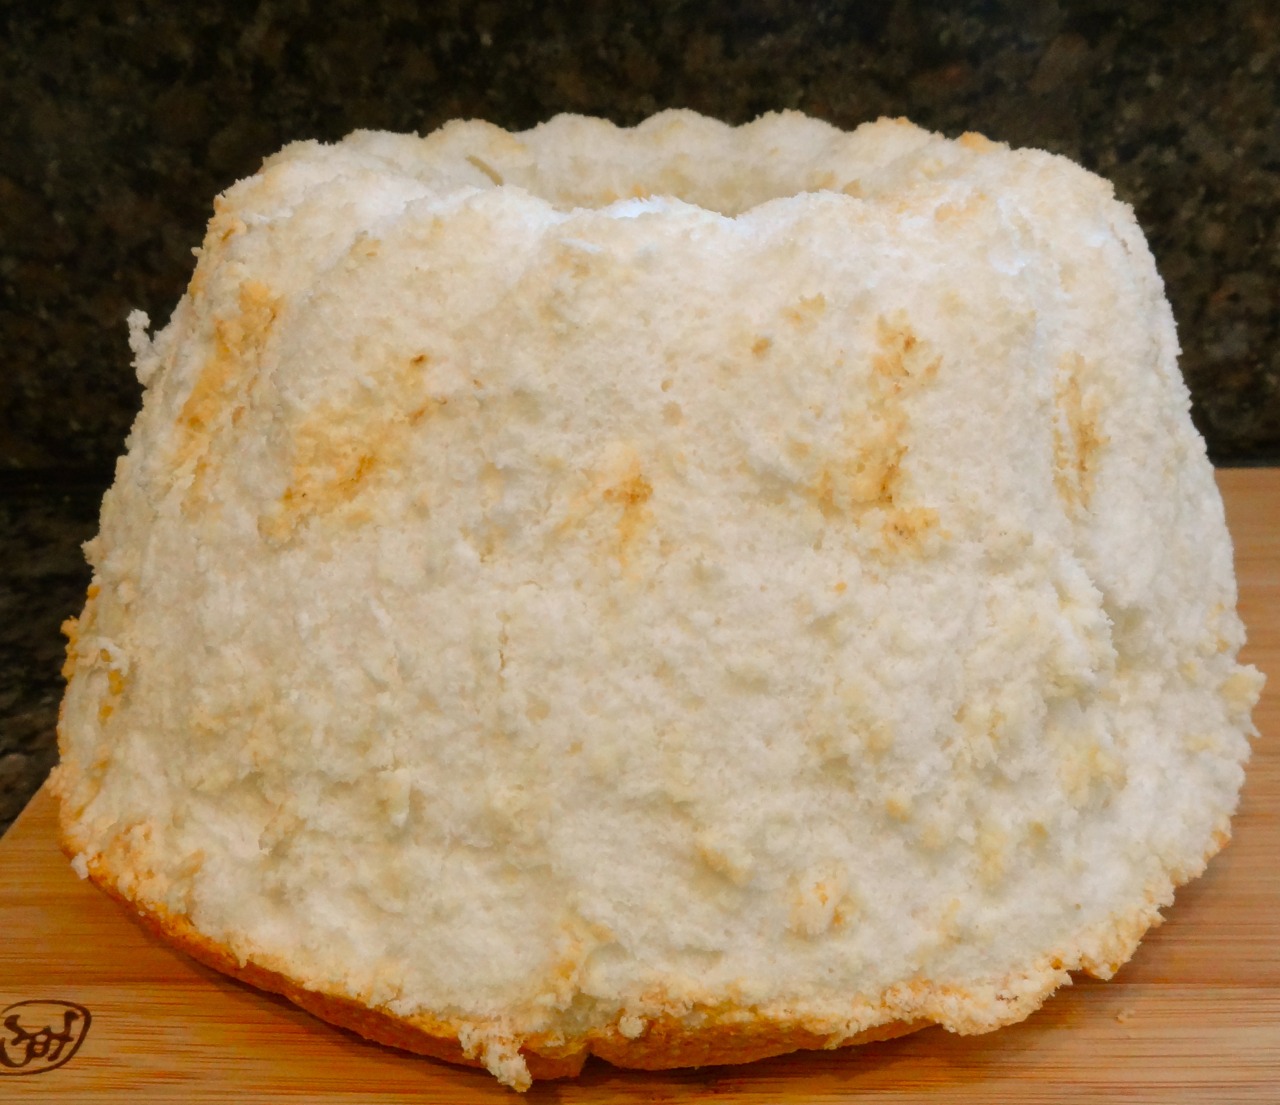
There are special pans for Angel Food Cake, but you don’t actually need one. I don’t have one — I make mine in a bundt pan. The reason for the special pan is that the cake must cool upside down (because you do not grease the pan and the cake would stick otherwise) and has “feet” for this purpose. I place the baked cake upside down on the neck of a glass (do NOT use plastic or it will melt) bottle. It works just fine as you can see in the photos.

Here is my recipe with variations. I think even my mother would like it.

Angel Food Cake

1 cup cake flour

1-1/2 cups sugar

1/2 teaspoon salt

1-1/2 cups egg whites at room temperature (about 10-12 eggs)

1-1/2 teaspoons cream of tartar

1 teaspoon vanilla extract

1/2 teaspoon almond extract

Preheat the oven to 350 degrees. Sift the cake flour, half the sugar and the salt together three times. Set aside. Whip the egg whites until they are foamy in an electric mixer set on medium-high. Gradually add the cream of tartar and whip until the mixture stands in soft peaks. Gradually add the remaining sugar and whip until the mixture stands in stiff, glossy peaks. Stir in the vanilla and almond extracts. Fold in the flour mixture in thirds, carefully incorporating the dry ingredients. Pour the batter into an ungreased 10” tube pan or angel cake pan. Bake for about 40 minutes or until the cake is puffy, golden brown and a cake tester, inserted into the center, comes out clean. Remove from the oven and place the cake upside down, either with the cake pan legs or by inverting the cake over a tall glass bottle. When the cake is cool, loosen the edges with the tip of a sharp knife, then invert and gently shake the pan over a cake plate. Makes one cake

Variations:

Chocolate: substitute 3/4 cup cake flour plus 1/4 cup unsweetened cocoa powder

Orange: add 1 teaspoon orange extract and 2 tablespoons grated fresh orange peel to the batter with the extracts

New York Cheesecake

This is my no-better-than-this-one cheesecake.

Honest.

I have tasted all sorts. Plain, chocolate, gloppy-cherry-topped, graham cracker crusted, pumpkin-infused, brandy-spiked, caramel swirled. Sara Lee’s, Lindy’s, Eli’s, Junior’s.

Not that I spend my life eating cheesecake. In fact, cheesecake is a rare item at our house because, let’s face it, there are enough calories in one slice for an entire meal.

Nope. Cheesecake is reserved for special occasions, like Shavuot (which begins at sundown May 14 this year). It’s tradition to eat dairy on this holiday, and cheesecake has always been the most popular holiday dessert.

As far as I’m concerned, because cheesecake is such a rarity in my life, it has to be worthy. Worthy of a celebration. Worth adding all those calories to my day.

This one is.

Honest.


New York Cheesecake


  • 1-1/2 teaspoons butter or margarine
  • 1/3 cup graham cracker crumbs (approximately)
  • 1-1/2 pounds cream cheese (3-8 ounce packages)
  • freshly grated peel of one small orange
  • 2 tablespoons freshly grated lemon peel
  • 1 teaspoon vanilla extract
  • 1/2 cup whipping cream
  • 1 cup sugar
  • 4 large eggs
  • 1/3 cup dairy sour cream or unflavored yogurt


Preheat the oven to 350 degrees. Spread the butter on the bottom and sides of a 9” springform pan. Sprinkle the inside of the pan with the graham cracker crumbs. Shake the pan to coat the bottom and sides of the pan completely. Beat the cream cheese, orange peel and lemon peel together in the bowl of an electric mixer set at medium speed for 1-2 minutes or until the cheese has softened and is smooth. Gradually add the vanilla, cream and sugar and beat for 2-3 minutes or until the mixture is smooth, scraping down the sides of the bowl occasionally with a rubber spatula. Add the eggs one at a time, beating them in after each addition. Stir in the sour cream. Pour the batter into the prepared pan. Prepare a bain-marie, that is, place the springform pan inside a larger pan. Fill the larger pan with enough hot water to come at least 1-inch up the sides of the baking dish. Bake for 70-75 minutes or until the top of the cake is lightly browned. Remove the springform pan from the larger pan and let the cake cool in the springform pan. When the cake has reached room temperature, refrigerate it for at least 4 hours or until it is thoroughly chilled. Remove the sides of the pan to serve the cake. Slices best using a knife that has been inserted into very hot water. Makes one

Chocolate Roll with Jam and Strawberries

So you think chocolate is delicious?

Okay, I grant you: chocolate is delicious.

But in my opinion, the most delicious thing in these photos isn’t the dessert, it’s the kid. My grandson, age 2-3/4.

Here he is putting the final touches on a chocolate roll cake. I prepared the batter. He licked the bowl.

These photos are proof of how easy it is to cook with children, even one who is 2-3/4. Remy was able to spread the strawberry jam on the baked cake. I sliced the strawberries. He placed them over the jam. 

He did a pretty good job don’t you think?

We rolled the cake together and plopped it onto a big serving dish.

Okay, the cake has some cracks in the surface. That sometimes happens to rolled cakes. So we covered it up somewhat: I held the strainer filled with confectioner’s sugar and he tapped it with a spoon, causing the white sprinkles to come down like snow and give a nice finish to our work.

No one cared that the cake didn’t look perfect. The time we had together was perfect.

Delicious.

You can do it with a kid in your life using my recipe. It would be a good Mother’s Day project. 


Chocolate Roll with Jam and Strawberries


6 ounces semisweet chocolate

3 tablespoons cold, strong coffee or orange juice

5 large eggs

1 cup sugar

1/2 teaspoon salt

1-1/2 teaspoons vanilla extract

1 cup strawberry jam

1 pint strawberries, sliced 

confectioners' sugar


Preheat the oven to 350 degrees. Butter a 15-1/2”x10-1/2” jelly roll pan. Line the pan with parchment paper, leaving several inches hanging over each of the short edges. Lightly grease the portion of the paper that fits inside the pan. Melt the chocolate and coffee together in the top part of a double boiler (or a bowl that fits into a saucepan) set over barely simmering water. Mix the ingredients well and remove the top part of the pan from the heat. Let cool. In the bowl of an electric mixer set at medium speed (or use a hand mixer), beat the egg yolks, sugar, salt and vanilla extract together for 3-4 minutes or until the mixture is thick and pale. Add the cooled chocolate mixture and blend it in thoroughly. In another bowl, beat the egg whites until they stand in stiff peaks. Mix about 1/4 of the beaten whites into the chocolate mixture. Fold the remaining whites into the chocolate mixture until the mixture has an even color. Spoon the batter into the prepared pan, smoothing it to make it even. Bake for 10 minutes. Remove the cake from the oven. Cover it with a slightly dampened kitchen towel. Let cool. Loosen the cake by pulling the overlapping ends of parchment paper. Invert the cake onto a clean sheet of parchment paper or kitchen towel (use the towel if you will be filling the roll later; keep the cake rolled inside the towel and set it aside, then unroll the cake to proceed).

Spread the jam evenly over the top of the cake. Top with the strawberries. Roll the cake starting on the long side. Place on a serving platter, seam side down. Dust (using a strainer) with confectioner’s sugar. Makes 8-10 servings


Lemon Almond Tea Cake

In the old days Passover desserts were the predictable two: macaroons or spongecake.

We’ve come a long way since then.

Not that I have anything against macaroons and spongecake. In fact, they rank right up there in the favorites category for me.

But now Passover desserts are so gourmet. And there’s lots to choose from and to cook or bake at home. I remember when flourless chocolate cake first appeared on the Passover scene. Now that seems old hat too. There’s so much more.

At any rate, I make a variety of different Passover desserts every year, some tried-and-true and always a couple of new ones. Some sweet with honey, some chocolatey. Some plain like this one for Lemon-Almond Cake. It’s a good choice after a heavy meal because it is light and fluffy and there’s no a sugar load of frosting or anything gooey.

This cake is wonderful as is. But of course, goes nicely with fresh fruit or sorbet or ice cream. Or with the Roasted Fruit Cocktail I wrote about yesterday. If you just can’t resist, there’s always a sauce you can pour on top, like zabaglione or caramel.

Lemon Almond Tea Cake

1-1/2 cups finely chopped almonds

1/2 cup potato starch

1 tablespoon kosher for Passover baking powder

2 tablespoons finely grated lemon peel

4 large eggs, separated

3/4 cup sugar

3/4 teaspoon of salt

1/2 cup vegetable oil

1/4 cup coconut oil, melted and cooled

6 tablespoons lemon juice

Passover Confectioner’s sugar 


Preheat the oven to 350 degrees.
 Lightly grease a 9-inch round cake pan and place a parchment paper circle on the bottom of the pan. Place the almonds in a bowl. Add the potato starch, baking powder and lemon peel and whisk ingredients thoroughly. Set aside. Place the egg yolks, sugar and salt in a food processor and process until thick and lighter in color. With the machine running, add the vegetable oil and melted, cooled coconut oil until all has been incorporated. Using the pulse feature, work in the ground almond mixture and lemon juice. Spoon the mixture into a large bowl. In another bowl (or bowl of an electric mixer), beat the egg whites until they are glossy and stand in stiff peaks. Mix about 1/3 of the beaten whites into the batter, to lighten it, then fold the remaining beaten whites into the batter. Pour into the prepared pan. Bake for 45-50 minutes or until a toothpick inserted into the center of the cake comes out clean. Place the pan on a cake rack. Let the cake cool in the pan. Remove from the pan. Dust with Passover confectioner’s sugar.

NOTE: you can make this without the baking powder; the cake will be more dense, but taste delicious


Classic Strawberry Shortcake

I know it was Julia Child’s 100th birthday this week and she was an important person in my life. Although it was my Mom who taught me the basics, Julia taught me to take giant leaps beyond. I didn’t cook every recipe in her first volume of Mastering…

I know it was Julia Child’s 100th birthday this week and she was an important person in my life. Although it was my Mom who taught me the basics, Julia taught me to take giant leaps beyond. I didn’t cook every recipe in her first volume of Mastering the Art of French Cooking, but I did make many of them. A boyfriend had given me that book — a treasured first edition — which is now gravy stained and coverless and signed by Julia herself on one of my favorite recipes (I met her when I took a cooking course along with several hundred other people like in some College 101 class).

So, Happy Birthday Julia.

But this week was also a friend’s birthday. A what you call “round number” birthday, so I invited her to my house, along with another friend, who recently celebrated that same round number birthday. We had a few hors d’oeuvre with a nice few glasses of wine, then grilled fish with Grilled Pineapple Salsa (and a few vegetables) for dinner.

SO healthy. We are all at that nice round number watch-what-you-eat age.

But dessert? Oh well. Why count calories when summer strawberries are out and you can eat Strawberry Shortcake?

Which is what I made instead of baking or buying a birthday cake.

Not a morsel was left on our plates.


Classic Strawberry Shortcake

2 pounds fresh strawberries
3 tablespoons plus 1 teaspoon sugar
orange, mango or papaya juice
2 cups all-purpose flour
3/4 teaspoon salt
2-1/2 teaspoons baking powder
1-1/2 teaspoons finely grated fresh lemon peel
6 tablespoons unsalted butter, cut into small pieces
1 large egg
1/2 cup milk
1 cup whipping cream

Preheat the oven to 450°F. Wash the berries and slice them into a bowl, sprinkle them with 2 tablespoons sugar and a few tablespoons of juice and set aside. In another bowl, mix the flour, 1 tablespoon sugar, salt, baking powder and lemon peel. Add the butter and work into the dry ingredients until the mixture resembles coarse meal. In a small bowl, beat the egg and milk together until well combined. Add the liquids to the flour mixture and mix until a soft dough forms. Roll or press the dough to 1/2-inch thick circle on a lightly floured surface. Cut out 8 circles with a cookie cutter. Place the circles on an ungreased cookie sheet. Bake for 12–15 minutes or until puffed and lightly brown. Remove from the oven and let cool. Whip the cream with the remaining teaspoon sugar until the mixture stands in soft peaks. Cut the biscuits in half and place each bottom half on a serving dish. Place the berries and any accumulated juices on top. Pour some of the cream on top. Top with the remaining biscuit halves. Makes 8 servings.

Chocolate-Raisin-Nut Babka

Doesn’t this Babka look as if it came from a bakery?

It didn’t, of course. You can see from the second photo that it was taken straight from the loaf pan. That paper hanging over on the sides is needed to lift the cake out of the pan, because if you invert the cake (as you do with layer cake layers), all the crumbles fall off. Which, now that I think of it is not so bad because then you can gather them up and eat them in the name of cleaning up, without having to share that delicious delicious part with anyone else.

I’ve made Babka before, but never this good and never one that looked as professional. My Mom, who was a terrific baker, never baked Babka. She always said the one from the bakery near us was so good that she needn’t bother. So of all the wonderful baked goods I learned from her, this wasn’t one.

Our nearby bakeries don’t have great-tasting Babka. But we love this coffee cake so much I have been intent on getting it right, homemade.

After a few tries I did.

It got two thumbs up from everyone, so I’d like to share the recipe:

Chocolate-Raisin-Nut Babka

  • 1 package active dry yeast
  • 1/2 cup sugar
  • 3/4 cup warm whole milk
  • 2 large eggs
  • 2 large egg yolks
  • 1 teaspoon vanilla extract
  • 3-4 cups all-purpose flour
  • 1 teaspoon salt
  • 8 tablespoons unsalted butter at room temperature
  • 4 tablespoons melted unsalted butter
  • 1/2 pound chopped semisweet chocolate
  • 1/2 cup raisins
  • 1/2 cup chopped nuts, optional
  • 1 large egg beaten with 2 teaspoons water
  • Streusel

Combine the yeast and 1/2 teaspoon of the sugar in a small bowl, pour in the warm milk and mix. Set aside for 5-6 minutes or until foamy. Beat the eggs, egg yolks, sugar and vanilla extract in the bowl of an electric mixer set at medium for 2-3 minutes or until well combined and smooth. Add 2 cups of flour and the salt and beat them in. Add the yeast mixture and beat it in until the batter is smooth. Gradually add as much of the remaining flour as is necessary to form a soft dough (about 1-3/4 cups). Add the butter one tablespoon at a time, beating each tablespoon in completely. Use a dough hook or knead by hand for a few minutes until the dough is soft and smooth and slightly sticky. Cover the bowl and let the dough rise in a warm place for about 2 hours or until doubled in bulk. 

Lightly grease 2 9”x5” loaf pans. Line the pans with parchment paper, leaving enough extra at the short side so that you can lift out the cake when it has finished baking. Cut the dough in half and roll each half out on a floured surface to rectangles 13”x9”. Brush each rectangle with equal amounts of the melted butter. Scatter the chocolate, raisins and nuts, if used, on top, leaving some room around the edges. Roll the dough, jelly roll style. Twist the filled dough 3-4 times and place in the loaf pans. Brush the tops with some of the beaten egg. Sprinkle with Streusel. Let rise for 1-1/2 hours in a warm place (or overnight in the refrigerator).

Preheat the oven to 350 degrees. Bake the Babkas for about 35 minutes or until golden brown. Let cool in the pan. Lift the cake out using the parchment paper ends.

 Streusel

  •  3/4 cup all-purpose flour
  • 1/3 cup sugar
  • 1/2 teaspoon cinnamon
  • 1/4 teaspoon salt
  • 6 tablespoons unsalted butter

Combine the flour, sugar, cinnamon and salt in a bowl. Add the butter in chunks and work into the dry ingredients with fingers or a pastry blender until the mixture is crumbly.

Makes two Babkas

Chocolate Yogurt Pound Cake

"This is just like room service!"

That, from my almost 6-year old grand daughter Lila (who apparently already knows about room service!?!) after I let her have her dinner in the family room and watch TV.

This is something I didn’t allow my own two daughters.

But honestly, after 35 years I was a little out of practice. And, like bike riding, you may not forget how, but you also may not race through the streets or peddle yourself up a steep hill quite as often or as easily either. 

So, when the kids came for a visit, sans parents, from Friday through Sunday, there were occasional, let’s say, concessions. If my daughter Gillian, their Mom, is reading this now, I say, don’t worry. These kids are terrific and 2 meals in front of the TV won’t harm them.

As you can see from the photos we did lots of stuff like draw, have a pedicure, blow bubbles outside, ride bikes, have a fashion show. We also frosted a birthday cake for their cousin Nina’s birthday party on Saturday (although the top decoration, an Ariel rice-paper scene, was store-bought).

The little one, Remy, age 21 months talks a blue streak although sometimes it’s difficult to understand his pronunciations. However, one of the new words he learned this weekend was “chocolate cake,” which he mentioned to his parents as soon as they walked in the door Sunday night.

"Tzockickcake!" he told them, with his tongue literally licking his lips.

When a kid is this young you can’t depend on “what happens at Grandma’s stays at grandma’s.”

I had baked the chocolate cake for a Hadassah Tea and was cutting it into slices. There were a few not-so-lovely pieces that I didn’t include on the platter I sent over for that event. Remy had a small sliver of the leftovers. He liked it, that’s for sure.

Can’t say I blame him. Smart kid!

Here’s the recipe:

Chocolate Yogurt Pound Cake

  • 2-1/2 cups all-purpose flour
  • 1 cup unsweetened cocoa powder
  • 1 teaspoon baking soda
  • 3/4 teaspoon salt
  • 12 ounces butter at room temperature
  • 3 cups sugar
  • 5 large eggs
  • 2 teaspoons vanilla extract
  • 1 cup plain yogurt
  • 1 cup boiling water
  • 1 cup chocolate chips

Preheat the oven to 350 degrees. Butter and flour a 10-cup bundt pan. Sift the flour, cocoa powder, baking soda and salt into a bowl and set aside. Beat the butter and sugar in the bowl of an electric mixer and mix at medium speed for 3-4 minutes or until well combined. Add the eggs, one at a time, blending each one in. Stir in the vanilla extract. Add the dry ingredients in thirds, alternating with the yogurt, until the flour mixture and yogurt have been used and the batter is well blended and smooth. Gradually add the boiling water, beating slowly, for 2-3 minutes or until the batter is smooth and well blended. Stir in the chocolate chips. Pour the batter into the prepared pan. Bake for 65-70 minutes or until a cake tester inserted into the center comes out clean. Let the cake cool in the pan for 10 minutes, then invert onto a cake rack to cool completely. Makes 12+ servings

Pear Torte

Creative People aren’t usually creative just about one thing. They think in unusual and varied ways about a lot.
Like my niece Rachel, who writes children’s books (such as Sometimes I’m Bombaloo and Justin Case) and young adult fic…

Creative People aren’t usually creative just about one thing. They think in unusual and varied ways about a lot.

Like my niece Rachel, who writes children’s books (such as Sometimes I’m Bombaloo and Justin Case) and young adult fiction (such as Lucky and Brilliant).

She decided she wanted to bake the Plum Torte recipe I posted a few months back. But plums aren’t in season now. So she made the cake with pears, and added a little vanilla to the batter, because pears and vanilla, well, it’s a perfect duo.

So here’s her recipe. We had this as one of the MANY desserts on Saturday night at her mother and father’s (my brother) annual Hanukkah party. It was DE-LISH!

Pear Torte

1/2 cup unsalted butter

3/4 cup plus one tablespoon sugar

1 cup all-purpose flour

1 teaspoon baking powder

1 teaspoon finely grated lemon peel

1/4 teaspoon salt

2 large eggs

1 teaspoon vanilla extract

2 ripe pears, unpeeled, cored, sliced

lemon juice (about one tablespoon)

cinnamon (about 1/4 teaspoon)

Preheat the oven to 350 degrees. Lightly grease a 9-inch springform pan. In the bowl of an electric mixer, cream the butter and 3/4 cup sugar on medium speed for 3-4 minutes or until creamy and well blended. Add the flour, baking powder, lemon peel and salt and mix briefly to blend ingredients slightly. Add the eggs and vanilla extract beat at medium speed for 2-3 minutes or until smooth and creamy. Spoon the batter into the prepared springform pan. Arrange the pear slices on top, pressing them slightly into the batter. Sprinkle the cake with the remaining tablespoon sugar. Squeeze some lemon juice over the cake and sprinkle with cinnamon. Bake for 55-60 minutes or until browned, set and crispy. Let cool. Makes 8 servings

Petit-Fours

Petit-fours are the new “big thing?” 

That’s sort of what I read here.

Okay, I get why chocolate chip cookies, doughnuts and cupcakes became so trendy. But petit-fours?

The last time I had a petit-four was during the 1960s when I was the activities chairman for my sorority house and ordered petit-fours for when the alums were coming to see if the house and all of us undergrads were doing things properly.

To tell the truth, now that I am recalling this for the first time in over 40 years, those petit-fours were fabulous. They looked gorgeous and tasted oh so wonderful. I could pop a few into my mouth even now and although I wouldn’t relish a flood of memories of sorority life, I could spend some lovely thoughts on the memory of those tiny little cakes.

In case you aren’t familiar with them, petit-fours are mini cakes. Little rectangles (maybe 2-inches by 1-inch) or ovals, rounds, etc. of scrumptious layer cake, frosted in fondant and usually decorated with piped icing bells and ribbony effects and little dots and so on. 

I am never going to make petit-fours. They are too labor intensive and it’s just too much trouble (but if you’re interested, you can find dozens of recipes online, including a decent sounding one from Land O’ Lakes (see below). Petit-fours are beautiful desserts for bridal showers and afternoon tea.)

The article raves about the petit-fours at Duane Park Patisserie in NYC’s Soho, so if you live anywhere near there you can try them for yourself. 

I think I’ll check it out and maybe find some other store bought ones and see if they are as good as I remember.

Land O'Lakes
Petits Fours

These dainty icing-coated miniature cakes add a special touch to showers, open houses or teas. Try this easy Petits Fours recipe.

2:00prep time3:50total time

4 dozen petit fours

Cake

3 cupsall-purpose flour

1 tablespoonbaking powder

1/2 teaspoonsalt

1 1/2 cupssugar

1/2 cupLand O Lakes® Butter, softened

6Land O Lakes® All-Natural Egg whites

1/2 teaspoonalmond extract1 cupmilk

Icing

3 cupssugar

1/4 teaspooncream of tartar

1 1/2 cupswater

1 cuppowdered sugar, sifted

1 teaspoonalmond extract or vanilla3 dropsfood color, if desired

Garnish

Candy flowers, if desiredFrosting flowers, if desired

Heat oven to 350°F. Grease and flour 13x9-inch baking pan; set aside.

Combine flour, baking powder and salt in large bowl. Set aside.

Beat sugar and butter in large bowl at medium speed, scraping bowl occasionally, until creamy. Add 1 egg white at a time, beating well after each addition. Add vanilla. Reduce speed to low. Add flour mixture alternately with milk, beating well after each addition just until mixed.

Pour batter into prepared pan. Bake for 30 to 35 minutes or until toothpick inserted near center comes out clean. Cool on wire racks 10 minutes. Loosen edge of cake by running knife around inside edge. Carefully remove cake from pan; cool completely.

Trim edges from cake; cut each cake into 24 (1 1/2-inch square) pieces. 

Combine sugar, cream of tartar and water in 3-quart saucepan. Cook over medium heat, stirring occasionally, until mixture comes to a full boil (12 to 14 minutes). Cover; boil 3 minutes. Uncover; continue cooking until candy thermometer reaches (228°F. to 234°F.) or small amount of mixture dropped into ice water forms a 2-inch soft thread (15 to 20 minutes). Remove from heat; cool to 110°F. or until bottom of pan is slightly warm to touch (do not stir) ( 1 hour). Stir in powdered sugar, 1 teaspoon almond extract and food color, if desired.

Place wire cooling rack over waxed paper. Place 1 cake piece on fork; drizzle icing over top and sides of cake, making sure each side is covered. Place onto wire rack; let stand until icing is set. (If icing becomes too thick, reheat over low heat until thin consistency and easy to drizzle (2 to 3 minutes)). Garnish each petit four with candy flowers or frosting flowers, if desired.

One Bowl Chocolate Cake with Fudge Frosting

image.jpg

Today is National Chocolate Cake Day. And also a snow day for a lot of us (we got at least another 14-inch dump of snow over the night and into the morning). I have to say, I resent a nighttime snow fall because I like watching the flakes come down. It’s so soft and quiet and makes me feel cozy and safe inside. When I woke up this morning it was all over, but for the plowing.

But I digress. It is National Chocolate Cake Day. A good day all around to make a dark, luscious, tender cake to enjoy while also maybe taking a snow day. It’s a good dessert for Valentine’s Day too. Or anytime really.

Here’s a cake I’ve been making ever since I was 12 years old, when I baked this for my own Bat Mitzvah celebration. I’ve tried dozens of different chocolate cake recipes over the years and haven’t found one I like better. And it’s easy to make too.

So, until I find a better cake, here’s my recipe for:

One Bowl Chocolate Cake with Fudge Frosting

  • 2 cups cake flour

  • 1-1/2 cups sugar

  • 2/3 cup unsweetened cocoa

  • 1-1/2 teaspoons baking soda

  • 1 teaspoon salt

  • 1-1/2 cups buttermilk

  • 1/2 cup vegetable shortening

  • 2 large eggs

  • 1-1/2 teaspoons vanilla extract

Preheat the oven to 350 degrees. Lightly grease 2 9-inch cake pans. Sift the flour, sugar, cocoa, baking soda and salt together into the bowl of an electric mixer (or large bowl for use with a hand mixer). Add the buttermilk and shortening and beat the ingredients at medium speed for about 2 minutes, scraping down the sides of the bowl occasionally. Add the eggs and vanilla extract and beat the ingredients for another 2 minutes, scraping down the sides of the bowl occasionally. Pour the batter into the prepared pans. Bake for 30-35 minutes or until a cake tester inserted into the center comes out clean. Let the cake layers cool in the pans for 10 minutes, then invert onto a cake rack to cool completely. Frost the layer and outside of the cake with the fudge frosting. Refrigerate leftovers.

Makes one 9-inch cake

Fudge Frosting

  • 12 ounces semisweet chocolate

  • 1 cup dairy sour cream

  • pinch of salt

  • 1 teaspoon vanilla extract

Melt the chocolate in the top part of a double boiler set over barely simmering water. When the chocolate has melted, remove the top pan from the bottom part of the double boiler. Add the sour cream, salt and vanilla extract to the chocolate and beat the ingredients vigorously with a whisk to blend them completely into a smooth frosting. Let cool for a few minutes, until it has a spreading consistency. Use between layers and for outside of the cake.